Building a GraphQL Server in Nestjs
Nest.js is a progressive Node.js Web Framework that provides you with a robust backend for your frontend applications. It is highly comparable to Angular in terms of concepts like Module, Provider, etc. and is a clear choice by Angular developers.
If you are interested, read more about Nest.js at:
In this section, I will create a full-stack application, using the Angular CLI, with the support of the Nest.js ng-universal library.
Basic Prerequisites
- Node.js v10.16.2
- Docker v19.03
- Code editor (Visual Studio Code, Sublime, etc.)
For this article, I've chosen to use the mysql database engine or "mysql". I will run an instance of mysql using a mysql Docker container, which I believe, is the cleanest, and easiest way to add a PostgreSQL database instance to your application.
Start by creating a new docker-compose.yml at the root of the Angular app and paste the following content inside it:
#  Run `docker-compose build` to build the images
#  Run `docker-compose up` to run the containers

version: '3.5'
services:
  db:
    image: mysql:5.7
    ports:
      - 3306:3306
    environment:
      MYSQL_ROOT_PASSWORD: root
      MYSQL_DATABASE: test
      MYSQL_USER: root
      MYSQL_PASSWORD: root
    volumes:
      - mysql_data:/var/lib/mysql
    networks:
      - core_service_network
  apis:
    command: npm run debug
    build: ./trainer-io-apis
    ports:
      - 3000:3000
      - 5858:5858
    volumes:
      - ./trainer-io-apis/docker/node/node-docker-entrypoint.sh:/usr/local/bin/docker-entrypoint.sh
      - ./trainer-io-apis:/app
    env_file:
      ./trainer-io-apis/.env
    depends_on:
      - db
    networks:
      - core_service_network
networks:
  core_service_network:
    driver: bridge
    name: core_service_network

volumes:
  mysql_data:
    name: global_mysql
  apis_modules:
    name: apis_modules
My docker file for apis in nestjs
FROM node:carbon
WORKDIR /app
We can configure entrypoint for image bootstrap while initilize
- trainer-io-apis/docker/node/node-docker-entrypoint.sh
#!/bin/sh
set -e

npm install
npm run build

if [ "${1#-}" != "${1}" ] || [ -z "$(command -v "${1}")" ]; then
  set -- node "$@"
fi

exec "$@"
This docker-compose file instructs Docker to create a new mysql & node js Docker container with the following settings:
- The container name is trainer-io-apis
- The Docker image mysql
- Create a new volume by mapping the physical folder named mysql_data to an internal folder inside the image. I will place an initialization script inside this folder so that Docker can run the first time it creates the mysql container.
- Finally, you expose the mysql instance to the host machine by mapping its internal port to a port used on the host machine 3306 is our port and also we are exposing node js container port which is 3000
As we are passing environments variables for mysql containers, it will create test database with defined user root so we don't need to manually create database and users
Add the following script under the script node inside the package.json file:
Finally, run the following command to start the container:
- docker-compose up &
- docker logs portals_apis_1 --tail 50 -f
This command will create the node js and mysql container in a detached mode. Now that the mysql database is up and running, let's move on and continue adding more features.
GraphQL Basics
GraphQL is a query language and runtime that can be used to build and expose APIs as a strongly typed schema instead of a messy REST endpoint. Users see that schema and can query for what fields they want in particular.
Here is a list of the key concepts you need to know about:
-
Schema — Core of GraphQL server implementation. Describes the functionality available to the client applications
-
Query — Request to read or fetch values
-
Mutation — Query that modifies data in the datastore
-
Type — Defines the structure of the data which is used in GraphQL
-
Resolver — Collection of functions that generate a response for a GraphQL query
NestJS provides us with two different ways of building GraphQL applications, the schema first and the code first respectively.
-
Schema first — In the schema first approach the source of truth is a GraphQL SDL (Schema Definition Language) and the TypeScript definitions of your GraphQL schema will be auto-generated by NestJS
-
Code first — In the code first approach you will only use declarators in your TypeScript classes to generate the corresponding GraphQL schema
In this post, I chose the code first approach because I personally find that it would make it easier to understand and follow this tutorial for people with little to none GraphQL experience.
If you want to know more about GraphQL and its concepts I would highly recommend looking at these resources:
-
Official documentation
-
How to GraphQL — Great beginners learning resources
Installing NestJS and Its Dependencies
Now that we know what we are going to build and why we are using each specific tool and technology, let’s get started by creating the project and installing the needed dependencies.
First, let’s install the Nest CLI and use it to create the project
npm i -g @nestjs/cli
nest new nest-graphql
After that, let’s move into the directory and install the needed dependencies
cd nest-graphql
npm i --save @nestjs/graphql apollo-server-express graphql-tools graphql @nestjs/mongoose mongoose type-graphql
Let's understand our requirment
1. Requirement
-
NestJs
-
GraphQL
-
MongoDB
2. Table of contents
-
Initialize NestJs project
-
Create folder User
-
Demo query “Hello world” with GraphQL
-
TypeORM connect MongoDB
-
CRUD with object User
3. Practice
A progressive Node.js framework for building efficient, reliable and scalable server-side applications. NestJS — A progressive Node.js web framework *NestJS is a framework for building efficient, scalable Node.js web applications. It uses modern JavaScript, is built…*nestjs.com
Setup
// Setting up a new project is quite simple with the [Nest CLI](https://docs.nestjs.com/cli/overview)

$ npm i -g @nestjs/cli
// or
$ yarn add global @nestjs/cli

// Create new nest project
$ nest new project-name
Run It!
// Development
$ npm run start
// or
$ yarn start

// Watch mode
$ npm run start:dev
// or
$ yarn start:dev
Logger
import { NestFactory } from '@nestjs/core';
import { AppModule } from './app.module';
import { Logger } from '@nestjs/common';

const port = process.env.PORT || 3000;

async function bootstrap() {
  const app = await NestFactory.create(AppModule);
  await app.listen(port);
  Logger.log(`🚀 Server running on http://localhost:${port}`, 'Bootstrap');
}
bootstrap();
GraphQL
Next, we will integrate GraphQL with nest via here
First of all, we must config tsconfig.json
{
  "compilerOptions": {
    "module": "commonjs",
    "declaration": true,
    "removeComments": true,
    "emitDecoratorMetadata": true,
    "experimentalDecorators": true,
    "target": "es6",
    "sourceMap": true,
    "outDir": "./dist",
    "baseUrl": "./",
    "incremental": true,
    "esModuleInterop": true,
    "moduleResolution": "node"
  },
  "exclude": ["node_modules"]
}
Second, we need to install the required packages:
$ npm i --save @nestjs/graphql apollo-server-express graphql-tools graphql

$ yarn add @nestjs/graphql apollo-server-express graphql-tools graphql
Nest offers two ways of building GraphQL applications, the schema first and the code first respectively.
In this example, I will use schema first
import { Module } from '@nestjs/common';
import { AppController } from './app.controller';
import { AppService } from './app.service';
import { GraphQLModule } from '@nestjs/graphql';
import { join } from 'path';

@Module({
  imports: [
    GraphQLModule.forRoot({
      typePaths: ['.//*.graphql'],
      playground: true
    }),
  ],
  controllers: [AppController],
  providers: [AppService],
})
export class AppModule {}
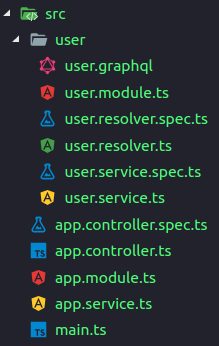
I use Nest CLI via here to generate code.
$ nest g mo user
$ nest g r user
$ nest g s user
Next, I touch user.graphql in user
$ touch src/user/user.graphqlFinally that we have a new folder structure like that.
 Folder structure
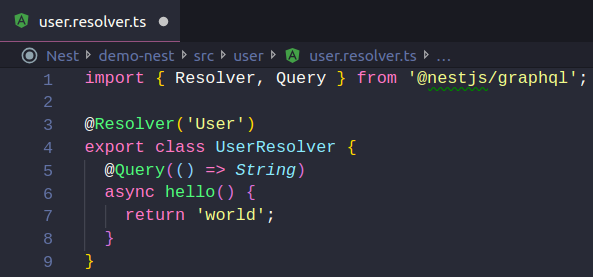
Demo query “Hello world”
We declare query hello below

TypeORM connect MongoDB
Base on nest via here, we have to install all required dependencies:
$ npm i --save @nestjs/typeorm typeorm [@types/mongodb](http://twitter.com/types/mongodb) mongodb
// OR
$ yarn add @nestjs/typeorm typeorm [@types/mongodb](http://twitter.com/types/mongodb) mongodb
import { Module } from '@nestjs/common';
import { AppController } from './app.controller';
import { AppService } from './app.service';
import { GraphQLModule } from '@nestjs/graphql';
import { UserModule } from './user/user.module';
import { TypeOrmModule } from '@nestjs/typeorm';
import { join } from 'path';
@Module({
imports: [
GraphQLModule.forRoot({
typePaths: ['.//*.graphql'],
playground: true,
}),
TypeOrmModule.forRoot({
type: 'mongodb',
url:
'mongodb+srv://<admin>:<password>@chnirt-graphql-apollo-vg0hq.mongodb.net/nest?retryWrites=true&w=majority',
entities: [join(__dirname, '/.entity{.ts,.js}')],
synchronize: true,
useNewUrlParser: true,
logging: true,
}),
UserModule,
],
controllers: [AppController],
providers: [AppService],
})
export class AppModule {}CRUD with object User
Read more TypeORM entity via here
Back to a user folder, we touch 2 files user.input.ts & user.entity.ts
$ touch src/user/user.entity.ts
$ touch src/user/user.input.ts
import { Entity, Column, ObjectIdColumn } from 'typeorm';
@Entity()
export class User {
@ObjectIdColumn()
_id: string;
@Column()
username: string;
@Column()
password: string;
}
export class UserInput {
username: string;
password: string;
}Create User, UserInput, users, createUser in user.graphql
type User {
  _id: String!
  username: String!
  password: String!
}

input UserInput {
  username: String!
  password: String!
}

type Query {
  hello: String!
  users: [User!]
}

type Mutation {
  createUser(input: UserInput!): User
}
Then we provide user entity for user.module.ts
import { Module } from '@nestjs/common';
import { UserResolver } from './user.resolver';
import { UserService } from './user.service';
import { TypeOrmModule } from '@nestjs/typeorm';
import { User } from './user.entity';

@Module({
  imports: [TypeOrmModule.forFeature([User])],
  providers: [UserResolver, UserService],
})
export class UserModule {}
At user.resolver.ts, we will inject user.service.ts and declare query, mutation
import { Resolver, Query, Mutation, Args } from '@nestjs/graphql';
import { UserService } from './user.service';
import { User } from './user.entity';
import { UserInput } from './user.input';

@Resolver('User')
export class UserResolver {
  constructor(private readonly userService: UserService) {}

  @Query(() => String)
  async hello() {
    return await 'world';
  }

  @Query(() => [User])
  async users() {
    return this.userService.findAll();
  }

  @Mutation(() => User)
  async createUser(@Args('input') input: UserInput) {
    return await this.userService.create(input);
  }
}
Similar, we will inject the user entity in user.service.ts
we will use uuid v4 for user._id
$ npm i uuidimport { Injectable } from '@nestjs/common';
import { UserInput } from './user.input';
import { InjectRepository } from '@nestjs/typeorm';
import { User } from './user.entity';
import { MongoRepository } from 'typeorm';
import * as uuid from 'uuid';
@Injectable()
export class UserService {
constructor(
@InjectRepository(User)
private readonly userRepository: MongoRepository<User>,
) {}
async findAll(): Promise<User[]> {
return this.userRepository.find();
}
async create(input: UserInput): Promise<User> {
const user = new User();
user._id = uuid.v4();
user.username = input.username;
user.password = input.password;
return this.userRepository.save(user);
}
}You can explore more on graphql with nestjs https://docs.nestjs.com/graphql/quick-start
GraphQL playground
The playground is a graphical, interactive, in-browser GraphQL IDE, available by default on the same URL as the GraphQL server itself. To access the playground, you need a basic GraphQL server configured and running. To see it now, you can install and build the working example here. Alternatively, if you're following along with these code samples, once you've complete the steps in the Resolvers chapter, you can access the playground.
With that in place, and with your application running in the background, you can then open your web browser and navigate to http://localhost:3000/graphql (host and port may vary depending on your configuration). You will then see the GraphQL playground, as shown below.
Comments