
What Exactly is Docker?
Alright, we get it, “cloud” is the future and we need to use containers with all the fancy tools it offers. We are going to containerize our app, use container orchestration tools for deployments, and we have to install Docker.
What is a container?
Remember the good old times where you used to SSH into the production server, go to the project directory, and run git pull to deploy your code? Before you deploy anything, in the very beginning of the life of your server, you’d install all the global dependencies for your app, curl most probably, then git, maybe the interpreter for the language you want to use, and some extensions for that as well, maybe nginx at some point. Once all the dependencies are installed, you’d bring your application to the server, run some commands to install and eventually start the application.
At this point, once you pulled your code to the server, you’d start the new version of your application, or you’d restart Nginx for some changes to take effect, or whatever. This setup probably worked for a long time, until it didn’t. One of the developers in your team relied on a system dependency that has a different version installed in the production server, and now your service is down. You quickly rollback your changes, but you will need to update that dependency at some point. A worse example may be the bugs caused by these kinds of dependency differences in a weird place of your app, which means you probably wouldn’t notice until it is too late, in other words, already shipped.
Consider another example, where you’d like to run multiple applications on the same host, but you need them to be isolated for security reasons. You either need to move the applications into separate hosts, which is not cost-efficient, or you’d run two different virtual machines in the host, which would give you the isolation but the resources will be consumed by the VMs mostly rather than your application, which is still not the best way.
These problems have existed for decades now; keeping the processes separate is a huge pain, and this caused a lot of security problems as well as inefficient setups in the past.
Linux containers to the rescue
In this context, a container is a set of isolated processes and resources. Linux achieves this by using namespaces, which allows processes to access only namespace resources, which allows having a process tree that is completely independent of the rest of the systems. The actual way containers work is a complex topic that I will not get into here, but overall the concept is simple: give me an operating system (OS) level virtualization so that I can play around with different stuff in isolation.
Enter Docker
Docker is one of the tools that used the idea of the isolated resources to create a set of tools that allows applications to be packaged with all the dependencies installed and ran wherever wanted. Docker defines the containers as follows: A container is a standard unit of software that packages up code and all its dependencies so the application runs quickly and reliably from one computing environment to another.
I can hear the thoughts like “this is the same thing as virtual machines”, but there are some differences:
-
Docker containers share the same system resources, they don’t have separate, dedicated hardware-level resources for them to behave like completely independent machines.
-
They don’t need to* *have a full-blown OS inside.
-
They allow running multiple workloads on the same OS, which allows efficient use of resources.
-
Since they mostly include application-level dependencies, they are pretty lightweight and efficient. A machine where you can run 2 VMs, you can run tens of Docker containers without any trouble, which means fewer resources = less cost = less maintenance = happy people.
Regarding the differences between the Docker containers and VMs, here is a nice answer on StackOverflow:
So, let’s say you have a 1 GB container image; if you wanted to use a full VM, you would need to have 1 GB times x number of VMs you want. With Docker and AuFS you can share the bulk of the 1 GB between all the containers and if you have 1000 containers you still might only have a little over 1 GB of space for the containers OS (assuming they are all running the same OS image).*
A full virtualized system gets its own set of resources allocated to it, and does minimal sharing. You get more isolation, but it is much heavier (requires more resources). With Docker you get less isolation, but the containers are lightweight (require fewer resources). So you could easily run thousands of containers on a host, and it won’t even blink.*
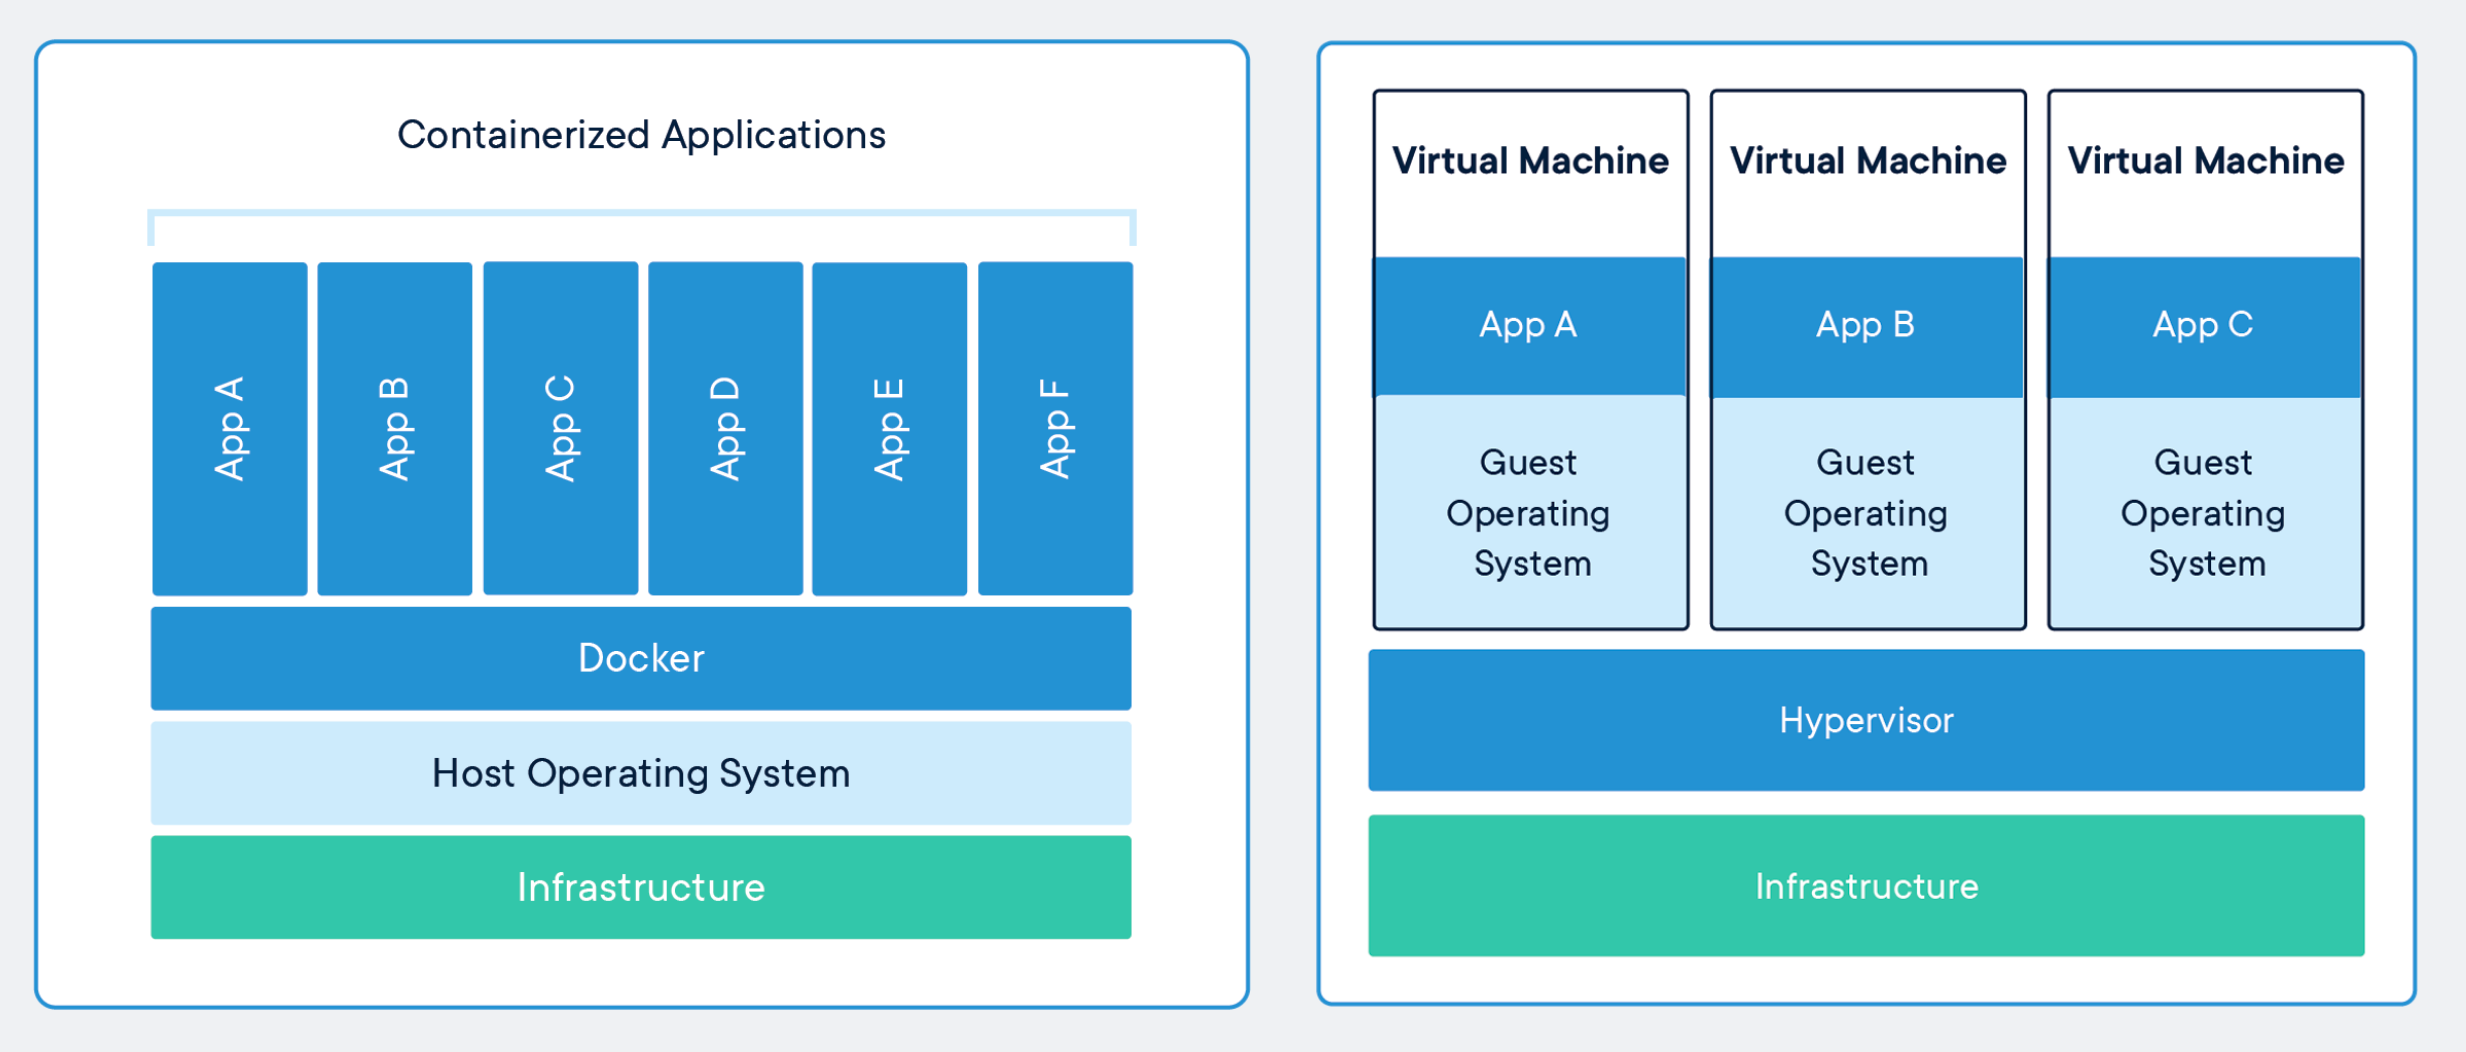 Comparison of containers and virtual machines, by Docker
Docker has two concepts that is almost the same with its VM containers as the idea, an image, and a container. An image is the definition of what is going to be executed, just like an operating system image, and a container is the running instance of a given image.
Give me a practical example
Docker images are defined within special text files called Dockerfile, and you need to define all the steps explicitly inside the Dockerfile. Here goes an example from one of my images that has Python 3.8 on Alpine 3.11, Chromium, Selenium with Chrome Driver and pytest in it; this is an actual image that I use for some of my acceptance test pipelines.
FROM python:3.8-alpine3.11

# update apk repo
RUN echo "http://dl-4.alpinelinux.org/alpine/v3.11/main" >> /etc/apk/repositories && \
    echo "http://dl-4.alpinelinux.org/alpine/v3.11/community" >> /etc/apk/repositories

# install chromedriver
RUN apk --no-cache add chromium chromium-chromedriver

# install selenium
RUN pip install selenium pytest
Let’s split this file into lines:
-
It uses python base image with the tag 3.8-alpine3.11, which is a specific version of Python along with specific version of Alpine.
-
Then it puts the community repository definitions and updates the repository indexes; if you are thinking like what the hell is a community repository”, give this piece a look.
-
Then it basically uses apk, the package manager of Alpine Linux, to install chromium and chromium-chromedriver.
-
Lastly, it uses pip to install selenium and pytest.
Once you have this file and named it as Dockerfile, you can just run this command to build your image:
docker build . -t my-image-name:my-tagIt will build your image, and once the build is done, you can run your image with this simple command:
docker run -it my-image-name:my-tag shThis command will give you a shell session inside the container, which you can use to do whatever you want. At this point, in order to understand the concept a little bit better, open another terminal session while keeping the one in the container running, and run docker ps, which will give you an output like this:
CONTAINER ID        IMAGE                  COMMAND             CREATED             STATUS              PORTS               NAMES
4a81c6a020c8        my-image-name:my-tag   "/bin/sh"           44 seconds ago      Up 44 seconds                           cocky_herschel
The one listed there is your currently running container, which you can see with the IMAGE column set to your new image. However, there is a small detail: if you exit the shell session inside the container by running exit or CTRL+D, your container will die and docker ps will give you an empty output.
There is a simple explanation behind this behavior; when you have executed the runner command above as docker run -it my-image-name:my-tag /bin/sh, you have basically told Docker to start this container with the /bin/sh process as the main process inside the container, which means once your process is dead, which is what happens when you exit the shell session, your container will die, simple as that.
While this example above is helpful, most of the time you will have multiple applications and dependencies that need to play together, which brings us to our next section.
Enter Docker Compose
In most of the real-life cases your applications will have external dependencies, such as databases, message queues or other external services that your application communicates with, and you need a reliable and easy to use way of bringing these dependencies into your development environment. While you can run everything as Docker containers, it quickly becomes cumbersome to manage the containers along with the application itself; and Docker has a very good solution for this: Docker Compose.
According to Docker:
Compose is a tool for defining and running multi-container Docker applications. With Compose, you use a YAML file to configure your application’s services. Then, with a single command, you create and start all the services from your configuration.
As explained, Docker Compose allows you to define your full application including its dependencies with a single file, which makes the development process incredibly easy. By using Compose, you get:
-
Single command to start your entire application: docker-compose up.
-
Simple DNS resolution using container names: meaning you can call the service-a container from service-b container by using http://service-a.
-
Mount volumes from your local filesystem to the container with a single line in the YAML definition.
-
Only restart the containers that have changes, which means faster boot times in case of restarts.
Here is an example docker-compose.yml file:
version: '3'
services:
  web:
    build: .
    ports:
      - "5000:5000"
    volumes:
      - .:/code
    environment:
      FLASK_ENV: development
      REDIS_HOST: redis
      REDIS_PORT: 6379
  redis:
    image: "redis:alpine"
Let’s walk through this file line by line as well:
-
It starts with defining the Docker Compose version, which defines which features can be used.
-
Then it goes into defining the services one by one.
-
web line defines the first container of the application.
-
build step tells Compose to build the current path with docker build , which implies that there is a Dockerfile in the current path and that should be used for the image.
-
ports define the mapping between the host and the container ports in the <HOST_PORT>:<CONTAINER_PORT> fashion. In this example, localhost:5000 will be mapped to the port 5000 of this container.
-
volumes define the filesystem mapping between the host and the container. In this example, the current path is going to be mounted to the /code path of the container, which allows you to replace the code in the image with your local filesystem, including your live changes.
-
environment allows you to set the environment variables for your container. In this example, it sets three environment variables: FLASK_ENV, REDIS_HOST, and REDIS_PORT. Beware that the REDIS_HOST value is set to redis only, which is possible because the Redis container below is using redis as the service name, which makes it accessible to the Compose network using the same name.
-
Then the next line defines the redis service, which uses the redis:alpine image, and that’s the only definition needed for this service.
As you can tell, the service definition here is pretty intuitive and it allows managing all the dependencies easily through this single file. Thanks to Docker Compose, local development with Docker containers becomes incredibly easy, and once you have included this file in your project root, then all your teammates can just run docker-compose up to have the whole application up and running, without needing to install anything other than Docker itself.
Other side benefits of containers
There is another advantage of containerizing applications that is often overlooked: putting your application in a container will eventually lead to better practices with your application. To give some examples:
-
Since you will be running more or less the same containers in development and live environments, hard-coding various configuration values into your codebase is going to cause problems; therefore, you will be externalizing these values and decouple them from the application, which will give you great flexibility in the long term with regards to deployment environments, be it development, or staging, or live.
-
While working with containers, you will notice that you are going to be restarting your containers from time to time, and the state will eventually be gone from the container, either due to differences in the storage or the container will need to be recreated, or simply you restarted your computer. In various cases like this, you will notice the application has an internal state, and you are going to want to externalize the state into somewhere else, which will allow you to have a stateless application, which will also be helping you a lot while scaling your services horizontally.
-
Since various members of the team, or even yourself, will be building images frequently, you might run into a case of an inconsistency with a wildcard dependency in your application, which will push you into having specific versions for all your dependencies, which is going to help you have reproducible builds and deploy with much greater confidence.
-
Since you will be running applications in containers, every time you will need logs from an application you are going to want to have a standardized way of working with logs, which is using stdout and stderr for all the logging needs. This will allow you to view stdout stream from your terminal locally while also allowing you to collect the logs with more sophisticated log managers on live; the application would not care about the logging system.
-
You will be able to have a clear separation between your build, release and deployment steps since you will be building Docker images, tagging them for releases and deploying them individually, which fits perfectly with The Twelve-Factor App’s “Build, release, run” factor.
All these exemplary benefits above are strongly advised in well-known software development guides such as “The Twelve-Factor App” and they are very beneficial improvements in case your applications lack them; they will simplify your life as well as your development lifecycle as a team. As the projects grow, these improvements will become necessities, and you will be able to address them promptly by being able to spot them early on.
Deploying containers
While developing applications in a reproducible manner is an important win, the main need is to be able to deliver the application to a live environment and being able to serve real traffic. Adapting containers and separating your applications from the environment pays off very good here, effectively decoupling your applications from their deployment environment. It can be deployed on a serverless cloud platform, it can be deployed to a 100-nodes cluster, or it can be deployed to a single bare-metal machine; your application doesn’t care.
When it comes to deploying containers, there are quite a lot of good solutions depending on your scale and your needs:
-
You can deploy your applications with a production Docker Compose file using a remote Docker host on a basic cloud VM, such as AWS EC2, DigitalOcean Droplets or any other remote machine you have.
-
You can deploy your application on a managed app deployment platform, such as AWS Elastic Beanstalk or Google App Engine, which will handle load balancing, auto-scaling, and deployments for you.
-
You can deploy on a serverless solution, such as AWS ECS or Google Cloud Run, which will allow you to not to pay when your application is not running and have a more flexible containerization solution. Correction: apparently ECS is not fully serverless, as you still need to allocate your own nodes, and it virtualizes them on your behalf. Another alternative for a direct serverless solution seems to be AWS Fargate.
-
You can deploy your application on a container orchestration solution, such as Docker Swarm, Kubernetes or Nomad. Especially for Kubernetes, there are managed solutions available as well, such as AWS EKS, Google Kubernetes Engine or DigitalOcean Kubernetes.
As you can see, there are many options with many alternatives, and the container deployment space still changing actively, with various new developments in deployment strategies as well as alternative platforms to deploy. Since having containers allows you to decouple your applications from infrastructure, you are going to be able to experiment with all these solutions without doing any rewrites or anything in the application itself until you find the one that fits best to you.
So, should I use this thing?
Overall, Docker allows applications to be packaged with all the dependencies inside, which simplifies the deployment process quite a bit and you get to have full reproducible environments. Combined with Docker Compose, and a container deployment/orchestration solution for your live environments, you can have a very powerful, reproducible setup for your applications, as well as a seamless transition between your development environment and the live deployments. Putting the initial basic effort into your Docker setup will compensate its effort very quickly, and it will allow you to gradually improve as your project matures, your needs change and your team grows.
I have started using Docker for my side projects around two years ago, and my experience has been a real pleasure. We are developing some side projects with some friends, each of us working in different computers and operating systems, and we are never having any kind of reproducibility issue with regards to applications, their dependencies, and inconsistencies between our local setups and live deployments. Thanks to containers, I am also able to run isolated pipelines for my CI/CD needs, deploy applications from push to live within single-digit minutes and focus only on delivering rather than infrastructure.
I’d suggest whoever is interested in this to give it a try; you might be able to learn a few things here and there and introduce it into your software development lifecycle to have release better software in less time with more automation.
If you would like to try some of these technologies referred in the article, here is a DigitalOcean link which will give you $100 60-days credit.
Understanding the Docker Internals
Image Source and Credits: https://delftswa.github.io/chapters/docker/
Docker takes advantage of several features of the Linux kernel to deliver its functionality.
Namespaces
Docker makes use of kernel namespaces to provide the isolated workspace called the container. When you run a container, Docker creates a set of namespaces for that container. These namespaces provide a layer of isolation. Each aspect of a container runs in a separate namespace and its access is limited to that namespace.
Docker Engine uses the following namespaces on Linux:
-
PID namespace for process isolation.
-
NET namespace for managing network interfaces.
-
IPC namespace for managing access to IPC resources.
-
MNT namespace for managing filesystem mount points.
-
UTS namespace for isolating kernel and version identifiers.
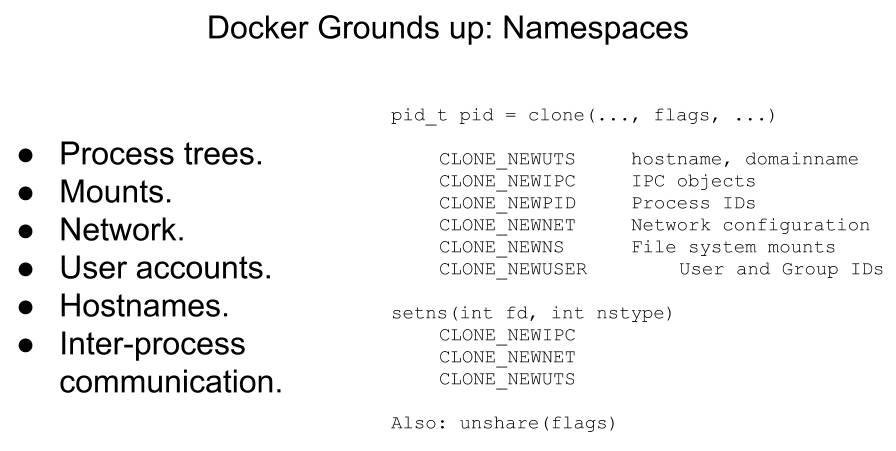 Image Source and Credits (Rohit Jnagal): http://www.slideshare.net/RohitJnagal/docker-internals
 Image Source and Credits (Rohit Jnagal): https://docs.google.com/presentation/d/1juVgXiLTM-ZmAmYBOshNwhBABkUqwIxVodHZwq-0eGg/edit?usp=sharing
Cgroups
Docker also makes use of kernel control groups for resource allocation and isolation. A cgroup limits an application to a specific set of resources. Control groups allow Docker Engine to share available hardware resources to containers and optionally enforce limits and constraints.
Docker Engine uses the following cgroups:
-
Memory cgroup for managing accounting, limits and notifications.
-
HugeTBL cgroup for accounting usage of huge pages by process group.
-
CPU group for managing user / system CPU time and usage.
-
CPUSet cgroup for binding a group to specific CPU. Useful for real time applications and NUMA systems with localized memory per CPU.
-
BlkIO cgroup for measuring & limiting amount of blckIO by group.
-
net_cls and net_prio cgroup for tagging the traffic control.
-
Devices cgroup for reading / writing access devices.
-
Freezer cgroup for freezing a group. Useful for cluster batch scheduling, process migration and debugging without affecting prtrace.
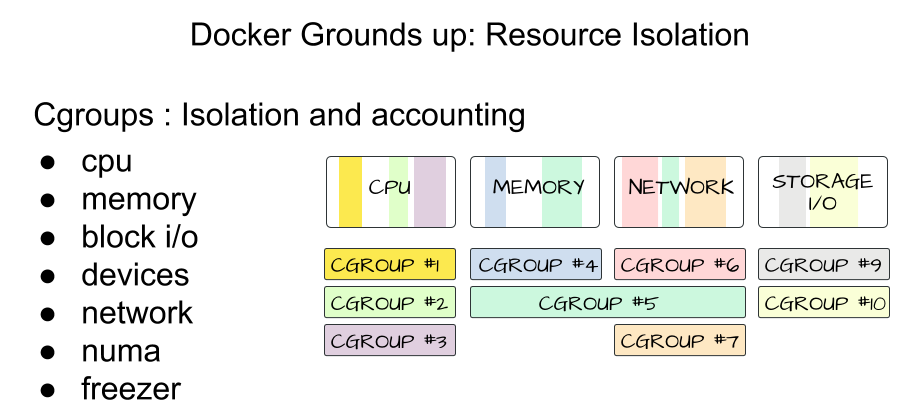 Image Source and Credits (Rohit Jnagal & Mairin): http://www.slideshare.net/RohitJnagal/docker-internals and https://mairin.wordpress.com/2011/05/13/ideas-for-a-cgroups-ui/
Union File Systems
Union file systems operate by creating layers, making them very lightweight and fast. Docker Engine uses UnionFS to provide the building blocks for containers. Docker Engine can use multiple UnionFS variants, including AUFS, btrfs, vfs, and devicemapper.
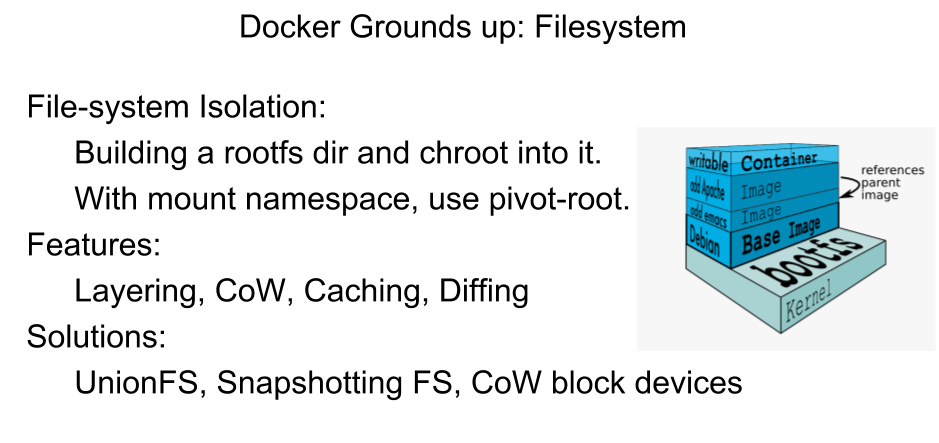 Image Source and Credits (Rohit Jnagal): http://www.slideshare.net/RohitJnagal/docker-internals
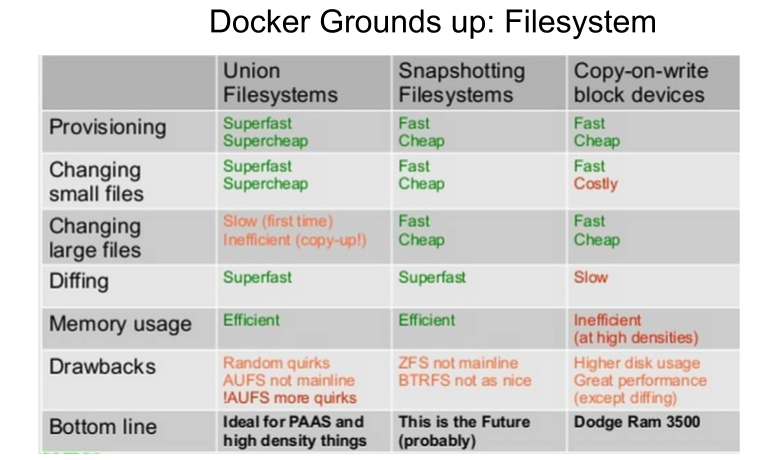 Image Source and Credits (Jerome Petazzoni): http://www.slideshare.net/RohitJnagal/docker-internals
Container Format
Docker Engine combines the namespaces, control groups and UnionFS into a wrapper called a container format. The default container format is libcontainer.
Security
Docker Engine makes use of AppArmor, Seccomp, Capabilities kernel features for security purposes.
-
AppArmor allows to restrict programs capabilities with per-program profiles.
-
Seccomp used for filtering syscalls issued by a program.
-
Capabilties for performing permission checks.
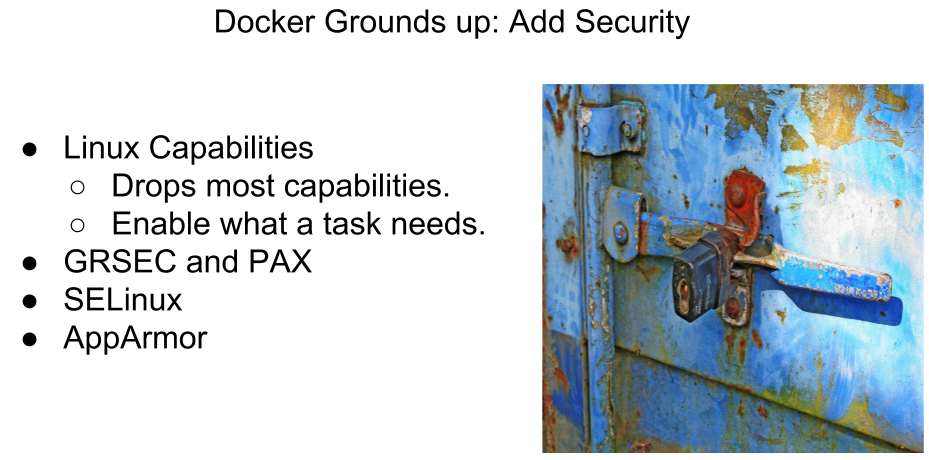 Image Source and Credits (Leo Reynolds): http://www.slideshare.net/RohitJnagal/docker-internals
Source: ~ http://docker-saigon.github.io/post/Docker-Internals/
Disclaimer: Content and Image source has been mentioned. Special credit to concerned folks.
Additional Resources
Here are some useful resources mentioned throughout the article, might be helpful to check them out.
Comments