
SvelteKit Handbook for developers || Leanring Next Gneration SSR
- Github : https://github.com/tkssharma/lets-play-with-sveltejs
- Playlist : https://www.youtube.com/watch?v=lxzyI4WoffM&list=PLT5Jhb7lgSBMqIuNda0gGNEiMS-ahGJM1

SvelteKit is a framework for building web applications of all sizes, with a beautiful development experience and flexible filesystem-based routing.
Unlike single-page apps, SvelteKit doesn't compromise on SEO, progressive enhancement or the initial load experience — but unlike traditional server-rendered apps, navigation is instantaneous for that app-like feel.
Index
- Introduction
- The main features provided by sveltekit
- layouts and client side routing
- How to install sveltekit
- sveltekit routing
- consuming rest api in sveltekit
introduction
Svelte is growing in popularity, and that’s for a good reason. Developing apps with Svelte is based on writing reusable and self-contained components — similar to other popular JavaScript frameworks such as React.
While Svelte alone gives you a very good development experience, you still have to decide on how you want to ship your application to the user. The classical approach would be to take your favorite module bundler like webpack or Rollup and bundle your code into one big, fat JavaScript file. Then, you’d call it from a very basic HTML document, like so:
<!DOCTYPE html>
<html>
  <head>
    <meta charset="UTF-8" />
    ...
  </head>

  <body>
    <!-- the entry point of your application -->
    <div id="app" />
    <!-- load the JavaScript that takes care of the rest -->
    <script src="dist/bundle.js"></script>
  </body>
</html>
prerendering and server-side rendering
First of all, instead of serving an almost empty HTML file to the client, SvelteKit already comes with all the HTML elements you need for the first page view. The benefits are faster page loads and SEO boosts. There are two ways SvelteKit does this: prerendering and server-side rendering. I’ll explain both in more detail below. What stays the same is that once the JavaScript has been loaded, it takes over and enables typical features of a single page application, like client-side routing.
code-splitting
The second obvious difference between SvelteKit and a classical single JavaScript bundle is code-splitting. Instead of serving the entire app in one single Javascript file, SvelteKit splits the code into separate smaller chunks. Each chunk represents a route of your application. For example, everything that needs to be fetched for the /home and for the /about routes will be loaded once the user actually needs it — or a little bit earlier if you make use of SvelteKit’s prefetching functionality (like we’ll do below).
Sveltekit removes all the bottlenecks of building modern web apps; it does all the boring stuff for you while you concentrate on the creative part. It is powered by Snowpack under the hood, a lightning-fast frontend build tool designed for the modern web. It uses Vite with Svelte plugin to provide a lightning-fast and feature-rich development experience with Hot Module Replacement (HMR). Changes to your code are instantly reflected in the browser.
lets play with simple app
To begin with, we initiate a new SvelteKit project. Execute the following commands in your terminal:
npm init svelte@next svelteKit-example-app You’ll be asked a few questions so that you can customize your project. For our purposes, answer the following:
Which Svelte app template? -> SvelteKit demo app
Use TypeScript components -> no
Add ESLint for code linting? -> no
Add Prettier for code formatting? -> no
This will load a SvelteKit development environment including a functional example application.
In your project route there are now some configuration files: your package.json, the static folder, and the src folder. We’ll be working mainly inside the src folder. It has the following structure.
src
├── app.css
├── app.html
├── global.d.ts
├── hooks.js
├── lib
│ ├── Counter
│ │ └── index.svelte
│ ├── form.js
│ └── Header
│ ├── index.svelte
│ └── svelte-logo.svg
└── routes
├── __layout.svelte
├── about.svelte
├── index.svelte
└── todos
├── _api.js
├── index.json.js
├── index.svelte
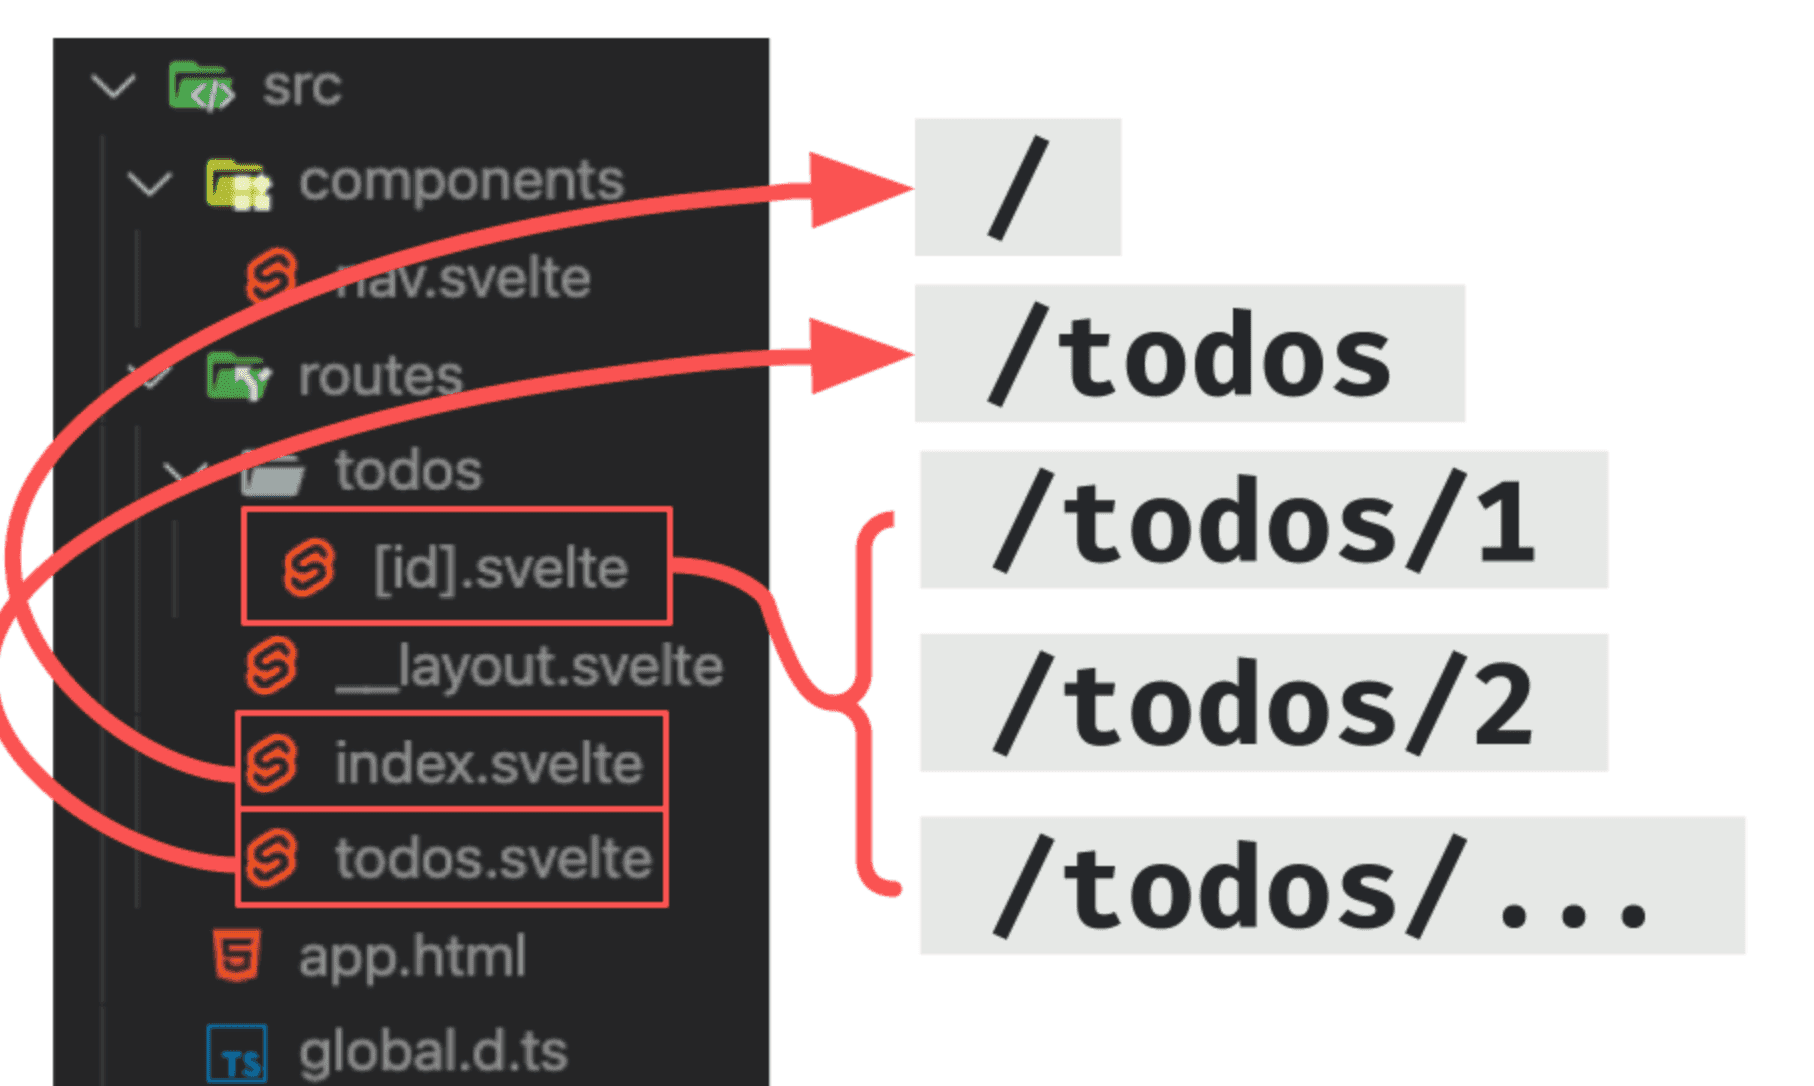
└── [uid].json.jsThe /src/routes folder is the heart of your application. The files inside this folder define the routes of your app. There are two types of routes: pages and endpoints. pages are Svelte components and are indicated by the .svelte extension. For example, a component named /src/routes/test.svelte would be served under the route /test. endpoints are normal JavaScript (or TypeScript) files and enable you to generate HTTP endpoints to fetch data.
Svelte components can have child components. For example, the route component /src/routes/test.svelte might import a component named Button.svelte. The place where you would store all your child components is the /src/lib folder.
Let’s see how all this works in action. Change into the newly created directory, then install the dependencies and start the app in development mode:
cd svelteKit-example-app
npm install
npm run dev -- --open
The main features provided by sveltekit
- svelteKit client based routing
- SvelteKit Layouts
- Environment Variables in SvelteKit
- Page based routing and default layouts
- async data fetching on page load
- loading styles or working with Tailwind
- API Routes and page based routes
layouts and client side routing
As explained earlier, pages are treated as entirely standalone components. So, upon navigation, the existing component will be destroyed, and a new one will take over. However, elements or components need to be visible on every page in many applications, such as a navigation menu or footer. So instead of repeating them on every page, we can use a layout component.
To create a layout component that applies to every page on our website, create a file called src/routes/__layout.svelte and paste the following code below inside.
<!-- src/routes/__layout.svelte -->
<nav>
   <div class="nav-container">
       <a href="/" class="nav-logo" title="Back to Homepage">David Adeneye</a>
       <div class="nav-links">
           <a href="/about" class="link">About</a>
           <a href="/blog" class="link">Blog</a>
           <a href="/projects" class="link">Projects</a>
           <a href="/contact" class="link">Contact</a>
       </div>
   </div>
</nav>
<div class="container">
 <!-- Pages will be injected below -->
    <slot></slot>
</div>
<style>
    .container {
       max-width: 1400px;
       margin: 50px auto;
   }
</style>
This code above is our navigation menubar that applies to all pages of our portfolio website. The default layout component that Sveltekit uses, if you dont include yours, looks like this:
How to install sveltekit
Building an app with all the modern best practices is fiendishly complicated. Those practices include build optimizations, so that you load only the minimal required code; offline support; prefetching pages before the user initiates navigation; and configurable rendering that allows you to generate HTML on the server or in the browser at runtime or at build-time. SvelteKit does all the boring stuff for you so that you can get on with the creative part.
It uses Vite with a Svelte plugin to provide a lightning-fast and feature-rich development experience with Hot Module Replacement (HMR), where changes to your code are reflected in the browser instantly.
You don't need to know Svelte to understand the rest of this guide, but it will help. In short, it's a UI framework that compiles your components to highly optimized vanilla JavaScript. Read the introduction to Svelte blog post and the Svelte tutorial to learn more.
Getting started The easiest way to start building a SvelteKit app is to run npm init:
npm init svelte my-app
cd my-app
npm install
npm run dev
The first command will scaffold a new project in the my-app directory asking you if you'd like to set up some basic tooling such as TypeScript. See the FAQ for pointers on setting up additional tooling. The subsequent commands will then install its dependencies and start a server on localhost:3000.
There are two basic concepts:
Each page of your app is a Svelte component You create pages by adding files to the src/routes directory of your project. These will be server-rendered so that a user's first visit to your app is as fast as possible, then a client-side app takes over Try editing the files to get a feel for how everything works – you may not need to bother reading the rest of this guide
svelteKit Routing
Like every other popular SSR solution, Sveltekit has a great file-based routing system. Pages in your app are stored by default inside the src/routes folder; this means that the structure of your application is defined by the structure of your codebase, specifically the content of src/routes.
Our portfolio website contain about six pages:
- Home - index.svelte (already created that above)
- About - about.svelte (we would create that in this section)
- Blog - blog.svelte (we would create that in next section)
- Projects - projects.svelte (copy the code file in the github repo)
- Contact - contact.svelte (copy the code file in the github repo)
- [id].svelte - Dynamic routes (copy the code file in the github repo)
Building a blog like application, we would need dynamically generated routes. Sveltekit enables us to implement this easily through dynamic routes.
To implement this, create a new folder called blog. Dynamic parameters in Sveltekit are encoded using [bracket]. For example, create a file called [id].svelte inside your blog folder. Open the file and paste the following code or follow along with the source code.
<script context="module">
   export const load = async ({ page, fetch }) => {
       const id = page.params.id;
       const res = await fetch(`https://jsonplaceholder.typicode.com/posts/${id}`);
       const post = await res.json();
       return {
           props: {
               post,
           }
       }
   }
</script>
From the code, we accessed the parameter within the load function and stored it with the variable id; the parameter was then used to fetch the exact blog post of that id. Suppose you go back to the blog.svelte you will see how we accessed the dynamically generated pages with a href in line 33 below:
<p class="readmore">
  <a style="color: rgb(10, 10, 139);" href={`/blog/${post.id}`}>
      Read More
  </a>
Dynamic Parameters and routing
Each user box on our landing page is an internal link with route /[lastName]. This is where dynamic parameters come into play. Under the route /[lastName], we’ll display additional information for the respective user. To do this, we’ll first have to extend our API with an additional endpoint for fetching individual user data.
Create a new file /src/routes/api/[lastName].js with the following content:
import faker from 'faker';

export async function get({ params }) {
  const { lastName } = params;
  return {
    body: {
      lastName,
      firstName: faker.name.firstName(),
      avatar: `https://avatars.dicebear.com/api/human/${lastName}.svg`,
      title: faker.name.title(),
      phone: faker.phone.phoneNumber(),
      email: faker.internet.email(),
    },
  };
}
Notice the dynamic parameter [lastName] in the file name. We can access this parameter from the params property of the get function. We use it to return the correct values for lastName and avatar in the body object. Next, we generate some additional mock data for this user with faker that we also return within the body object.
We can test this endpoint with an arbitrary lastName value. Open the browser and navigate to http://localhost:3000/api/Spiderman. This will load the raw data for an arbitrary user with a value Spiderman of lastName.
Next, we create a new page — /src/routes/[lastName].svelte — with the following content:
<script context="module">
  export async function load({ fetch, page }) {
    const { lastName } = page.params;
    const res = await fetch(`/api/${lastName}`);

    if (res.ok) return { props: { user: await res.json() } };
    return {
      status: res.status,
      error: new Error(),
    };
  }
</script>

<script>
  export let user;
</script>

<main>
  <h1>{user.firstName} {user.lastName}</h1>
  <div class="box">
    <img src="{user.avatar}" alt="{user.astName}" />
    <ul>
      <li>Title: {user.title}</li>
      <li>Phone: {user.phone}</li>
      <li>Email: {user.email}</li>
    </ul>
  </div>
</main>
Prefetching
There’s one last feature that I’d like to show, and I am really excited about it. SvelteKit offers the possibility to prefetch data for individual pages.
Let’s go back to our /src/routes/index.svelte page and add the attribute sveltekit:prefetch to the anchor tag
<a sveltekit:prefetch href={`/\${lastName}`} class="box">
</a>

<a href="/todos/{todo.id}" sveltekit:prefetch>
    {todo.id}: {todo.title}
</a>
This tells SvelteKit to execute the load function of the corresponding page upon hovering the element.
Try it out by opening the network tab in your browser (see below). Every time you hover over one of the user boxes, a request to /api/[lastName] is made and the data for the corresponding user page is fetched. This saves additional milliseconds and ensures a better user experience.
consuming rest api in sveltekit
To learn how to fetch data from a REST API and the concept of loading in Sveltekit, we would build a demo blog post on our website. We will be interacting with a free fake REST API called JSONPlaceholder, it’s a free online REST API for testing and prototyping.
To get started, open src/routes/blog.svelte and paste the following code or read along with the accompanying source code.
SvelteKit offers a very elegant solution for this — the load function. The load function can run both on the client and on the server side and in both cases will be executed before the component renders. This is why we have to place it inside a script element with context="module".
load receives an object with property fetch that we can use to fetch data. It behaves identically to the native fetch API. In this example, we use our new endpoint /api to fetch the array of user objects. To pass this data to our component, we return an object with the props property, which stores our user array.
<svelte:head>
   <title>Blog</title>
</svelte:head>
<script context="module">
   export const load = async ({ fetch }) => {
       const res = await fetch("https://jsonplaceholder.typicode.com/posts");
       const blogposts = await res.json();
       return {
           props: {
               blogposts,
           }
       }
   }
</script>
<script>
   export let blogposts;
</script>
<div class="container">
   <h1>My Articles</h1>
   <div class="blogposts">
       {#each blogposts as post}
       <div class="post">
           <h2>{post.title.substring(0, 20)}</h2>
           <p>{post.body.substring(0, 80)}</p>
           <p class="readmore">
            <a style=" color: rgb(10, 10, 139);" href={`/blog/${post.id}`}>
              Read More
            </a>
          </p>
       </div>
       {/each}
   </div>
</div>
Fetching Data using Load function
<!-- src/routes/todos.svelte -->

<script context="module">
    export async function load({page, fetch, session, context}) {
    console.log('Loading ToDos');
    const url = `https://jsonplaceholder.typicode.com/todos`;
    const res = await fetch(url);

    if (res.ok) {
    return {
    props: {
    todos: await res.json()
}
};
}

    return {
    status: res.status,
    error: new Error(`Could not load ${url}`)
};
}
</script>

<script lang="ts">
    export let todos: any[];
</script>

<svelte:head>
    <title>b-nova ToDos</title>
</svelte:head>
<h1>To Dos</h1>

<ul>
    {#each todos as todo}
    <li>
        <a href="/todos/{todo.id}">
            {todo.id}: {todo.title}
        </a>
    </li>
    {/each}
        </ul>
Customizing
Now we want to adapt header information, for example, the title or certain SEO data, the kit also offers us an elegant solution for this. We can use the svelte:head directive to overwrite/adapt certain metadata in the header:
<svelte:head>
    <title>b-nova To Do list</title>
</svelte:head>
<h2>Welcome to the b-nova SvelteKit To Do List</h2>

<svelte:head>
    <title>b-nova ToDos</title>
</svelte:head>
<h1>To Dos</h1>
Rendering & adapters
SvelteKit supports server-side rendering. At first glance it sounds logical, but we want to look behind the facade and highlight the differences to client-side rendering and other types.
First, let's take a closer look at the well-known client-side rendering (short CSR). The browser receives an almost empty HTML page from the server, has to download and execute the complete JavaScript and can then reload the data asynchronously and display the page. The moment when something is displayed to the customer is the same when the page is fully usable and the customer can interact. This method has the great advantage that the computing power is transferred to the client and no server is required. If the customer has a slow internet connection or insufficient computing power, this can quickly lead to problems.
The server-side rendering (kurz SSR) on the other hand delivers a fully rendered, displayable HTML to the browser. All requests for dynamic data etc. are made on the server. The browser can directly display the page to the customer and then load the JavaScript framework to make the page interactive. This process is called Hydration.
There are differences here depending on the implementation, but most of the rest of the rendering is then taken over by the front end, since the framework is loaded. The name Universal Rendering is often used for this. This has the great advantage that it takes less time to display the page. Of course it is a disadvantage that you need a server for rendering. SvelteKit activated SSR by default.
SvelteKit supports two other types of rendering: Pre-Rendering and Static Rendering. With Static Rendering the entire application is rendered during the build process and delivered as a static artifact. In the ** pre-rendering**, however, only individual pages are statically built and delivered in this way. The Youtuber Franck Abgrall has animated, short videos on his channel that clearly illustrate these processes.
Adapters
In SvelteKit a so-called adapter is used to control the build & deployment behavior of the SvelteKit app. With the @sveltejs/adapter-static the complete page is built as static HTML files during the build process. For this you have to adapt the svelte.config.js file accordingly:
<!-- svelte.config.js -->
import preprocess from 'svelte-preprocess';
import adapter from '@sveltejs/adapter-static';

/** @type {import('@sveltejs/kit').Config} */
const config = {
    // Consult https://github.com/sveltejs/svelte-preprocess
    // for more information about preprocessors
    preprocess: preprocess(),

    kit: {
        // hydrate the <div id="svelte"> element in src/app.html
        target: '#svelte',
        adapter: adapter()
    }
};

export default config;
All pages are called up one after the other and further links including querying the Rest API etc. are called up and built. With pre-rendering, on the other hand, only individual pages of the application are rendered at build time; this can be configured for each page.
Conclusion
Working with SvelteKit feels very intuitive. All in all, it took me only about an hour to learn all the main features and the results are absolutely astonishing. You get blazing-fast, SEO-optimized web apps that provide you the best user experience that modern build tools can possibly deliver.
Comments