
How to run API Gateway, AWS Lambda, SNS, SQS and DynamoDB locally
Sometimes you want to test your API before opening a pull request, or you might not have an internet connection and still want to make progress. This article will help you do these things without having to deploy anything to AWS.
Architecture
We are going to be using AWS Serverless Application Model (SAM) and dynamodb-local to run the service. Both of these use Docker to allow you to run everything on your machine.
We need the container that is run by SAM to run commands against the DynamoDB Local container. To do this we will run both containers under the same Docker Network as shown below.
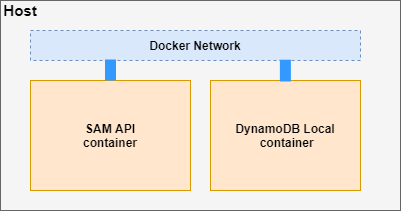
Docker Container architecture
Now that we’ve got the high level understanding of how this will work, we can start setting up.
Environment Setup
Before we begin, you need to have few things installed:
- AWS CLI
- SAM CLI
- Docker
- NoSQL Workbench
- NodeJS (if you are working with the provided example)
Create Docker Network
First we will create a Docker Network that both of our containers will run under. This will let our SAM API container be able to make requests to DynamoDB.
Run docker network create local-api-network
DynamoDB Local Setup
To create the DynamoDB container we need to run this command:
docker run -d -p 8000:8000 --network=local-api-network --name dynamo-local amazon/dynamodb-local
What this command is doing is that it’s running a container based of the amazon/dynamodb-local image. It runs it under the Docker Network that was created by using the network-local attribute. It is using Port Forwarding so we can run commands from our machine using localhost as you will see below.
To confirm that it’s running we can run:
aws dynamodb list-tables --endpoint-url http://localhost:8000
If it worked you will get an empty array of TableNames.
or we can use docker-compose
version: "3.9"

services:
  localstack:
    container_name: "${LOCALSTACK_DOCKER_NAME-localstack_main}"
    image: localstack/localstack
    network_mode: bridge
    ports:
      - "4566:4566"
      - "4571:4571"
      - "${PORT_WEB_UI-8080}:${PORT_WEB_UI-8080}"
    environment:
      # https://github.com/localstack/localstack#configurations
      - SERVICES=dynamodb,sts,ssm,iam,cloudformation,s3,kms,sns
      - DEBUG=1
      - DEFAULT_REGION=us-east-1
      - DOCKER_HOST=unix:///var/run/docker.sock
    volumes:
      - "${TMPDIR:-/tmp/mercanis-localstack}:/tmp/mercanis-localstack"
      - "/var/run/docker.sock:/var/run/docker.sock"
Create table and data with NoSQL Workbench
NoSQL Workbench added support for DynamoDB local in November 2019. This simplified how we generate DynamoDB tables and how we can seed data into the local instance.
We will be using the import capability to define the table schema and sample data. Save the JSON below and use the Import data model button to create it in NoSQL Workbench.
If you want to take a deeper dive into Data Modeling with NoSQL Workbench, this is a good place to start.
When you look at the Aggregate view of the Data Model you should see this.

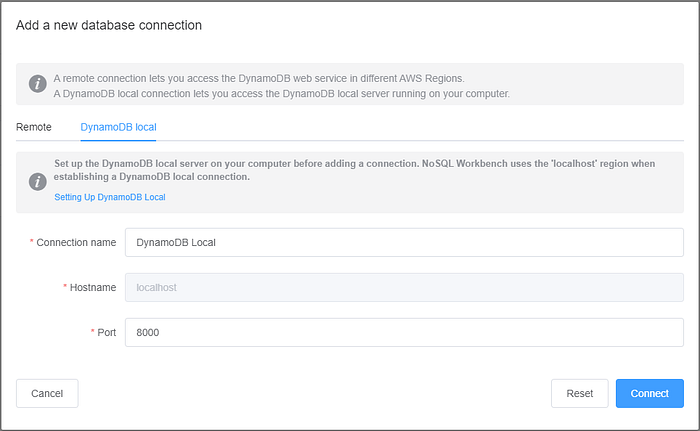
Create a DynamoDB Local connection in NoSQL Workbench
Previously we had to define tables and data using JSON files, and execute aws cli commands to use those files. Now we can simply create a connection to our local database instance and it will take care of creating everything with what we defined in NoSQL Workbench.
Go to the operation builder and add a new connection. Give your connection a name and leave the default port (unless you have a port conflict).
If you open the connection right now you will see that there are no tables. To import the table we have already defined, go to the Visualizer section and Open the Item Schema and hit the Commit to DynamoDB button.
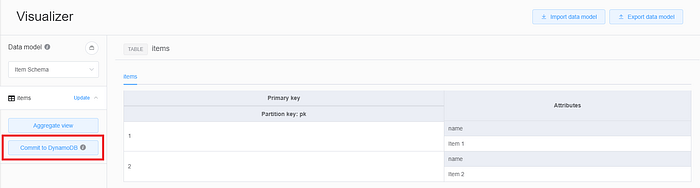
From the saved connections select the new one that you created and hit Commit.

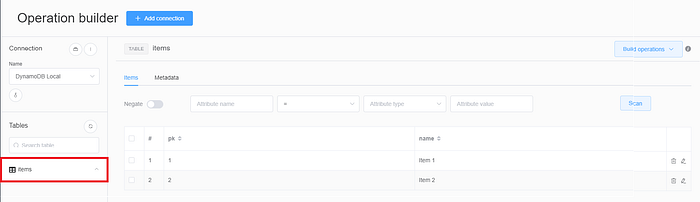
When you go back to the Operation builder for the new connection you will see a new items table.
Setup local credentials
NoSQL Workbench creates Access Keys for you to be able to access the data using the same connection that you had already created. To access these you need to hit the button with the Key icon and it will show you the keys specific to this connection.
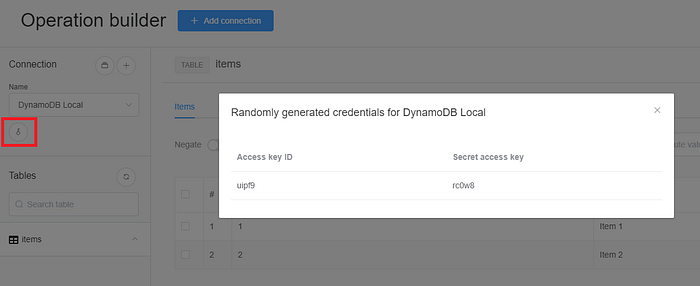
We are going to set the default profile in the AWS Credentials file to use the keys as shown below. (NoSQL Workbench uses localhost as it’s region)
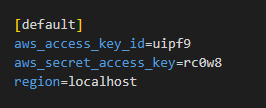
This tells the aws and sam cli to use the local DynamoDB instance whenever it runs commands.
Run the API using SAM
Clone or download this example from GitHub.
AWS SAM lets you run the API under a Docker Network, this is done by using the docker-network attribute. Run the following command to spin up the service:
sam local start-api --docker-network local-api-network
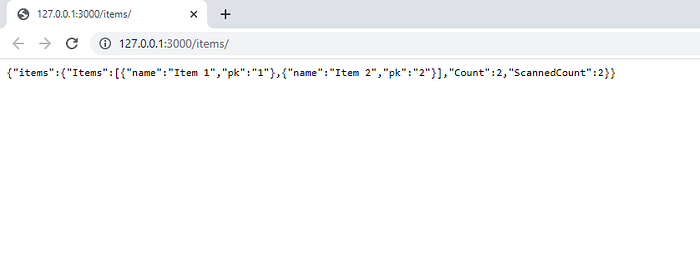
Once this is done you can test if the data is there. On a new tab go to http://localhost:3000/items to hit the endpoint that gets all items. You should see this response in your browser:
Summary
By using all AWS tools we were able to run and test an API on your local machine. NoSQL workbench is a great tool that was just made GA, it allows to easily model and visualize how your data will be stored and queried in DynamoDB and with the added functionality for local development, it really facilitates seeding data into your local DynamoDB instance. Now you will be able to test your application even if you have no internet connection.
Thanks for reading and keep on coding!
References
- https://github.com/andmoredev/offline-development-api
- https://github.com/anmoreno
- https://docs.aws.amazon.com/serverless-application-model/latest/developerguide/sam-cli-command-reference-sam-local-start-api.html
- https://www.techtarget.com/searchaws/tip/SAM-Local-enables-offline-development-for-serverless-apps
Comments