
Secure AWS API Gateway Using A Lambda Authorizer
Amazon API Gateway enables you to create and deploy your own REST and WebSocket APIs at any scale. You can create robust, secure, and scalable APIs that access AWS or other web services, as well as data that’s stored in the AWS Cloud. You can create APIs to use in your own client applications, or you can make your APIs available to third-party app developers.
This post will provide a walkthrough on how to secure an AWS API Gateway using Lambda Authorizers.
Prerequisites
You need to have an AWS account and some basic knowledge working with AWS services. Following AWS services will be utilised throughout this guide.
- Lamda Service
- API Gateway Service
You will learn
- To create Lambda functions.
- To create an API Gateway.
- To connect a Lambda function to an API Gateway.
- To Add Authorizers to AWS API Gateway.
In AWS API Gateway, you can secure your endpoints using either IAM roles or an API key. That’s all good. But, imagine this scenario.
You have an external Authentication system (Hosted god knows where) that handles user authentication and issue tokens for authenticated users and this same system needs to be used for AWS API Gateway endpoint security as well. Meaning the token issued from the external Authentication System needs to be passed for each and every request to the API Gateway as well.
Great! But where do we write our code to verify the JWT token?
This is where Lambda Authorizers come in. You can create a Lambda function that will be invoked every time a request is made to an API Gateway endpoint and you can write your own custom code to verify that token sent to the request is valid by sending the token to the external Authentication system and check for validity. Please refer to the diagram below to get a better understanding.
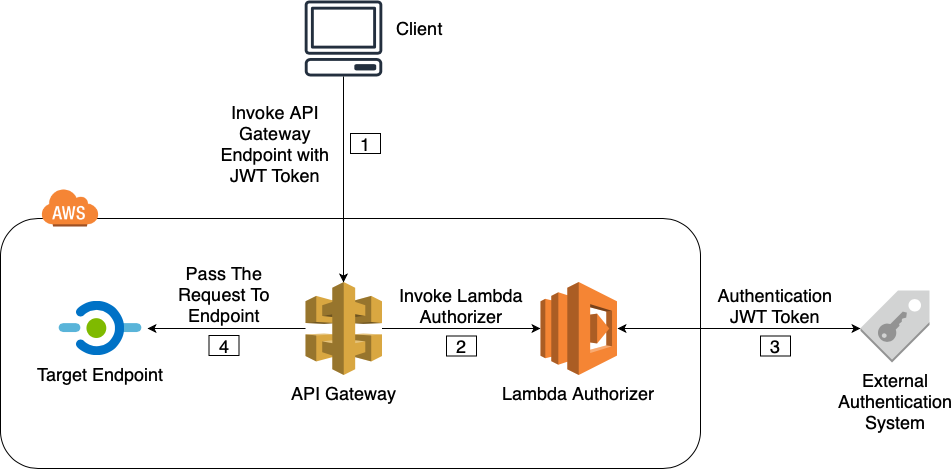
Figure 01
The sequence of the above illustration is explained below.
[1]. An API Gateway endpoint is invoked with a JWT token.
[2]. Before sending the request to the endpoint, API Gateway invokes the Lambda Authorizer for JWT token verification.
[3]. Lambda Authorizer checks the validity of the JWT token using custom code with an external authentication system.
[4]. If the JWT token is valid, the request is passed to the requested endpoint or explicitly denied if the JWT token is invalid.
A Brief Look At Lambda Authorizers
Lambda authorizer gets invoked whenever a request has been made to the AWS API Gateway. When invoking the Lambda authorizer by AWS API Gateway, the payload that is configured will be passed to the Lambda function as input for verification.
As for the output, After the verification, the Lambda should return an AWS policy document (a dictionary like object) which should look like below.

principalid — An identifier for the user associated with the token.
Effect — Whether the request should be allowed or denied.
Resource — The ARN (Amazon Resource Name) for the API Gateway endpoint the request was sent.
Optionally it’s possible to forward additional key value pairs to the target Lambda or the next endpoint via context map. This is useful to pass additional data from the Lambda Authorizer to the next endpoint.
If the API uses a usage plan, one of the usage plan’s API keys must be set in usageIdentifierKey property value.
Of course you can generate this policy document dynamically, but to make things easy, AWS provides us blueprints with boilerplate code to generate this policy document which will be used in the demo.
Lambda Authorizer Event Payloads
Event payload is the input sent to the Lambda function. There is a token based payload and a request based payload. The “Figure 01” refers to a token based Lambda Authorizer.
Token Based Lambda Authorizer
- Specify the header name in which the JWT token will be supplied.
- Can only verify the caller using the token.
Request Based Lambda Authorizer
- Specify multiple request parameters to be extracted from the request that needs to be sent to Lambda Authorizer.
- Can verify the caller using multiple request parameters.
Depending on the need you can decide which type of event payload to use. If you have a token that needs to be validated, obviously use token based payload. If you have a need to validate some values in the request parameters, request based payload is the way to go.
A Simple Demo
This demo will be based on the token based Lambda Authorizer.
1. Creating an API Gateway
- Go to API Gateway service in AWS Console.
- Click on “Get Started” and fill out information as displayed below and click on “Create API”.

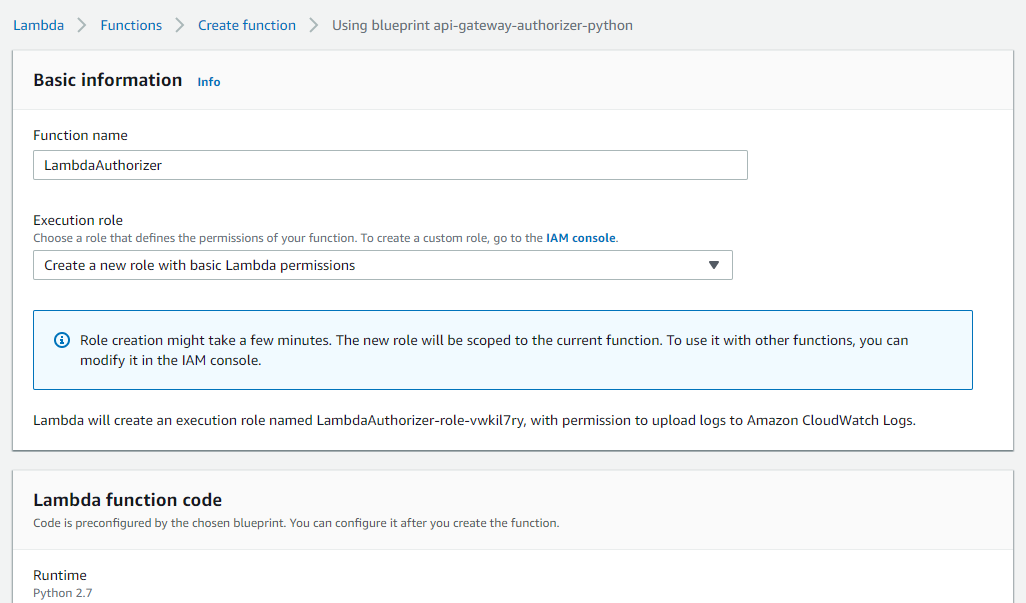
2. Creating the Lambda Authorizer
Before configuring an Authorizer in AWS API Gateway, we need to create a Lambda function that will be set as the Authorizer in the API Gateway.
- Go to Lambda service and click “Create a function”.
- Select “Use a blueprint” and search for Python based AWS API Gateway Authorizer blueprint as displayed below and click “Configure”.

3. Give a “Function name”, select “Execution role” as “Create a new role with basic lambda permissions” as below and click “Create function”.
4. Go to the Lambda designer and paste the code below. lambda_handler was changed from the blueprint code to allow all methods if the token value is equal to “allow” and deny all methods if token value is something else.
This is typically where the token will be sent to an external authentication system and check for validity. But for the purposes of this demo, let’s keep it simple.
3. Adding An Authorizer to the API Gateway
- Go to the API Gateway created in step “1”.
- Go to “Authorizers” section and click “Create New Authorizer”.
- Enter a “Name”, select “Type” as “Lambda”, select the Lambda function that was created in step “2” as “Lamda Function”. For the field “Token Source” enter the name “jwt_token” as below. This will be the header name in which the token should be supplied. De-select “Authorization Caching” and click “Create” as below.
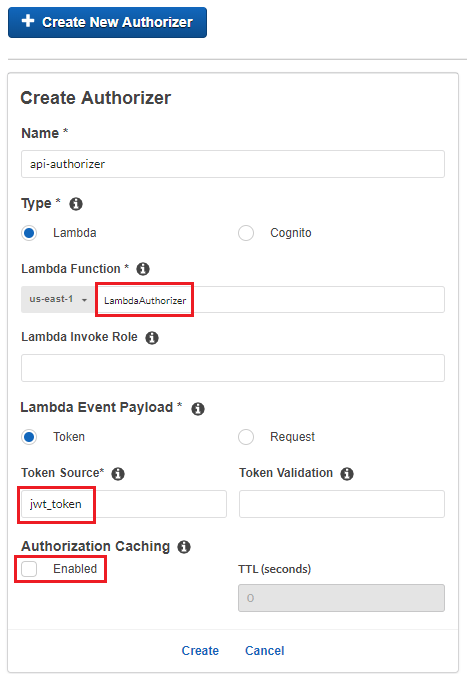
3. AWS will ask to grant permission for API Gateway to invoke the Lambda function. Click “Grant & Create”.
Now this Authorizer will be available to be used in API Gateway resources.
4. Creating The Target Lambda
- Go to Lambda service and click “Create function”.
- Select “Author from scratch”, enter a “Function name”, select “Python 3.6” as “Runtime” and click “Create function” as below.

5. Connecting The Target Lambda with API Gateway
- Go the API Gateway that was created in step “1” and go to “Resources”.
- Click “Actions” -> “Create Resource” and enter “Resource Name” as “sayhello” as displayed below. Click “Create Resource”.

3. Select the resource that was created in previous step and go to “Actions” -> “Create Method” and add a “Get” method as below.

4. In the Get method configuration page that appear next, enter the name of the Lambda that was created in step “4” as below and click “Save”.

5. AWS will ask to grant permission for API Gateway to invoke the Lambda function. Click “OK”.
Now the target Lambda that was created in step “4” is now connected with this “sayhello” API endpoint.
Whenever you have made changes in API Gateway, for them to get applied in the environment, it needs to be deployed. Although you can test locally from within the AWS Gateway console without deploying.
6. Deploying The API
- Select “Actions” -> “Deploy API”.
- Create a new deployment stage as below and click “Deploy”.

7. Invoking The Target Lambda Without The Authorizer
Before securing our API Gateway endpoint, let’s make sure we can call them without any authorization.
- Go to the deployment stage that was created in previous step and copy the invoke URL as displayed below. This is our API Gateway endpoint.
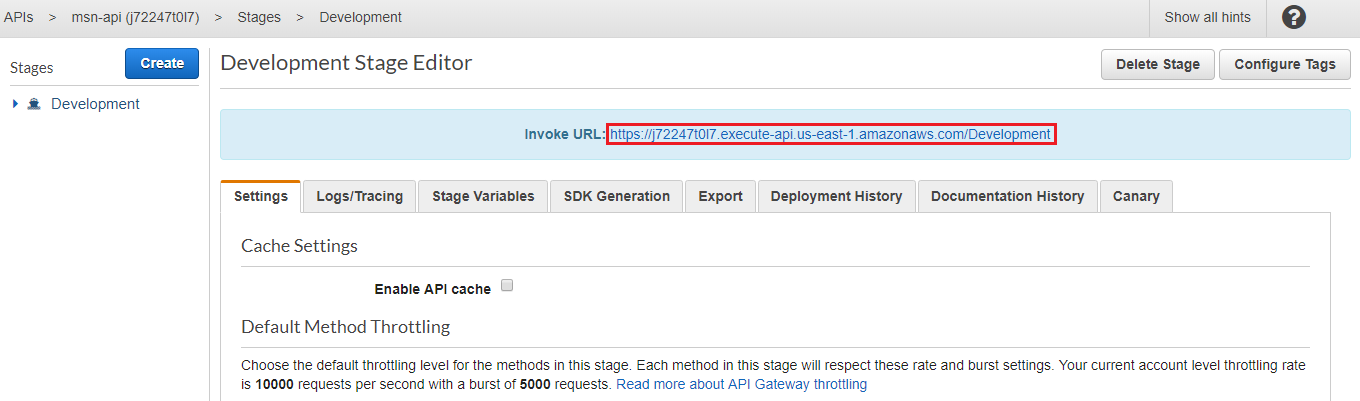
2. Append the “Resource Name” that was created in step “5.2” which was “/sayhello” and call the complete URL in the browser. The result should be returned from the target Lambda as below.

Let’s add authorization and secure our endpoint.
8. Adding An Authorizer to The API Gateway Endpoint.
- Go to the “Get” method that was created in step “5.3” and select “Method Request” as displayed below.

2. In the next configuration page, select the “api-authorizer” Authorizer that was created in step “3” as below and apply changes.

3. For the changes to take affect, API needs to be redeployed.
9. Re-deploying The API
- Select “Actions” -> “Deploy API”.
- Select the “Deployment stage” that was created in step “6.2” and click “Deploy” as below.

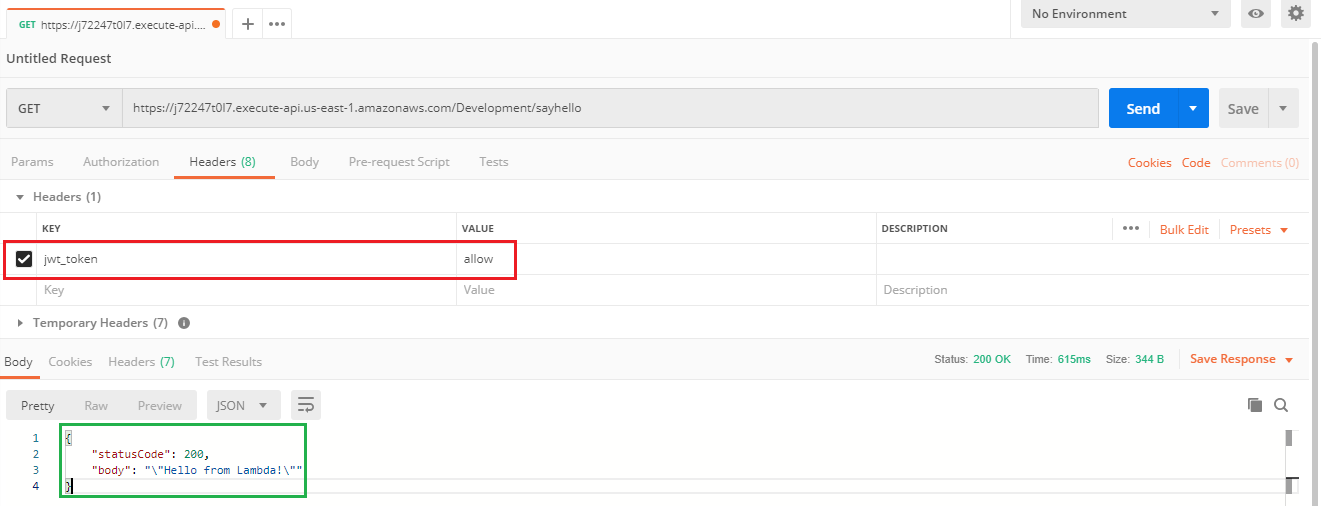
10. Invoking The Target Lambda With Authorizer
- Wait for a few seconds for changes to take affect and reload the URL that was invoked in step “7.2”. Now this endpoint needs the correct header with a valid token in order to get successfully invoked. It should give an error as below since there’s no “jwt_token” header given.

2. In order to pass the token header with the request, use an API testing tool. In this case “Postman” is used.
The header name in which the token should be passed is the “Token Source” that was specified in step “3.3”.
In our Lambda Authorizer, for the purposes of this demo and to keep things simple, the token is valid if the value is “allow”.
The Postman configuration to send this request is displayed below. Notice the header “jwt_token” and it’s value “allow”.
Reference
Amazon Cognito identity pools provide temporary AWS credentials for users who are guests
Comments