
Learning Redux with React JS
Getting Started with React and Redux

Redux is a predictable state container for JavaScript apps.
It helps you write applications that behave consistently, run in different environments (client, server, and native), and are easy to test. On top of that, it provides a great developer experience, such as live code editing combined with a time traveling debugger.
You can use Redux together with React, or with any other view library. It is tiny (2kB, including dependencies), but has a large ecosystem of addons available.
What is Redux?
Redux is a state container for JavaScript apps. It is most commonly paired with React, where it takes control of state away from React components and gives it to a centralised place called a ‘store’.
Consider the following diagram:
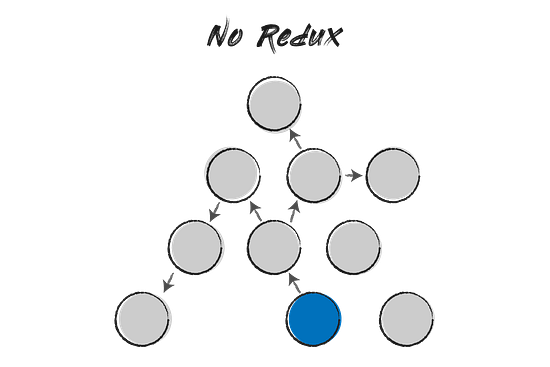

The left diagram represents a regular React app without Redux. Each circle represents a component.
When a component initiates a change (the blue circle), this change is communicated to the other components one step at a time. This may seem simple enough when we only have 10 components, but what about an app with 20, 50 or 100 components? As an app becomes larger, debugging can quickly become tricky, as we lose sight of how information is passed from one component to another.
On the right is the same React app with Redux. This time, when a component initiates a change, that information goes straight from it (the blue circle) to our store (the green circle). From there, the change is then communicated directly to all the components that need to update.
Redux, therefore, makes it much easier to diagnose problems: a problem will either be in the component that initiated the change (the blue circle) or in the code related to Redux itself.
Redux Flow
Before jumping into the code, it’s useful to think about how Redux is working conceptually. The diagram below demonstrates the essential steps to Redux’s process:
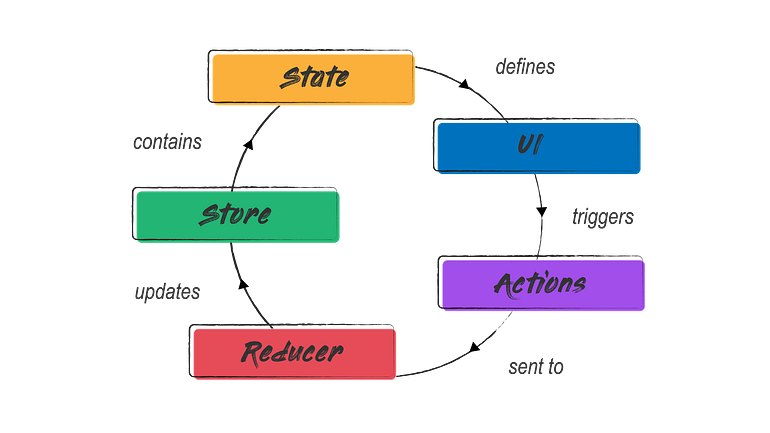
Step 1: UI (User Interface)
This is where a change is triggered. For example, a user clicking a ‘+’ button in a simple counter app.
Step 2: Actions
The actual action we want to take place, for example, “add one”.
In Redux, actions are plain JavaScript objects, and they must have a type property (e.g. 'ADD_ONE' ).
Step 3: Reducer
These specify how the application’s state should change in response to each action. For example, our new state should be one integer higher than our old state. (It is reducers which give Redux its name — they share the same Latin root).
Step 4A: Store
The store brings everything together. It holds application state, and it is where you will find three critical methods:
 getState() — which allows access to the state object

 dispatch(action) — which allows state to be updated

 subscribe(listener) — which registers listeners, allowing code to trigger every time a change takes place
Step 4B: State
Finally, state is contained within the store. It is a concept you should be familiar with from React. In short, it is an object that represents the dynamic parts of the app: anything that may change on the client-side.
In our example of a counter app, the state object will contain whatever number our counter is on. This change is then communicated back to the UI, where it will appear to the user.
Additional Jargon
There are also a few more terms you’re likely to encounter when using Redux:
Boilerplate: sections of code that have to be included in many places with little or no alteration. One of the reasons Redux can seem tricky to beginners is because it contains more boilerplate than you’re likely used to for front-end development.
Payload: the conventional name used for the property that holds the actual data in a Redux action object. A payload isn’t necessary, but it’s fairly common to see actions defined like this:
    const ADD_USER = {
      type: "ADD_USER",
      payload: {name: "John Smith", age: 45},
    }
Middleware: in general, middleware glues together client-side and server-side code, allowing (back-end) developers to implement logic based upon the request made from the client. In Redux, middleware provides a way to interact with actions that have been dispatched to the store before they reach the store’s reducer.
File Structure
Finally, before diving into the code, we’ll take a quick look at file structure. The fact that Redux’s boilerplate code tends to span multiple files can be one of the most confusing parts for beginners. Redux is largely unopinionated, which means there are endless ways to structure a Redux app. One of the simplest options looks like this:

The image above shows the src folder, lightly adapted from src folder that comes with create-react-app . I’ve deleted any unnecessary files and added in three new files for Redux:
actions.js — for storing our app’s various actions and their definitions;
reducers.js — where we define the reducers for each action;
store.js — where we create our store and bring everything together.
In reality, few apps are likely to have file structures as simple as the one above. Below is a more scalable example.
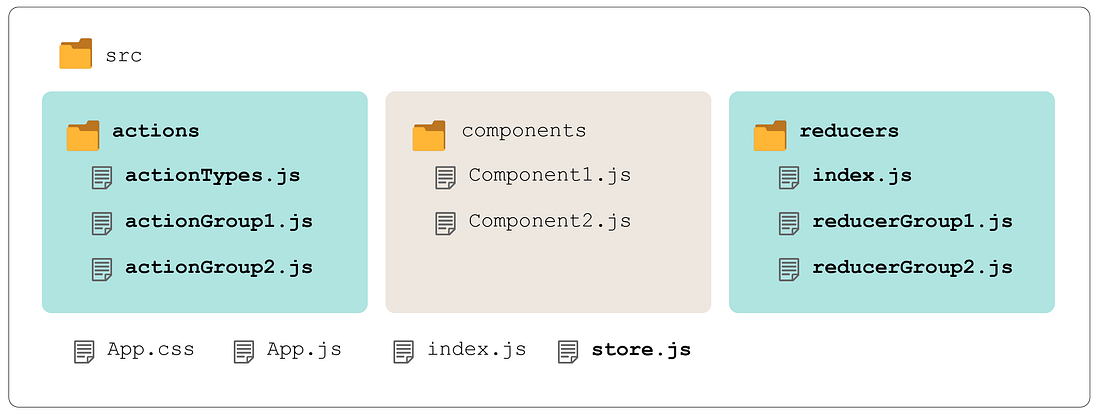
Let’s say our app had a series of actions related to filtering items in a shop: some based on budget and others based on product category. Instead of putting these together in a single file, we can keep our code cleaner by organising them in separate files for each group.
So, for example, our actions/actionGroup1.js would correspond to reducers in our reducers/reducerGroup1.js . Meanwhile, actions/actionTypes.js and reducers/index.js bring all the different action- or reducer-groups together.
In our sample app, we’ll follow the simpler format, but it’s worth bearing in mind how you could scale up for a larger project.
Coding a Simple Counter App with Redux
We’ll begin with a simple example. Ensure you have Node.js installed, then type the following into your terminal:
npx create-react-app redux-counterTo set up our (extremely basic) UI, create a file called src/Counter.js and paste in the following code:
    import React, { Component } from 'react';

    const containerStyle = {
      display: 'flex'
    }

    const buttonStyle = {
      fontSize: '1.5rem',
      width: '40px',
      height: '40px'
    }

    class Counter extends Component {
      render() {
        return (
          <div className="App" >
            <header className="App-header">
              <h1>0</h1>
              <div style={containerStyle}>
                <button type="button" style={buttonStyle}>-</button>
                <button type="button" style={buttonStyle}>+</button>
              </div>
            </header>
          </div>
        );
      }
    }

export default Counter;Next, let’s pass our counter into src/App.js :
import React from 'react';
import './App.css';
import Counter from './Counter';
function App () {
return (
<>
<Counter />
</>
);
}
export default App;When that’s done, you should see something like this:

Now, if we were using React’s component state to provide the counter’s functionality, we could make src/Counter.js look something like this:
    import React, { Component } from 'react';
    import './App.css';

    const containerStyle = {
      display: 'flex'
    }

    const buttonStyle = {
      fontSize: '1.5rem',
      width: '40px',
      height: '40px'
    }

    class Counter extends Component {

      state = {
        number: 0
      }

      addOne = () => {
        this.setState({
          number: this.state.number + 1
        });
      }

      minusOne = () => {
        this.setState({
          number: this.state.number - 1
        });
      }

    render() {
        return (
          <div className="App" >
            <header className="App-header">
              <h1>{this.state.number}</h1>
              <div style={containerStyle}>
                <button type="button" style={buttonStyle}>-</button>
                <button type="button" style={buttonStyle}>+</button>
              </div>
            </header>
          </div>
        );
      }
    }

    export default Counter;
The question is: how do we achieve the same functionality using Redux?
In the remainder of this article, we’ll look at one way of doing it. This is, of course, a simple example, and so all the code could go into a single file. However, to help distinguish the different parts of Redux, I’ll separate the main functionalities into different files corresponding to their steps in the ‘Redux flow’ above.
actions.js
We’ll start by defining our actions. An action can be an object or, as in our case, a simple string. We need one action to increment our counter, and one action to decrement it, so create a file called actions.js and add the following:
    export const ADD_ONE = 'ADD_ONE';
    export const MINUS_ONE = 'MINUS_ONE';
Simple!
reducers.js
Next, we need to specify how the application’s state should change in response to each action.
This is where we can record our initial state, which is an object just like what you’d expect in a regular React state. Create a file called reducers.js and add in the following:
    const initialState = {
      number: 1
    };
Next, we need to create our reducer function. This takes two arguments:
a state;
an action, which defines how we go about changing state.
It’s common to pass in our initial state as the default argument, and this is also where we import our actions. The final code for reducers.js should look like this:
    import { ADD_ONE, MINUS_ONE } from './actions';

    const initialState = {
      number: 0
    };

    function reducer(state = initialState, action) {
    switch(action.type) {

      case ADD_ONE:
        return {
          number: state.number + 1
        };

      case MINUS_ONE:
        return {
          number: state.number - 1
        };

      default:
        return state;
      }
    }

    export default reducer;
Note that it’s common to use switch statements to distinguish action types here, but regular if and else statements will work fine too.
store.js
Up til now, we haven’t needed to install the redux and react-redux dependencies, but we’ll need them to set up our store. Type the following into your terminal:
npm i redux react-reduxWhen that’s done, we’ll need to import the createStore function from 'redux' and pass in our reducer, like so:
    import { createStore } from 'redux';
    import reducer from './reducers';

    const store = createStore(reducer);

    export default store;
App.js
Now that we’ve exported our store we need to import it into App.js , by passing it into React-Redux’s Provider component:
    import React from 'react';
    import { Provider } from 'react-redux';

    import Counter from './Counter';
    import store from './store';
    import './App.css';

    function App () {
      return (
        <Provider store={store}>
          <Counter />
        </Provider>
      );
    }

    export default App;
This means that any child of the Provider component can access our store and, therefore, our actions and reducers.
Counter.js
Finally, we need to connect our Counter component to our store, which we can do by importing connect (which is a higher order function) from the react-redux module:
import { connect } from 'react-redux';We should also create a helper function mapStateToProps, which will allow us to access number from our Redux state as a prop inside our component.
    const mapStateToProps = (state) => {
      return {
        number: state.number
      };
    }
At the bottom of Counter.js , we need to wrap our component in the connect function, passing in mapStateToProps . You should be used to this syntax if you’ve worked with higher order functions before:
export default connect(mapStateToProps)(Counter);The connect function must be used to export any component that needs to access to change Redux state.
Lastly, we can use the dispatch prop (by calling this.props.dispatch) to link each method of our component with an action:
    addOne = () => {
      this.props.dispatch({ type: 'ADD_ONE' });
    }

    minusOne = () => {
      this.props.dispatch({ type: 'MINUS_ONE' });
    }
And that’s everything. The overall code in Counter.js should look something like this:
import React, { Component } from 'react';
import { connect } from 'react-redux';

const containerStyle = {
  display: 'flex'
}
const buttonStyle = {
  fontSize: '1.5rem',
  width: '40px',
  height: '40px'
}

class Counter extends Component {

  addOne = () => {
    this.props.dispatch({ type: 'ADD_ONE' });
  }

  minusOne = () => {
    this.props.dispatch({ type: 'MINUS_ONE' });
  }

  render() {
    return (
      <div className="App" >
        <header className="App-header">
          <h1>{this.props.number}</h1>
          <div style={containerStyle}>
            <button onClick={this.minusOne} type="button" style={buttonStyle}>-</button>
            <button onClick={this.addOne} type="button" style={buttonStyle}>+</button>
          </div>
        </header>
      </div>
    );
  }
}

const mapStateToProps = (state) => {
  return {
    number: state.number
  };
}

export default connect(mapStateToProps)(Counter);
If you’ve done everything correctly, your counter should now be working!
Adding Redux DevTools
A final useful step to working with Redux is to install and initiate Redux’s own development tools.
If you’re using Chrome, you can enable Redux DevTools by following the link below: Redux DevTools Redux DevTools for debugging application's state changes.chrome.google.com
But there’s one more step to getting it to work. In our createStore method, we need to pass the following as an argument after our reducer: window.REDUX_DEVTOOLS_EXTENSION && window.REDUX_DEVTOOLS_EXTENSION()() .
With that addition, store.js should look like this:
    import { createStore } from 'redux';
    import reducer from './reducers';

    const store = createStore(reducer, window.__REDUX_DEVTOOLS_EXTENSION__ && window.__REDUX_DEVTOOLS_EXTENSION__());

    export default store;
We’ll now be able to access Redux DevTools from Chrome’s DevTools panel (by pressing CTRL/CMD + Shift + I) and selecting Redux.
Link - Link - https://www.youtube.com/watch?list=PLIGDNOJWiL18X8gaUi-PQYaOSHc9OAtIN&v=aS4fLCOMg1o&feature=emb_title
https://github.com/tkssharma/redux-training-2020
Thanks for reading and happy coding!
Comments