
Progressive web apps (PWAs) came in the limelight recently. It uses the best of web and the best of apps to give a smooth experience to users and feels like a native app. PWAs are responsive and fast, consume less data, need less storage space, support push notifications and offline use in the browser. Twitter recently launched mobile.twitter.com which delivers a mobile app like experience to users in the browser without actually installing on the user device. This article focuses upon building a progressive web app with React JSWe’re going to build a simple PWA in this article. You can use this code as boilerplate for further PWA developments.
Getting Started with PWA
First, let’s generate a React application with create-react-app. You can run the following commands to generate the React app.
npm install -g create-react-app

create-react-app pwa-app
Next, we will install the React Router:
cd pwa-app

npm install --save react-router@3.0.5
Now replace your src/App.js content with below gist. It will give us a basic template with navigation.
import React, { Component } from 'react';
import { Router, browserHistory, Route, Link } from 'react-router';
import './App.css';

const NavBar = () => (
  <div className="navbar">
    <Link to="/">Feed</Link>
    <Link to="/profile">Profile</Link>
  </div>
);

const Template = ({ title }) => (
  <div>
    <NavBar />
    <p className="page-info">
      This is the {title} page.
    </p>
  </div>
);

const Feed = (props) => (
  <Template title="Feed"/>
);

const Profile = (props) => (
  <Template title="Profile"/>
);

class App extends Component {
  render() {
    return (
      <Router history={browserHistory}>
        <Route path="/" component={Feed}/>
        <Route path="/profile" component={Profile}/>
      </Router>
    );
  }
}

export default App;
Next we need to update the default styles a bit to make our app look clean. Replace your src/App.css with below styles.
.navbar {
  background-color: #01C8E5;
  text-align: center;
}

.navbar a {
  display: inline-block;
  padding: 10px;
  color: #fff;
  text-decoration: none;
}

.page-info {
  text-align: center;
  font-weight: bold;
}
Finally run npm start to check the app in the browser. Now this is a basic app with 2 routes. We will now convert it to PWA.
Install Lighthouse and Audit
Lighthouse is an open-source, automated tool which helps us to test our app against PWA checklist. It also provides audits for performance, accessibility, and more. You can download and install in your chrome browser by following this link.
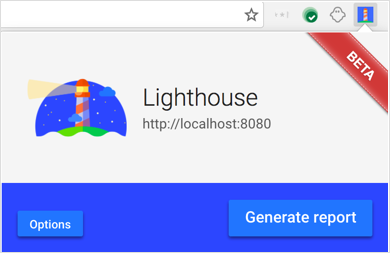
Next let’s test our app using Lighthouse. Click on Lighthouse icon in the top right corner of Chrome and then click on Generate Report button. This is how the generated report looks like –
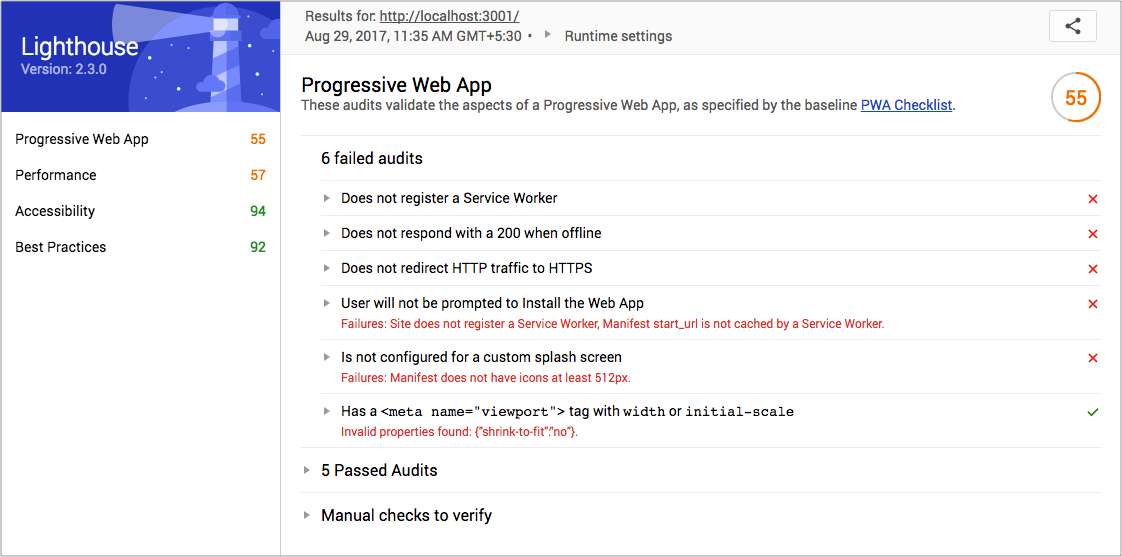
We will fix all 6 failed audit next.
Register a Service Worker
Services worker act as proxy servers that sit between app and network. Using this we will intercept network requests and serve cached files. It will allow our web app to work even if network is offline.
First create a blank worker.js file in public folder of the app and add this block of code in that file.
// Flag for enabling cache in production
var doCache = false;

var CACHE_NAME = 'pwa-app-cache';

// Delete old caches
self.addEventListener('activate', event => {
  const currentCachelist = [CACHE_NAME];
  event.waitUntil(
    caches.keys()
      .then(keyList =>
        Promise.all(keyList.map(key => {
          if (!currentCachelist.includes(key)) {
            return caches.delete(key);
          }
        }))
      )
  );
});

// This triggers when user starts the app
self.addEventListener('install', function(event) {
  if (doCache) {
    event.waitUntil(
      caches.open(CACHE_NAME)
        .then(function(cache) {
          fetch('asset-manifest.json')
            .then(response => {
              response.json();
            })
            .then(assets => {
              // We will cache initial page and the main.js
              // We could also cache assets like CSS and images
              const urlsToCache = [
                '/',
                assets['main.js']
              ];
              cache.addAll(urlsToCache);
            })
        })
    );
  }
});

// Here we intercept request and serve up the matching files
self.addEventListener('fetch', function(event) {
  if (doCache) {
    event.respondWith(
      caches.match(event.request).then(function(response) {
        return response || fetch(event.request);
      })
    );
  }
});
We will check whether the browser supports service workers, and then register our worker.js. To do so add the below script to public/index.html. (Notice that we have removed “shrink-to-fit=no” from viewport meta tag.)
<!doctype html>
<html lang="en">
<head>
<meta charset="utf-8">
<meta name="viewport" content="width=device-width, initial-scale=1">
<meta name="theme-color" content="#000000">
<link rel="manifest" href="%PUBLIC_URL%/manifest.json">
<link rel="shortcut icon" href="%PUBLIC_URL%/favicon.ico">
<title>React App</title>
</head>
<body>
<noscript>
You need to enable JavaScript to run this app.
</noscript>
<div id="root"></div>
<script>
if ('serviceWorker' in navigator) {
window.addEventListener('load', function() {
navigator.serviceWorker.register('worker.js').then(function(registration) {
console.log('Worker registration successful', registration.scope);
}, function(err) {
console.log('Worker registration failed', err);
}).catch(function(err) {
console.log(err);
});
});
} else {
console.log('Service Worker is not supported by browser.');
}
</script>
</body>
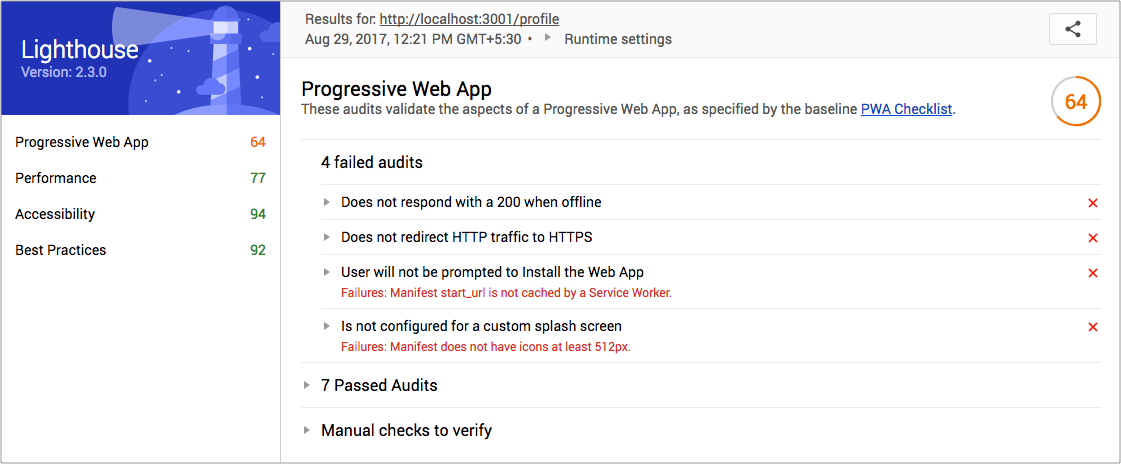
</html>Restart you app and reload the browser. You will see “Worker registration successful” message in developer console. Now let’s re-generate the Lighthouse report.
Improve Progressive Nature of the app
Currently, our app renders empty root div till the JavaScript loads and React hooks up the initial route. We need make sure our app works without any JavaScript loading and displays some HTMl and CSS before React comes into the play. Here’s how our updated index.html looks like.
<!doctype html>
<html lang="en">
  <head>
    <meta charset="utf-8">
    <meta name="viewport" content="width=device-width, initial-scale=1">
    <meta name="theme-color" content="#000000">
    <link rel="manifest" href="%PUBLIC_URL%/manifest.json">
    <link rel="shortcut icon" href="%PUBLIC_URL%/favicon.ico">
    <title>React App</title>
    <style type="text/css">
      body {
        margin: 0;
        padding: 0;
        font-family: sans-serif;
      }
      .navbar {
        background-color: #01C8E5;
        text-align: center;
      }
      .navbar a {
        display: inline-block;
        padding: 10px;
        color: #fff;
        text-decoration: none;
      }
      .page-info {
        text-align: center;
        font-weight: bold;
      }
    </style>
  </head>
  <body>
    <noscript>
      You need to enable JavaScript to run this app.
    </noscript>
    <div id="root">
      <div class="navbar">
        <a href="/">Feed</a>
      </div>
      <p class="page-info">
        Loading an awesome app...
      </p>
    </div>
    <script>
      if ('serviceWorker' in navigator) {
        window.addEventListener('load', function() {
          navigator.serviceWorker.register('worker.js').then(function(registration) {
            console.log('Worker registration successful', registration.scope);
          }, function(err) {
            console.log('Worker registration failed', err);
          }).catch(function(err) {
            console.log(err);
          });
        });
      } else {
        console.log('Service Worker is not supported by browser.');
      }
    </script>
  </body>
</html>
Re-audit the app using Lighthouse and you will see the performance is improved;
Add Splash Icons
We need to add a 512×512 icon to show up on splash screen. For doing so we need to update the manifest.json and put the icon in public folder.
{
  "short_name": "React App",
  "name": "Create React App Sample",
  "icons": [
    {
      "src": "icon-192x192.png",
      "sizes": "192x192",
      "type": "image/png"
    },
    {
      "src": "icon-512x512.png",
      "sizes": "512x512",
      "type": "image/png"
    }
  ],
  "start_url": "/",
  "display": "standalone",
  "theme_color": "#000000",
  "background_color": "#ffffff"
}
We also need to add these meta tags to inform the browser that our app is a PWA.
<!-- Tell the browser it's a PWA -->
<meta name="mobile-web-app-capable" content="yes">
<!-- Tell iOS it's a PWA -->
<meta name="apple-mobile-web-app-capable" content="yes">
Another Way using sw-precache Module -Part-2
npm install --save sw-precachesw-precache *Generates a service worker to cache your local App Shell resources.*www.npmjs.com
It’s a short way to get PWA using React in create-react-app
We have to sw-precache-config.js in the root of our real application
module.exports = {
  stripPrefix: 'build/',
  staticFileGlobs: [
    'build/*.html',
    'build/manifest.json',
    'build/static/**/!(*map*)'
  ],
  dontCacheBustUrlsMatching: /\.\w{8}\./,
  swFilePath: 'build/service-worker.js'
};
Next, Modify our NPM scripts
{
  "name": "intro",
  "version": "0.1.0",
  "private": true,
  "dependencies": {
    "react": "^16.2.0",
    "react-dom": "^16.2.0",
    "react-router-dom": "^4.2.2",
    "react-scripts": "1.0.17",
    "sw-precache": "^5.2.1"
  },
  "scripts": {
    "start": "react-scripts start  && sw-precache --config=sw-precache-config.js",
    "build": "react-scripts build  && sw-precache --config=sw-precache-config.js",
    "test": "react-scripts test --env=jsdom",
    "eject": "react-scripts eject"
  }
}
This script sw-precache — config=sw-precache-config.js will create service-worker in the build folder and it looks like this
Finally, we have to Register this generate service worker in our code, there is a simple way to register a service worker, to keep service worker clean and updated I am always de-registering an existing service worker
import React from 'react';
import ReactDOM from 'react-dom';
import App from './App';

ReactDOM.render(<App />, document.getElementById('root'));

if (window.navigator && navigator.serviceWorker) {
  navigator.serviceWorker.getRegistrations()
    .then(function (registrations) {
      const promise = [];
      for (let registration of registrations) {
        promise.push(registration.unregister());
      }
      return Promise.all(promise);
    }).then((data) => {
        navigator.serviceWorker.register('service-worker.js').then(function (registration) {
          // Registration Success
          console.log(registration);
          console.log('[serviceWorker]: registration successful with scope: ', registration.scope + 'for env ' + process.env.PUBLIC_URL);
        }).catch(function (err) {
          // Registration failed :(
          console.log('[serviceWorker] registration failed', err);
        });
    })
}
Also, add manifest.json
{
  "author": " Application",
  "background_color": "#3367D6",
  "description": "app",
  "display": "fullscreen",
  "icons": [
    {
      "src": "favicon.ico",
      "sizes": "64x64 32x32 24x24 16x16",
      "type": "image/x-icon"
    }
  ],
  "lang": "en-US",
  "name": "App",
  "orientation": "portrait",
  "scope": "./",
  "short_name": "App",
  "start_url": "index.html",
  "theme_color": "#0099ff",
  "version": "0.1"
}
Create the manifest
A complete manifest.json file for a progressive web app.
{
  "short_name": "Maps",
  "name": "Google Maps",
  "icons": [
    {
      "src": "/images/icons-192.png",
      "type": "image/png",
      "sizes": "192x192"
    },
    {
      "src": "/images/icons-512.png",
      "type": "image/png",
      "sizes": "512x512"
    }
  ],
  "start_url": "/maps/?source=pwa",
  "background_color": "#3367D6",
  "display": "standalone",
  "scope": "/maps/",
  "theme_color": "#3367D6"
}
what is this manifest file?
When you have created the manifest, add a link tag to all the pages that encompass your web app:
<link rel="manifest" href="/manifest.json">The request for the manifest is made without any credentials (even if it’s on the same domain), thus if the manifest requires credentials, you must include crossorigin="use-credentials" in the manifest tag.
short_name and/or name
You must provide at least the short_name or name property. If both are provided, short_name is used on the user's home screen, launcher, or other places where space may be limited. name is used in the app install prompt.
"short_name": "Maps",
"name": "Google Maps"
icons
When a user adds your site to their home screen, you can define a set of icons for the browser to use. These icons are used in places like the home screen, app launcher, task switcher, splash screen, etc.
icons is an array of image objects. Each object should include the src, a sizes property, and the type of image.
"icons": [
  {
    "src": "/images/icons-192.png",
    "type": "image/png",
    "sizes": "192x192"
  },
  {
    "src": "/images/icons-512.png",
    "type": "image/png",
    "sizes": "512x512"
  }
]
Success: include a 192x192 pixel icon and a 512x512 pixel icon. Chrome will automatically scale the icon for the device. If you’d prefer to scale your own icons and adjust them for pixel-perfection, provide icons in increments of 48dp.
start_url
The start_url tells the browser where your application should start when it is launched, and prevents the app from starting on whatever page the user was on when they added your app to their home screen.
Your start_url should direct the user straight into your app, rather than a product landing page. Think about what the user will want to do once they open your app, and place them there.
"start_url": "/?utm_source=a2hs"Success: add a query string to the end of the start_url to track how often your installed app is launched.
background_color
The background_color property is used on the splash screen when the application is first launched.
display
You can customize what browser UI is shown when your app is launched. For example, you can hide the address bar and browser chrome. Or games may want to go completely full screen.
"display": "standalone"ParametersvalueDescriptionfullscreenOpens the web application without any browser UI and takes up the entirety of the available display area.standaloneOpens the web app to look and feel like a standalone native app. The app runs in its own window, separate from the browser, and hides standard browser UI elements like the URL bar, etc.minimal-uiThis mode is similar to fullscreen, but provides the user with some means to access a minimal set of UI elements for controlling navigation (i.e., back, forward, reload, etc). Note: Only supported by Chrome on mobile.browserA standard browser experience.
Success: In order to show the Add to Home Screen Prompt, display must be set to standalone.
orientation
You can enforce a specific orientation, which is advantageous for apps that work in only one orientation, such as games. Use this selectively. Users prefer selecting the orientation.
"orientation": "landscape"scope
The scope defines the set of URLs that the browser considers to be within your app, and is used to decide when the user has left the app. The scope controls the URL structure that encompasses all the entry and exit points in your web app. Your start_url must reside within the scope.
"scope": "/maps/"Caution: If the user clicks a link in your app that navigates outside of the scope, the link will open and render within the existing the PWA window. If you want the link to open in a browser tab, you must add target="_blank" to the tag. On Android, links with target="_blank" will open in a Chrome Custom Tab.
A few other tips:
-
If you don’t include a scope in your manifest, then the default implied scope is the directory that your web app manifest is served from.
-
The scope attribute can be a relative path (../), or any higher level path (/) which would allow for an increase in coverage of navigations in your web app.
-
The start_url must be in the scope.
-
The start_url is relative to the path defined in the scope attribute.
-
A start_url starting with / will always be the root of the origin.
theme_color
The theme_color sets the color of the tool bar, and may be reflected in the app's preview in task switchers.
"theme_color": "#3367D6"Success: the theme_color should match the meta theme color specified in your document head.
Learn more about theming in this video.
Splash screens
When your app first launches, it can take a moment for the browser to spin up, and the initial content to begin rendering. Instead of showing a white screen that may look to the user like the app is stall, Chrome will show a splash screen, until the first paint.
Chrome will automatically create the splash screen from the manifest properties, including:
-
name
-
background_color
-
icons
The background_color should be the same color as the load page, to provide a smooth transition from the splash screen to your app.
Icons used for the splash screen
Chrome will choose the icon that closely matches the 128dp icon for that device. 128dp is the ideal size for the image on the splash screen, and means no scaling will be applied to the image.
Again, providing a 192px and a 512px icon will be sufficient for most cases, but you can provide additional icons as necessary.
Test your manifest
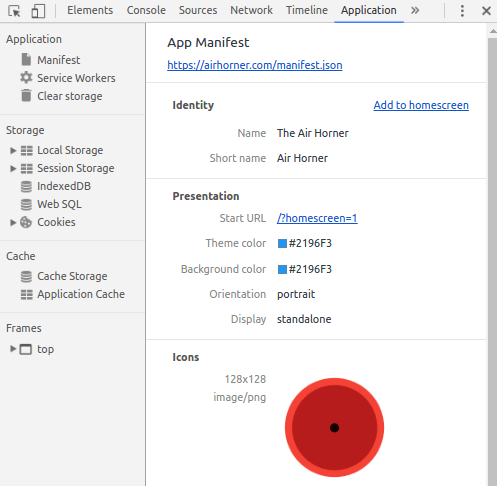
To manually verify your manifest is set up correctly, you can use the Manifest tab on the Application panel of Chrome DevTools.
This tab provides a human-readable version of many of your manifest’s properties. You can also simulate Add to Home Screen events from here. See Testing the app install banner for more on this topic.
If you want an automated approach towards validating your web app manifest, check out Lighthouse. Lighthouse is a web app auditing tool. It’s built into the Audits tab of Chrome DevTools, or can be run as an NPM module. You provide Lighthouse with a URL, it runs a suite of audits against that page and then displays the results in a report.
Add your manifest file in your index.html file and just run your application
<!DOCTYPE html>
<html lang="en">
  <head>
    <meta charset="utf-8" />
    <link rel="shortcut icon" href="%PUBLIC_URL%/favicon.ico" />
    <link rel="manifest" href="%PUBLIC_URL%/manifest.json" />
    <!--
      Notice the use of %PUBLIC_URL% in the tags above.
      It will be replaced with the URL of the `public` folder during the build.
      Only files inside the `public` folder can be referenced from the HTML.

      Unlike "/favicon.ico" or "favicon.ico", "%PUBLIC_URL%/favicon.ico" will
      work correctly both with client-side routing and a non-root public URL.
      Learn how to configure a non-root public URL by running `npm run build`.
    -->
    <title>VM DBA 2.0</title>
  </head>
  <body>
    <noscript>You need to enable JavaScript to run this app.</noscript>
    <div id="root"></div>
    <!--
      This HTML file is a template.
      If you open it directly in the browser, you will see an empty page.

      You can add webfonts, meta tags, or analytics to this file.
      The build step will place the bundled scripts into the <body> tag.

      To begin the development, run `npm start` or `yarn start`.
      To create a production bundle, use `npm run build` or `yarn build`.
    -->
  </body>

</html>
Comments