
Nest.js is a progressive Node.js Web Framework that provides you with a robust backend for your frontend applications. It is highly comparable to Angular in terms of concepts like Module, Provider, etc. and is a clear choice by Angular developers.
If you are interested, read more about Nest.js at:
In this section, I will create a full-stack application, using the Angular CLI, with the support of the Nest.js ng-universal library.
Basic Prerequisites
- Node.js v10.16.2
- Docker v19.03
- Code editor (Visual Studio Code, Sublime, etc.)
For this article, I've chosen to use the mysql database engine or "mysql". I will run an instance of mysql using a mysql Docker container, which I believe, is the cleanest, and easiest way to add a PostgreSQL database instance to your application.
Start by creating a new docker-compose.yml at the root of the Angular app and paste the following content inside it:
#  Run `docker-compose build` to build the images
#  Run `docker-compose up` to run the containers

version: '3.5'
services:
  db:
    image: mysql:5.7
    ports:
      - 3306:3306
    environment:
      MYSQL_ROOT_PASSWORD: root
      MYSQL_DATABASE: test
      MYSQL_USER: root
      MYSQL_PASSWORD: root
    volumes:
      - mysql_data:/var/lib/mysql
    networks:
      - core_service_network
  apis:
    command: npm run debug
    build: ./trainer-io-apis
    ports:
      - 3000:3000
      - 5858:5858
    volumes:
      - ./trainer-io-apis/docker/node/node-docker-entrypoint.sh:/usr/local/bin/docker-entrypoint.sh
      - ./trainer-io-apis:/app
    env_file:
      ./trainer-io-apis/.env
    depends_on:
      - db
    networks:
      - core_service_network
networks:
  core_service_network:
    driver: bridge
    name: core_service_network

volumes:
  mysql_data:
    name: global_mysql
  apis_modules:
    name: apis_modules
My docker file for apis in nestjs
FROM node:carbon
WORKDIR /app
We can configure entrypoint for image bootstrap while initilize
- trainer-io-apis/docker/node/node-docker-entrypoint.sh
#!/bin/sh
set -e

npm install
npm run build

if [ "${1#-}" != "${1}" ] || [ -z "$(command -v "${1}")" ]; then
  set -- node "$@"
fi

exec "$@"
This docker-compose file instructs Docker to create a new mysql & node js Docker container with the following settings:
- The container name is trainer-io-apis
- The Docker image mysql
- Create a new volume by mapping the physical folder named mysql_data to an internal folder inside the image. I will place an initialization script inside this folder so that Docker can run the first time it creates the mysql container.
- Finally, you expose the mysql instance to the host machine by mapping its internal port to a port used on the host machine 3306 is our port and also we are exposing node js container port which is 3000
As we are passing environments variables for mysql containers, it will create test database with defined user root so we don't need to manually create database and users
Add the following script under the script node inside the package.json file:
Finally, run the following command to start the container:
- docker-compose up &
- docker logs portals_apis_1 --tail 50 -f
This command will create the node js and mysql container in a detached mode. Now that the mysql database is up and running, let's move on and continue adding more features.
Add TypeORM module
TypeORM is an Object Relational Mapping (ORM) library written in JavaScript and is capable of connecting to a variety of database engines including PostgreSQL, MySQL, Maria DB, MongoDB and much more.
Nest.js fully supports this library and provides the @nestjs/typeorm package as a wrapper around the TypeORM library to effortlessly integrate with the Nest.js Dependency Injection System.
-
You can consult the Nest.js official documentation on Working with databases in Nest.js.
-
You can also read a more detailed explanation on TypeORM, how Nest/js integrates with this library and examples on using them together by checking my article on Nest.js Step by Step Guide - Databases.
To start using TypeORM in the Nest.js application, we need to install a few NPM packages. Run the command:
npm install @nestjs/typeorm typeorm mysql, mysql2
- The
@nestjs/typeormpackage represents the Nest.js wrapper over TypeORM. - The
typeormpackage is the official TypeORM library package. - The
mysql, mysql2package is the official connector library for mysql.
Let’s import the TypeOrmModule inside the server/app.module.ts as follows:
Next, create a new ormconfig.json file at the root of the Angular app, and paste the following content inside it:
{
  "type": "mysql",
  "host": "localhost",
  "port": 3306,
  "username": "typeormseed_user",
  "password": "password123",
  "database": "typeormseed",
  "entities": ["dist//*.entity.js"],
  "migrations": ["dist/server-app/migration//*.js"],
  "synchronize": false,
  "cli": {
    "entitiesDir": "server",
    "migrationsDir": "server/migration"
  }
}
At runtime, the TypeOrmModule class loads the configuration settings from the ormconfig.json file, and creates a TypeORM database connection to the mysql database instance.
That’s it!
Build the Blog API
Now that the full-stack application is up and running with an active connection to the database, it’s time to start building the Blog API.
This next section is a step by step on how to:
- Add a new module in Nest.js
- Add model objects
- Generate, and run migrations
- Create migrations, and seed data
- Add a Nest.js service
- Add a Nest.js controller to test the application.
Let’s get started.
Add Blog module
Nest.js framework offers the Nest.js CLI. This component is similar to Angular CLI, or other CLI. The goal of the CLI, is to increase productivity by enhancing the software development process, and make it easier on the developer to add new Nest.js artifacts to the application.
Install the Nest.js CLI globally on your machine by running:
npm install -g @nestjs/cli
Back to the application, change directory cd to the server folder, and run the following command to scaffold a Blog Nest.js module:
nest g module blog --no-spec
The command creates a new blog module under the path /server/src/blog. In addition, it also imports this module into the main app.module.ts file.
Add model objects
We will create the Blog and BlogPost entity objects. Run the following command to create the two classes together:
touch src/blog/post.entity.ts src/blog/comment.entity.ts
Paste this code inside the blog/post.entity.ts file:
import { Entity, PrimaryGeneratedColumn, Column, OneToMany } from 'typeorm';
import { Comment } from './comment.entity';

@Entity()
export class Post {
  @PrimaryGeneratedColumn()
  id: number;

  @Column('varchar')
  title: string;

  @Column('text')
  content: string;

  @Column({ type: 'varchar', nullable: true })
  tags: string;

  @Column({ name: 'created_at', default: () => `now()`, nullable: false })
  createdAt: Date;

  @Column({ name: 'updated_at', default: () => 'now()', nullable: false })
  updateTime: Date;

  @OneToMany(type => Comment, comment => comment.post, {
    primary: true,
    cascade: ['insert']
  })
  comments: Comment[];
}
The file defines the post entity to use to create a new post in the blog engine. It defines a one-to-many relation with the comment entity.
Paste the following inside the blog/comment.entity.ts file:
import { Entity, PrimaryGeneratedColumn, Column, ManyToOne } from 'typeorm';
import { Post } from './post.entity';

@Entity()
export class Comment {
  @PrimaryGeneratedColumn()
  id: number;

  @Column('text')
  content: string;

  @Column({ type: 'varchar', nullable: false })
  author: string;

  @Column({ type: 'varchar', nullable: false })
  email: string;

  @Column({ name: 'created_at', default: () => `now()`, nullable: false })
  createdAt: Date;

  @ManyToOne(type => Post, post => post.comments, {
    primary: true,
    cascade: ['insert']
  })
  post: Post;
}
The comment entity represents a single comment on a blog post. It defines a many-to-one relation with the post entity.
As a final step, let’s configure the TypeOrmModule with these entities at the level of the blog.module.ts file as follows:
@Module({
  imports: [TypeOrmModule.forFeature([Post, Comment])]
})
export class BlogModule {}
The TypeOrmModule will be able to generate custom repository classes for those entities, and make them available via the Nest.js Dependency Injection System as you will see shortly.
Generate, and run a migration
Now that the entities are ready, let’s generate a new migration with TypeORM.
A TypeORM single migration has two functions, up() and down(), that hold the code for a migration. The up() function runs when running a migration against the database, and usually contains code to create, or alter stuff, in the database. While the down() function runs when undoing a migration.
import { MigrationInterface, QueryRunner } from 'typeorm';

export class INITIALDB1566761690370 implements MigrationInterface {
  public async up(queryRunner: QueryRunner): Promise<any> {}
  public async down(queryRunner: QueryRunner): Promise<any> {}
}
Start by building, and compiling the application, by running the following command:
npx tsc -p server/tsconfig.json
npm run serve
Run the next command to create our first migration. Make sure the mysql container is up and running.
npx typeorm migration:generate --name=INITIAL_DB
This command uses the TypeORM CLI to generate a new migration. It compares the state of the database with the entities it finds in the application, and generates the migration accordingly.
When you finish running this command, navigate to server/migration folder, and locate the new migration file there. It hosts the following migration content:
// 1566761690370-INITIAL_DB.ts

import { MigrationInterface, QueryRunner } from 'typeorm';

export class INITIALDB1566761690370 implements MigrationInterface {
  public async up(queryRunner: QueryRunner): Promise<any> {
    await queryRunner.query(
      `CREATE TABLE "post" ("id" SERIAL NOT NULL, "title" character varying NOT NULL, "content" text NOT NULL, "tags" character varying, "created_at" TIMESTAMP NOT NULL DEFAULT now(), "updated_at" TIMESTAMP NOT NULL DEFAULT now(), CONSTRAINT "PK_be5fda3aac270b134ff9c21cdee" PRIMARY KEY ("id"))`
    );
    await queryRunner.query(
      `CREATE TABLE "comment" ("id" SERIAL NOT NULL, "content" text NOT NULL, "author" character varying NOT NULL, "email" character varying NOT NULL, "created_at" TIMESTAMP NOT NULL DEFAULT now(), "postId" integer NOT NULL, CONSTRAINT "PK_f685613ae59fda2ac1e490c9189" PRIMARY KEY ("id", "postId"))`
    );
    await queryRunner.query(
      `ALTER TABLE "comment" ADD CONSTRAINT "FK_94a85bb16d24033a2afdd5df060" FOREIGN KEY ("postId") REFERENCES "post"("id") ON DELETE NO ACTION ON UPDATE NO ACTION`
    );
  }

  public async down(queryRunner: QueryRunner): Promise<any> {
    await queryRunner.query(
      `ALTER TABLE "comment" DROP CONSTRAINT "FK_94a85bb16d24033a2afdd5df060"`
    );
    await queryRunner.query(`DROP TABLE "comment"`);
    await queryRunner.query(`DROP TABLE "post"`);
  }
}
The up() function shows the SQL code to create the two tables post, and comment. Also, it shows the code that alters the comment table to add a Foreign Key to the post Primary Key.
Once again, run the following command to build and compile the application:
npm run serve
Let's run the migration and create the corresponding tables in the database. Issue the following command:
npx typeorm migration:run
The command collects all the migrations that haven't been applied before on the database, and executes their up() function. In this case, we only have one migration to run.
The command creates the two tables and configures the relation between them.
To verify the migration, run:
npx typeorm query "SELECT * FROM post"
The result is the following:
Lets understand typeORM Migration First
Migrations
How migrations work
Once you get into production you'll need to synchronize model changes into the database.
Typically it is unsafe to use synchronize: true for schema synchronization on production once
you get data in your database. Here is where migrations come to help.
A migration is just a single file with sql queries to update a database schema and apply new changes to an existing database.
Let's say you already have a database and a post entity:
import { Entity, Column, PrimaryGeneratedColumn } from 'typeorm';

@Entity()
export class Post {

    @PrimaryGeneratedColumn()
    id: number;

    @Column()
    title: string;

    @Column()
    text: string;

}
And your entity worked in production for months without any changes. You have thousands of posts in your database.
Now you need to make a new release and rename title to name.
What would you do?
You need to create a new migration with the following sql query (postgres dialect):
ALTER TABLE "post" ALTER COLUMN "title" RENAME TO "name";Once you run this sql query your database schema is ready to work with your new codebase. TypeORM provides a place where you can write such sql queries and run them when needed. This place is called "migrations".
Creating a new migration
Pre-requisites: Installing CLI
Before creating a new migration you need to setup your connection options properly:
{
    "type": "mysql",
    "host": "localhost",
    "port": 3306,
    "username": "test",
    "password": "test",
    "database": "test",
    "entities": ["entity/*.js"],
    "migrationsTableName": "custom_migration_table",
    "migrations": ["migration/*.js"],
    "cli": {
        "migrationsDir": "migration"
    }
}
Here we setup three options:
"migrationsTableName": "migrations"- Specify this option only if you need migration table name to be different from"migrations"."migrations": ["migration/*.js"]- indicates that typeorm must load migrations from the given "migration" directory."cli": { "migrationsDir": "migration" }- indicates that the CLI must create new migrations in the "migration" directory.
Once you setup connection options you can create a new migration using CLI:
typeorm migration:create -n PostRefactoringHere, PostRefactoring is the name of the migration - you can specify any name you want.
After you run the command you can see a new file generated in the "migration" directory
named {TIMESTAMP}-PostRefactoring.ts where {TIMESTAMP} is the current timestamp when the migration was generated.
Now you can open the file and add your migration sql queries there.
You should see the following content inside your migration:
import {MigrationInterface, QueryRunner} from "typeorm";

export class PostRefactoringTIMESTAMP implements MigrationInterface {
    async up(queryRunner: QueryRunner): Promise<void> {
    }
    async down(queryRunner: QueryRunner): Promise<void> {
    }
}
There are two methods you must fill with your migration code: up and down.
up has to contain the code you need to perform the migration.
down has to revert whatever up changed.
down method is used to revert the last migration.
Inside both up and down you have a QueryRunner object.
All database operations are executed using this object.
Learn more about query runner.
Let's see what the migration looks like with our Post changes:
import {MigrationInterface, QueryRunner} from "typeorm";

export class PostRefactoringTIMESTAMP implements MigrationInterface {

    async up(queryRunner: QueryRunner): Promise<void> {
        await queryRunner.query(`ALTER TABLE "post" RENAME COLUMN "title" TO "name"`);
    }

    async down(queryRunner: QueryRunner): Promise<void> {
        await queryRunner.query(`ALTER TABLE "post" RENAME COLUMN "name" TO "title"`); // reverts things made in "up" method
    }
}
Running and reverting migrations
Once you have a migration to run on production, you can run them using a CLI command:
typeorm migration:runtypeorm migration:create and typeorm migration:generate will create .ts files. The migration:run and migration:revert commands only work on .js files. Thus the typescript files need to be compiled before running the commands. Alternatively you can use ts-node in conjunction with typeorm to run .ts migration files.
Example with ts-node:
ts-node ./node_modules/typeorm/cli.js migration:runThis command will execute all pending migrations and run them in a sequence ordered by their timestamps.
This means all sql queries written in the up methods of your created migrations will be executed.
That's all! Now you have your database schema up-to-date.
If for some reason you want to revert the changes, you can run:
typeorm migration:revertThis command will execute down in the latest executed migration.
If you need to revert multiple migrations you must call this command multiple times.
Generating migrations
TypeORM is able to automatically generate migration files with schema changes you made.
Let's say you have a Post entity with a title column, and you have changed the name title to name.
You can run following command:
typeorm migration:generate -n PostRefactoringAnd it will generate a new migration called {TIMESTAMP}-PostRefactoring.ts with the following content:
    "lint": "./node_modules/.bin/tslint --project ./tsconfig.json -e 'src/test/**/*.*'",
    "lint:fix": "./node_modules/.bin/tslint --project ./tsconfig.json -e 'src/test/**/*.*'  --fix",
    "typeorm": "ts-node ./node_modules/typeorm/cli.js",
    "dev": "ts-node-dev --respawn --transpileOnly src/index.ts",
    "typeorm:cli": "ts-node ./node_modules/typeorm/cli -f ./ormconfig.ts",
    "db:drop": "npm run typeorm:cli schema:drop",
    "migration:generate": "typeorm migration:create -n",
    "db:create": "ts-node src/scripts/create-database.ts",
    "db:revert": "npm run typeorm:cli migration:revert",
    "db:sync": "npm run typeorm:cli schema:sync",
    "db:migrate": "npm run typeorm:cli migration:run",
import {MigrationInterface, QueryRunner} from "typeorm";
export class PostRefactoringTIMESTAMP implements MigrationInterface {
async up(queryRunner: QueryRunner): Promise<void> {
await queryRunner.query(`ALTER TABLE "post" ALTER COLUMN "title" RENAME TO "name"`);
}
async down(queryRunner: QueryRunner): Promise<void> {
await queryRunner.query(`ALTER TABLE "post" ALTER COLUMN "name" RENAME TO "title"`);
}
}See, you don't need to write the queries on your own. The rule of thumb for generating migrations is that you generate them after "each" change you made to your models.
Running query: SELECT
Query has been executed. Result:
[]
The table is found but contains 0 records.
Seed data using migrations
So far you've seen how to generate a migration with TypeORM.
Now the plan is to use TypeORM to create a new empty migration. Then, we will fill this new migration with the code required to insert some static data. When the migration is ready, we will use the TypeORM CLI to run the migration against the database and seed the data into the tables.
This is how you would go about adding the seed data into the database using TypeORM.
Let's begin!
Run the command:
npx typeorm migration:create --name SEED_DATA
Replace the content of this file with the following:
import { MigrationInterface, QueryRunner, getRepository } from 'typeorm';
import { Post } from '../src/blog/post.entity';
import { Comment } from '../src/blog/comment.entity';

export class SEEDDATA1566763187470 implements MigrationInterface {
  public async up(queryRunner: QueryRunner): Promise<any> {
    // create a post
    const post = getRepository(Post).create({
      title: 'Seeding data to database with TypeORM',
      content:
        'In this post, I will walk you through a step by step guide on how to seed data to database.'
    });

    await getRepository(Post).save(post);

    // create a comment
    const comment1 = getRepository(Comment).create({
      content: 'Nice job!',
      author: 'Jim Jones',
      email: 'jim.jones@myemail.com',
      post
    });

    // create a comment
    const comment2 = getRepository(Comment).create({
      content: 'Informative blog post!',
      author: 'Bin Nadal',
      email: 'bin.nadal@myemail.com',
      post
    });

    await getRepository(Comment).save(comment1);
    await getRepository(Comment).save(comment2);
  }

  public async down(queryRunner: QueryRunner): Promise<any> {}
}
The code uses the getRepository(post) function to get access to a repository instance for the post entity. Then, it uses the repository create() function to create a new post object together with the comments on this post.
It then uses the repository save() function to save the changes to the database.
To verify the results, run the following command:
npx typeorm migration:run
npx typeorm query "SELECT * FROM post"
The query results in the following:
Running query: SELECT * FROM post
Query has been executed. Result:
[
  {
    "id": 1,
    "title": "Seeding data to database with TypeORM",
    "content": "In this post I will walk you through a step by step guide on how to seed data to database.",
    "tags": null,
    "created_at": "2019-08-25T17:39:11.917Z",
    "updated_at": "2019-08-25T17:39:11.917Z"
  }
]
There is a single post that exists in the database, and has an id = 1.
Let's also query for the comments by running the following command:
npx typeorm query "SELECT * FROM comment"
The query results in the following:
Running query: SELECT * FROM comment
Query has been executed. Result:
[
  {
    "id": 1,
    "content": "Nice job!",
    "author": "Jim Jones",
    "email": "jim.jones@myemail.com",
    "created_at": "2019-08-25T17:39:11.953Z",
    "postId": 1
  },
  {
    "id": 2,
    "content": "Informative blog post!",
    "author": "Bin Nadal",
    "email": "bin.nadal@myemail.com",
    "created_at": "2019-08-25T17:39:11.974Z",
    "postId": 1
  }
]
Both comment objects were created with the postId = 1. All is working great!
This method of seeding data to a database with TypeORM using a migration is the best option available for you in the time being to populate your database with data during the development life cycle of your application.
Add the Blog service
Let's create the Blog service, and define functions to query for posts, and comments.
Change directory cd server to the server directory, and run the following command:
nest generate service blog --no-spec
This command creates the blog.service.ts file inside the blog folder and also adds this service as a provider on the blog.module.ts. This last step makes the BlogService available via the Nest.js Dependency Injection System.
Replace the content of this service with the following code:
import { Injectable } from '@nestjs/common';
import { InjectRepository } from '@nestjs/typeorm';
import { Post } from './post.entity';
import { Repository } from 'typeorm';

@Injectable()
export class BlogService {
  constructor(
    @InjectRepository(Post)
    private repo: Repository<Post>
  ) {}

  async findAll(): Promise<Post[]> {
    return await this.repo.find({ relations: ['comments'] });
  }
}
The BlogService is decorated with @Injectable() decorator. This tells the framework that this service is expecting to receive dependencies through its constructor.
The service constructor injects a custom repository class for Post entity. The @nestjs/typeorm package is responsible for generating those custom repositories for all entities that we have already defined on the blog.module.ts by importing the TypeOrmModule.forFeature([Post, Comment]).
The service defines a single findAll() function that returns all posts stored in the database and eagerly loads their related comment objects too.
Add Controller
Now let's expose a Blog API Controller endpoint to allow client apps to request this data.
Change directory to the server folder cd server, and run the following command:
nest generate controller blog --no-spec
The command creates the BlogController class inside the blog/blog.controller.ts file, and also imports the controller into the controllers property of the blog.module.ts module. This last step makes the BlogController available via the Nest.js Dependency Injection System.
Replace the content of this controller with the following code:
import { Controller, Get, Req } from '@nestjs/common';
import { BlogService } from './blog.service';
import { Post } from './post.entity';

@Controller('blog')
export class BlogController {
  constructor(private readonly blogService: BlogService) {}

  @Get()
  async findAll(@Req() req: any): Promise<Post[]> {
    return await this.blogService.findAll();
  }
}
The BlogController class is decorated with the @Controller() decorator.
The constructor accepts a BlogService instance. The Nest.js Dependency Injection System creates, and provides, this controller a BlogService instance at run time.
This controller defines a single action designated by @Get() decorator to say that this action is accessed via a GET request. This action delegates the call to the BlogService to query for all post data in the database, and return them back in a response to the client request.
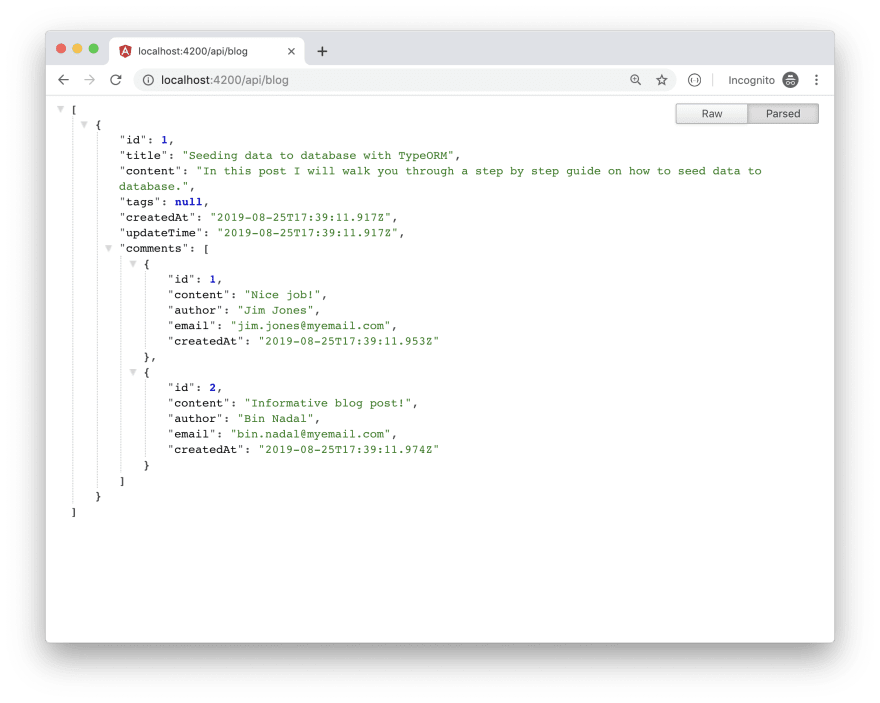
Let’s run the application and access this controller endpoint via the browser. Run the following command:
npm run serve
Navigate to the browser and type in the URL http://localhost:4200/api/blog and you shall see something similar to Figure 3 below:
Test with Postman
Let's test the BlogController using Postman this time.
With Postman, you can simulate a browser by sending HTTP requests, and receiving HTTP responses.
If you want to learn more about Postman, you can check my complete guide on Postman for busy developers.
Make sure the app is up and running, open Postman, and send a GET request to the URL http://localhost:4200/api/blog as shown in Figure 4 below:

Conclusion
At the beginning of every new project, you will be busy putting together the foundations of the application, building dummy interfaces to start showing the client, and getting some feedback. You won’t have enough time to build full services on the backend that provide all the CRUD (Create Read Update and Delete) operations right from the beginning to enable you to add data, and use it for testing purposes.
Using the TypeORM migrations to seed data into the database is a neat and quick workaround to get you started quickly. The added benefit of using these migrations is that they do not waste time on unnecessary activities in the early stages of the application.
Comments