
 NestJS logo
Nest (NestJS) is a framework for building efficient, scalable Node.js server-side applications. It uses progressive JavaScript, is built with and fully supports TypeScript (yet still enables developers to code in pure JavaScript) and combines elements of OOP (Object Oriented Programming), FP (Functional Programming), and FRP (Functional Reactive Programming).
Under the hood, Nest makes use of robust HTTP Server frameworks like Express (the default) and optionally can be configured to use Fastify as well!
Nest provides a level of abstraction above these common Node.js frameworks (Express/Fastify), but also exposes their APIs directly to the developer. This allows developers the freedom to use the myriad of third-party modules which are available for the underlying platform.
Philosophy#
In recent years, thanks to Node.js, JavaScript has become the “lingua franca” of the web for both front and backend applications. This has given rise to awesome projects like Angular, React and Vue, which improve developer productivity and enable the creation of fast, testable, and extensible frontend applications. However, while plenty of superb libraries, helpers, and tools exist for Node (and server-side JavaScript), none of them effectively solve the main problem of - Architecture.
Nest provides an out-of-the-box application architecture which allows developers and teams to create highly testable, scalable, loosely coupled, and easily maintainable applications. The architecture is heavily inspired by Angular.
Installation#
To get started, you can either scaffold the project with the Nest CLI, or clone a starter project (both will produce the same outcome).
To scaffold the project with the Nest CLI, run the following commands. This will create a new project directory, and populate the directory with the initial core Nest files and supporting modules, creating a conventional base structure for your project. Creating a new project with the Nest CLI is recommended for first-time users. We'll continue with this approach in First Steps.
$ npm i -g @nestjs/cli
$ nest new project-name
Alternatively, to install the TypeScript starter project with Git:
$ git clone https://github.com/nestjs/typescript-starter.git project
$ cd project
$ npm install
$ npm run start
Open your browser and navigate to http://localhost:3000/.
To install the JavaScript flavor of the starter project, use javascript-starter.git in the command sequence above.
You can also manually create a new project from scratch by installing the core and supporting files with npm (or yarn). In this case, of course, you'll be responsible for creating the project boilerplate files yourself.
$ npm i --save @nestjs/core @nestjs/common rxjs reflect-metadataWhy we need nestJS another fraemwork for Writing Apps
-
CLI: Angular offers us a CLI to easily get started with a new project. Even in .Net, I can create an app using the CLI. Though there are many generators available, a CLI with ExpressJS would have been a great addition.
-
Clean architecture: ExpressJS doesn’t come with any clean architecture defined, and, of course, it's not the purpose of ExpressJS — as you’re free to define your own architecture. But for an enterprise application, I prefer something that has a clean and well-defined architecture.
-
Code sharing: For a big enterprise application, we may need to share the code across multiple apps or even APIs. In other programming languages, this can be achieved using libraries. In ExpressJS, we can to create an npm module and make it available via Artifactory.
NestJS to the Rescue
NestJS is a framework that’s written on top of ExpressJS, and it’s written in TypeScript. Let’s see some advantages:
-
TypeScript support: NestJS supports TypeScript, which makes me really comfortable as I’ve been using TypeScript for a long time while working with Angular. You have the option to choose JavaScript as well.
-
Code sharing: NestJS supports creating libraries and applications using the CLI. It becomes really easy to share the code and becomes a great choice for enterprise applications.
-
monorepo support: Angular supports monorepo, and starting with Version 6, NestJS comes with monorepo support.
-
Learning path: Another thing I like about NestJS is if you’re coming from a .Net or Java background and have an idea about creating APIs, NestJS is easy to learn. Also, if you’re an Angular developer, you’ll feel at home since it follows the same modular pattern.
-
Fastify support: NestJS uses ExpressJS as the default framework, but it also has support for Fastify and can be easily configured.
Architecture
If I have to define the architecture of the API created using NestJS, this is how it looks like: We have a root module available, which will be used to configure database providers, to define the controller, to add middleware, to add the pipe and guards, and to provide services.
We can also have a module for each controller. We’ll see how to achieve that in upcoming pieces. Once our module receives a request, it’ll be redirected to the respective controller (which will handle the request). The service is optional, but we should try to use the service to follow the single responsibility principle (SRP).
Installation
Now, we have an idea of why we should use NestJS. Let’s see how to use it.
-
Before we can start using NestJS, we need to install the NestJS CLI. Run the following command to install the CLI globally:
npm install -g @nestjs/cli
-
You can also download the starter project from GitHub and use it.
Creating our First API
-
Once the CLI is installed, run the following command to create a new application called shoppingAPI. We’ll use the same API for our upcoming pieces.
nest new shoppingAPI
-
The CLI creates an app using Typescript as the default language. If you like JavaScript as the language, you can run the following command:
nest new shoppingAPI -l JS
Running and Testing the API
Once a new project is created, we can use the following command to run the application.
cd shopping-API
npm start
The app is configured to run on port 3000 by default. Once one controller is already defined, visit http://localhost:3000/, and you’ll get Hello World! as a response.
We have created our first app using NestJS with minimum configuration. In the next piece, we’ll go through the app structure and will configure our own controller to handle HTTP requests.
different mode of nestJS
Standard mode vs. monorepo mode
NestJS logo
In my previous article, we saw why and how to use NestJS, in this article, we will go through the NestJS workspace.
NestJS Workspace
NestJS supports two modes:
-
Standard mode
-
Monorepo mode
Standard mode
When we create a new application using nest new
Monorepo mode
A monorepo mode is where we have more than one application, generally, it's one app and one library, we already have app, let’s add a library by using the below command. It will add a new library project.
nest generate lib shoppingLibNow, as we are in monorepo mode, rather than tsc, webpack will be used as a build tool. You can open the nest-cli.json and notice the below lines of code being added. compilerOptions has webpack value to true.
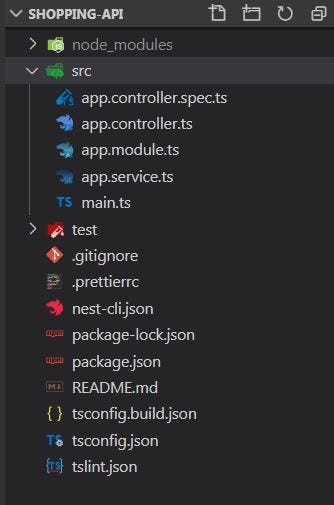
And after adding a library, the app structure will look like below:
 monorepo
Let’s go through some important files:
-
tsconfig.json: The configuration file to be used while running tsc to transpile your files.
-
nest-cli.json: The Nest CLI config file has a list of projects when we are in monorepo mode, and defines which build tool we are using webpack in monorepo and by default it’s tsc.
-
main.ts: This is the entry file for our NestJS application and has a bootstrap() function to bootstrap our app. By default, the server runs on port 3000, you can change it and while using it in production, we can use an environment variable.
-
app.module.ts: This is our root module which has registered all modules, controllers, services.
-
app.controller.ts: Our application should have at least one controller defined and this is our default controller.
-
app.service.ts: We can have multiple services in our application. This is a sample service added as a part of the workspace, this is optional.
-
Libraries: Libraries can have reusable code like service, pipes, guards, or interceptors.
Tool for a Full-Stack App With NestJS
If you are building a full-stack application with Angular/React.js and want to use NestJS as a back end, you should consider Nx Dev Tools which provides a lot of features.
Conclusion
Keep learning
Comments