
Check out my first Blog to get More idea about Kubernetes and its building block with Architecture, With all this, you will understand how you can orchestrate your application or Microservices using K8S
Kubernetes (also referred to as ‘k8s’) provides powerful abstractions that completely decouple application operations such as deployments and scaling from underlying infrastructure operations. So, with Kubernetes, you do not work with individual hosts or virtual machines on which to run your code, but rather Kubernetes sees the underlying infrastructure as a sea of computing on which to put containers.
Different Ways of Installing K8S
-
Using kubeadm
-
using Minikube
-
Play with K8s https://labs.play-with-k8s.com/
-
Using EKS, AKS or GKS Cloud Kubernetes environment
-
A simple one is you can enable K8S on docker (Single node Cluster )
Added below files to have setup using MiniKube and Kubeadm
You can't perform that action at this time. You signed in with another tab or window. You signed out in another tab or window. Reload to refresh your session. Reload to refresh your session.
You can't perform that action at this time. You signed in with another tab or window. You signed out in another tab or window. Reload to refresh your session. Reload to refresh your session.
Downloading and installing Docker for Mac
For now, Kubernetes is only available on Docker for Mac 17.12 CE Edge (special Docker version for new and experimental features), so make sure you install the Edge version.
On your Mac, double-click the Docker.dmg file and begin the installation process as instructed.
This process takes a few minutes, at the end of which Docker is installed and launched. You will also see the little Docker whale icon appear at the top of your Mac’s screen. Open your terminal and enter the docker info command to verify.
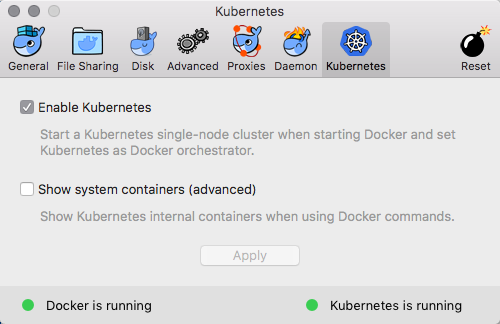
Kubernetes is not enabled by default. To enable it, click on the Docker icon, go to Preferences | Kubernetes, select the Enable Kubernetes checkbox and hit Apply.
After a few minutes, Kubernetes will be enabled, as reflected by the green statuses at the bottom of the preferences dialog.
Exploring our Kubernetes installation
Let’s enter some kubectl commands to find out more about the installation.
We’ll start with:
**kubectl version**

Client Version: version.Info{Major:"1",
Minor:"8", GitVersion:"v1.8.2",
GitCommit:"bdaeafa71f6c7c04636251031f93464384d54963",
GitTreeState:"clean", BuildDate:"2017-10-24T19:48:57Z",
GoVersion:"go1.8.3", Compiler:"gc", Platform:"darwin/amd64"}

Server Version: version.Info{Major:"1", Minor:"8",
GitVersion:"v1.8.2",
GitCommit:"bdaeafa71f6c7c04636251031f93464384d54963",
GitTreeState:"clean", BuildDate:"2017-10-24T19:38:10Z",
GoVersion:"go1.8.3", Compiler:"gc", Platform:"linux/amd64"}
Next, let’s find out about the single-node cluster:
**kubectl cluster-info**

Kubernetes master is running at [https://localhost:6443](https://localhost:6443)
KubeDNS is running at [https://localhost:6443/api/v1/namespaces/kube-system/services/kube-dns/proxy](https://localhost:6443/api/v1/namespaces/kube-system/services/kube-dns/proxy)

**kubectl get nodes**

NAME                 STATUS    ROLES     AGE       VERSION
docker-for-desktop   Ready     master    1d       v1.8.2
For management purposes, I’m also going to install the Kubernetes dashboard:
**kubectl create [https://raw.githubusercontent.com/kubernetes/dashboard/master/aio/deploy/recommended/kubernetes-dashboard.yaml](https://raw.githubusercontent.com/kubernetes/dashboard/master/aio/deploy/recommended/kubernetes-dashboard.yaml)**

secret “kubernetes-dashboard-certs” created
serviceaccount “kubernetes-dashboard” created
role “kubernetes-dashboard-minimal” created
rolebinding “kubernetes-dashboard-minimal” created
deployment “kubernetes-dashboard” created
service “kubernetes-dashboard” created
Since the dashboard pod is deployed under the Kube-system namespace, I’m going to use the following command to see the pod:
kubectl get pods --namespace kube-system

NAME                                         READY     STATUS    RESTARTS   AGE
etcd-docker-for-desktop                      1/1       Running   0          1d
kube-apiserver-docker-for-desktop            1/1       Running   0          1d
Next, I’m going to configure port forwarding for the pod (be sure to change the name in the command):
**kubectl port-forward kubernetes-dashboard-7798c48646-ctrtl 8443:8443 --namespace=kube-system**

Forwarding from 127.0.0.1:8443 -> 8443
We can now access the dashboard at https://localhost:8443 (just skip the warning messages that are displayed).
Kubernetes Concepts
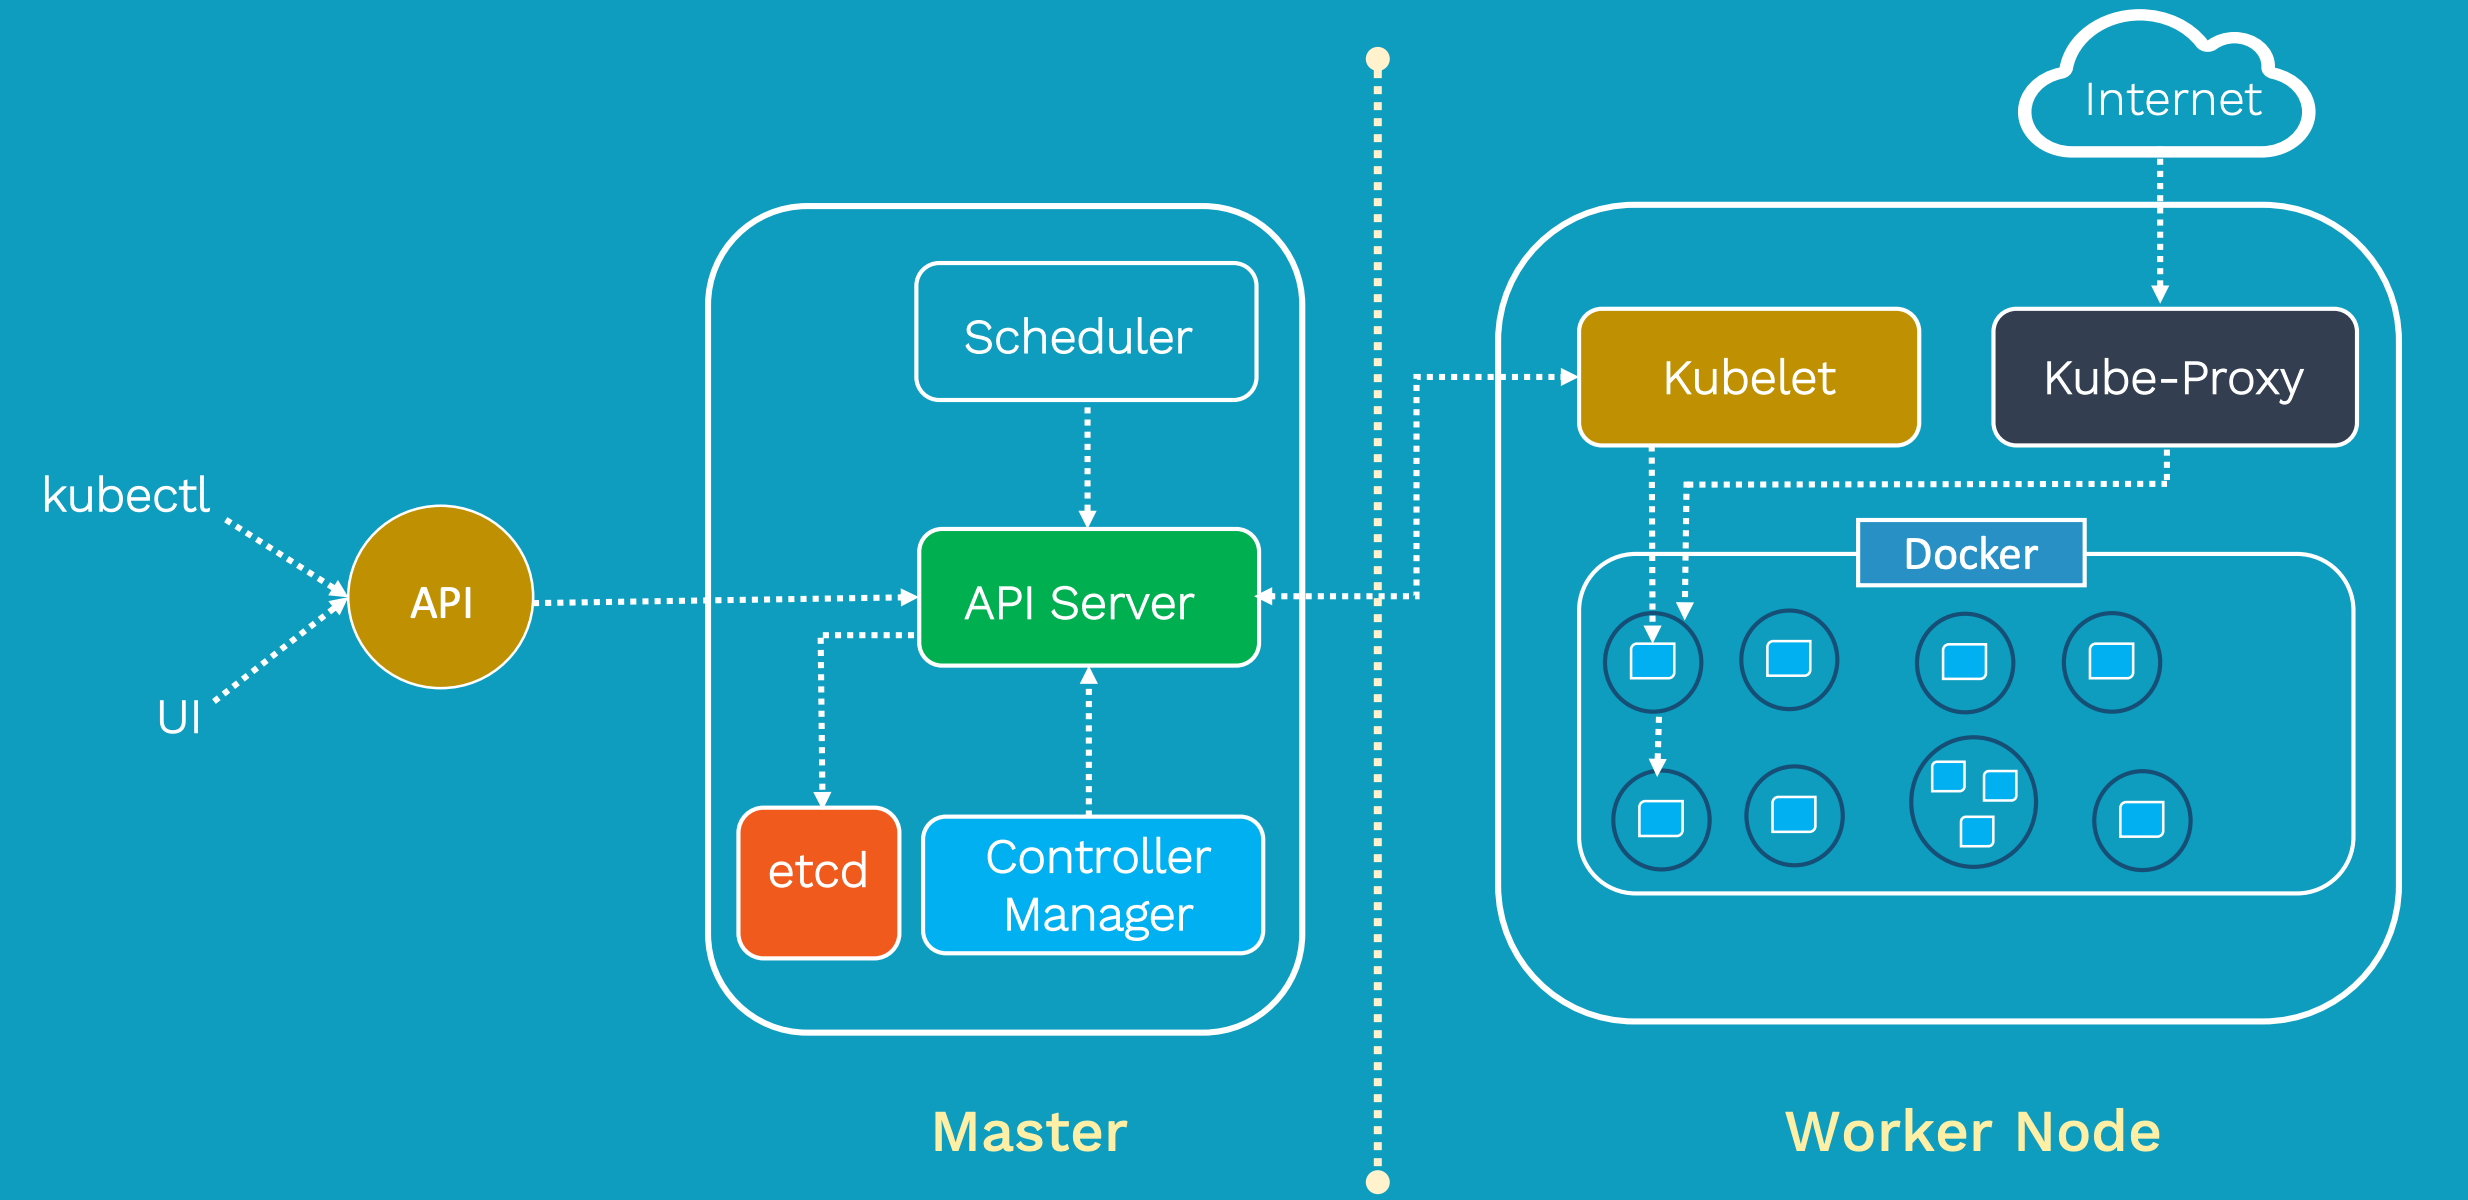
Kubernetes has a client/server architecture. Kubernetes server runs on your cluster (a group of hosts) on which you will deploy your application. And you typically interact with the cluster using a client, such as the kubectlCLI.
Pods
A pod is the basic unit that Kubernetes deals with, a group of containers. If there are two or more containers that always need to work together, and should be on the same machine, make them a pod.
Node
A node is a physical or virtual machine, running Kubernetes, onto which pods can be scheduled.
Label
A label is a key/value pair that is used to identify a resource. You could label all your pods serving production traffic with “role=production”, for example.
Selector
Selections let you search/filter resources by labels. Following on from the previous example, to get all production pods your selector would be “role=production”.
Service
A service defines a set of pods (typically selected by a “selector”) and a means by which to access them, such as single stable IP address and corresponding DNS name.
Let’s create a POD definition file, sample Nginx deployment sample file
The run a NodeJS application in Kubernetes, no matter which platform is hosting it, you will need the following installed.
-
Kubernetes Cluster (DigitalOcean, GKE, AKS, EKS)
-
Docker installed locally
-
Kubectl installed locally
Building a Docker Image
In order for your NodeJS application to run in Kubernetes, it will need to be shipped as a container. There are two schools of thought when it comes to deciding how to containerize your applications — use an existing NodeJS image or build your own image.
Using Existing NodeJS Images
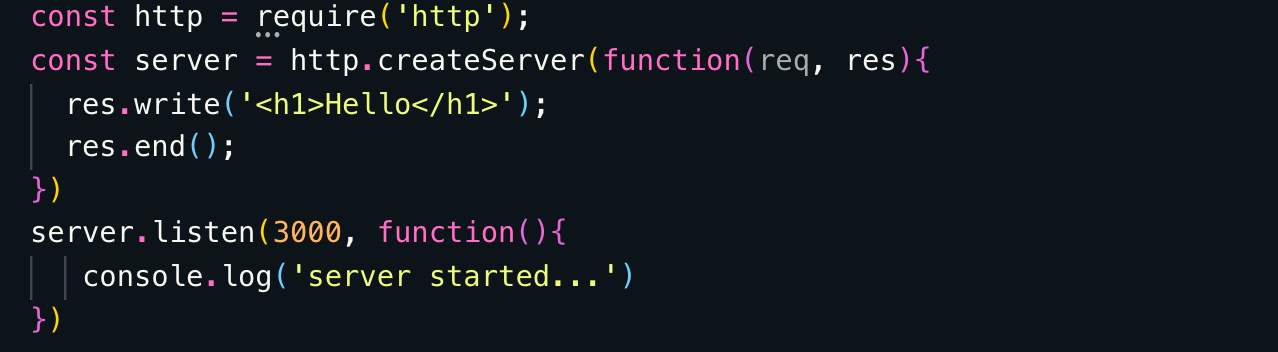
Node offers official images for Node.js applications. The simplest, most productive way for getting started in containerizing your application. The following is an example of a Dockerfile for creating a basic container.
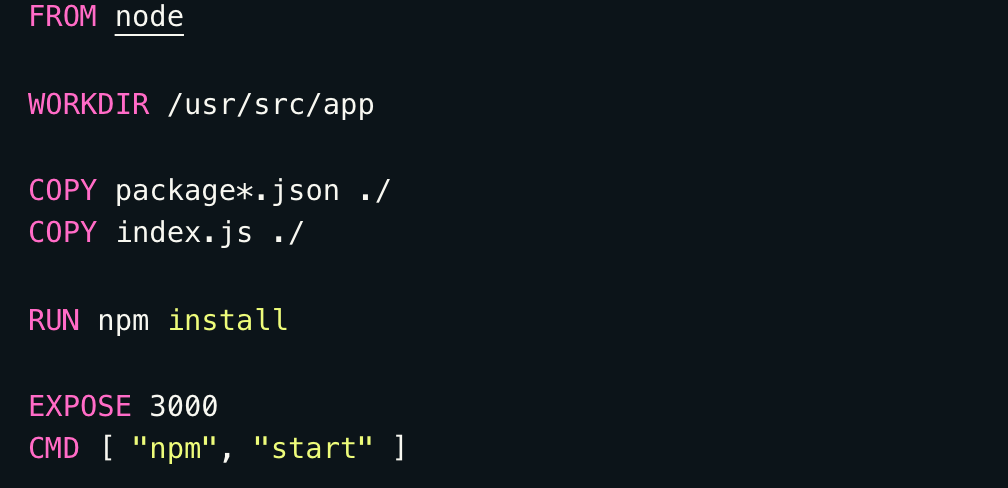
FROM node

WORKDIR /usr/src/app

COPY package*.json ./
COPY index.js ./
COPY ./app ./app

RUN npm install

EXPOSE 3000
CMD [ "npm", "start" ]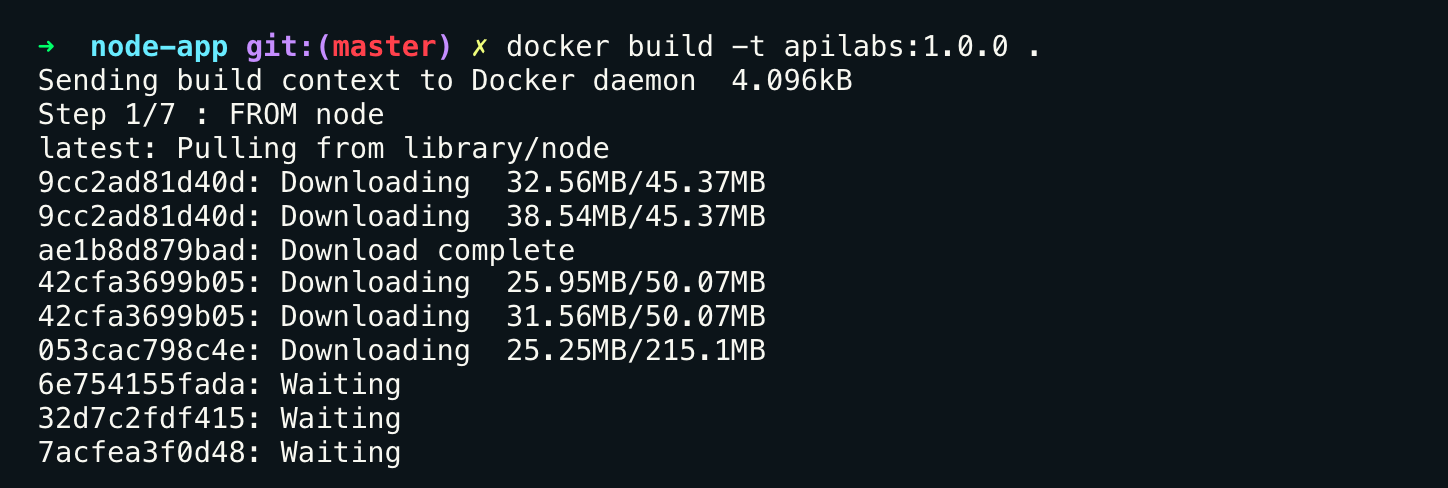
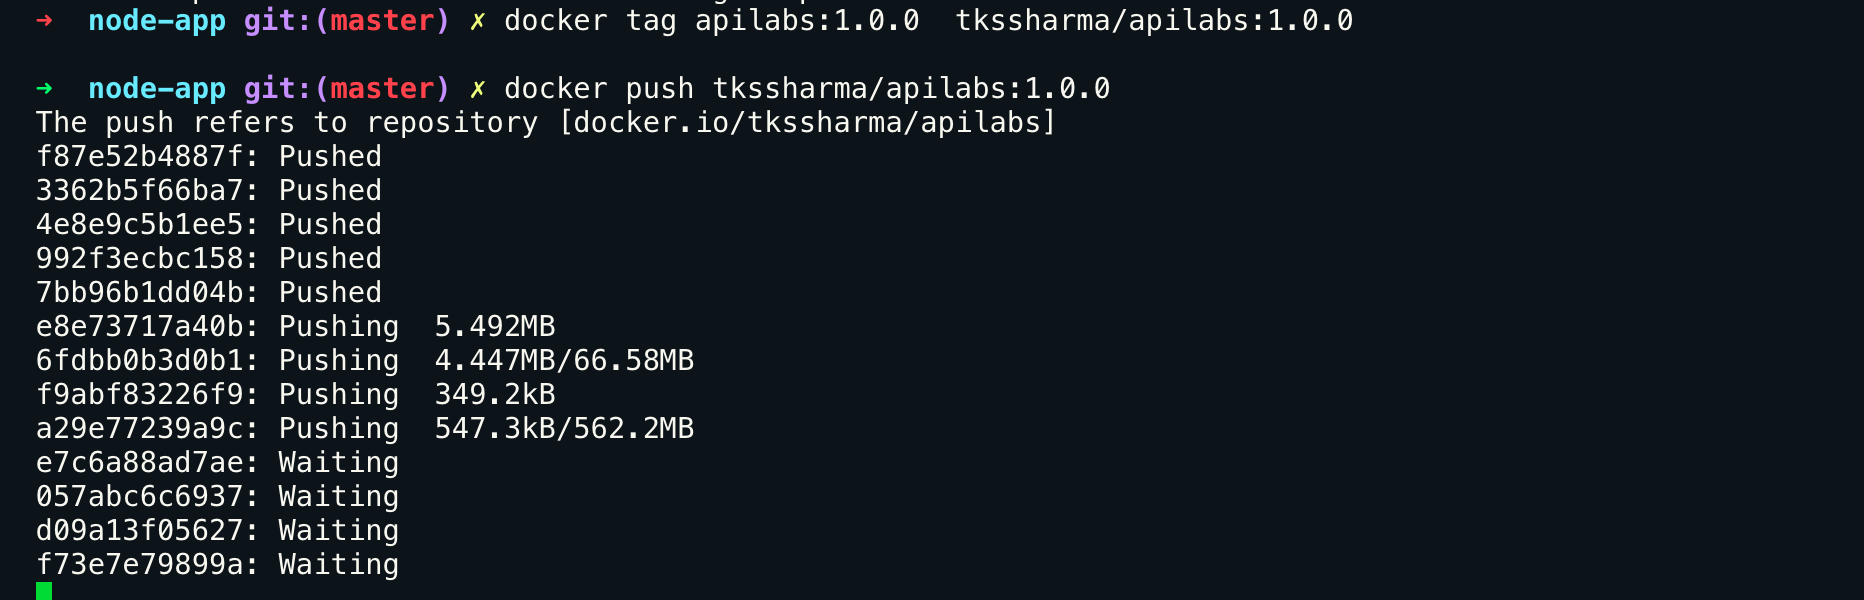
Pushing Your Image to a Docker Repository
In order to run your containerized application in Kubernetes it must be available in a Docker repository. The repository must be accessible to the Kubernetes cluster, as it will be pulled down every time a pod container your image is deployed.
Dockerhub is a good start for anyone just getting into Kubernetes. They offer both public and private repositories, and Kubernetes can use both. If you are using Google Kubernetes Engine (GKE), you may use Google repository, for example.
In this tutorial, we will use Dockerhub as the repository for demonstration purposes. We will point to it in our pod and deployment manifests. To deploy our image, we will have to push it up to Dockerhub, which requires us to login first.
docker login
Add a tag to the image you built earlier so that the name includes the repository. When using Dockerhub, it must begin with your DockerID. “tkssharma” is my docker username, add your’s in your case
Deploying to Kubernetes
Creating a Pod
A pod is the smallest, atomic part of a Kubernetes cluster. Pods are were your Docker containers run, so let’s start off by creating a pod for the NodeJS application.
Create a new file named simple-api-pod.yml
touch simple-api-pod.ymlAdd the following contents to the new file.

apiVersion: v1
kind: Pod
metadata:
  name: simple-api
  labels:
    name: simple-api
spec:
  containers:
  - name: simple-api
    image: tkssharma/apilabs:1.0.0
ports:
    - containerPort: 3000
The example above is a very basic pod declaration. To understand the manifest a little better, the different parts of the file are described below.
apiVersion The apiVersion is used to let Kubernetes know which schema to use when creating a resource. This value is required to let Kubernetes know which version of the schema should be used when creating the resource.
kind There are many resources kinds handled by Kubernetes, from pods to ingress controllers. This is a required key that lets Kubernetes know what type of resource is being created.
metadata Metadata is where we provide details about the resource that is being declared.
spec The spec is where we declare how our resource must be created. For a Pod, we describe the container image to be used, the name the container will run as, as well as other details, such as ports and environment variables.
Starting and Managing the Pod
The remain operations regarding pods will be done using the kubectl command. There are two ways of creating a resource, such as a pod, in Kubernetes. You can use the kubectl create command or the kubectl apply command. Kubectl apply will be the preferred method in this tutorial, as it allows you to update some of the configurations on the fly.
To create the Pod and start it, run the following command targeting the YAML file created for the NodeJS POD.
kubectl apply -f simple-api-pod.ymlViewing a list of running pods is done using **kubectl get pods **command.
kubectl get podsWithout specifying a pod all pods will be listed. We can narrow the results by targeting the name of the pod we are interested in.
kubectl get pods simple-apiPod Details and Logs
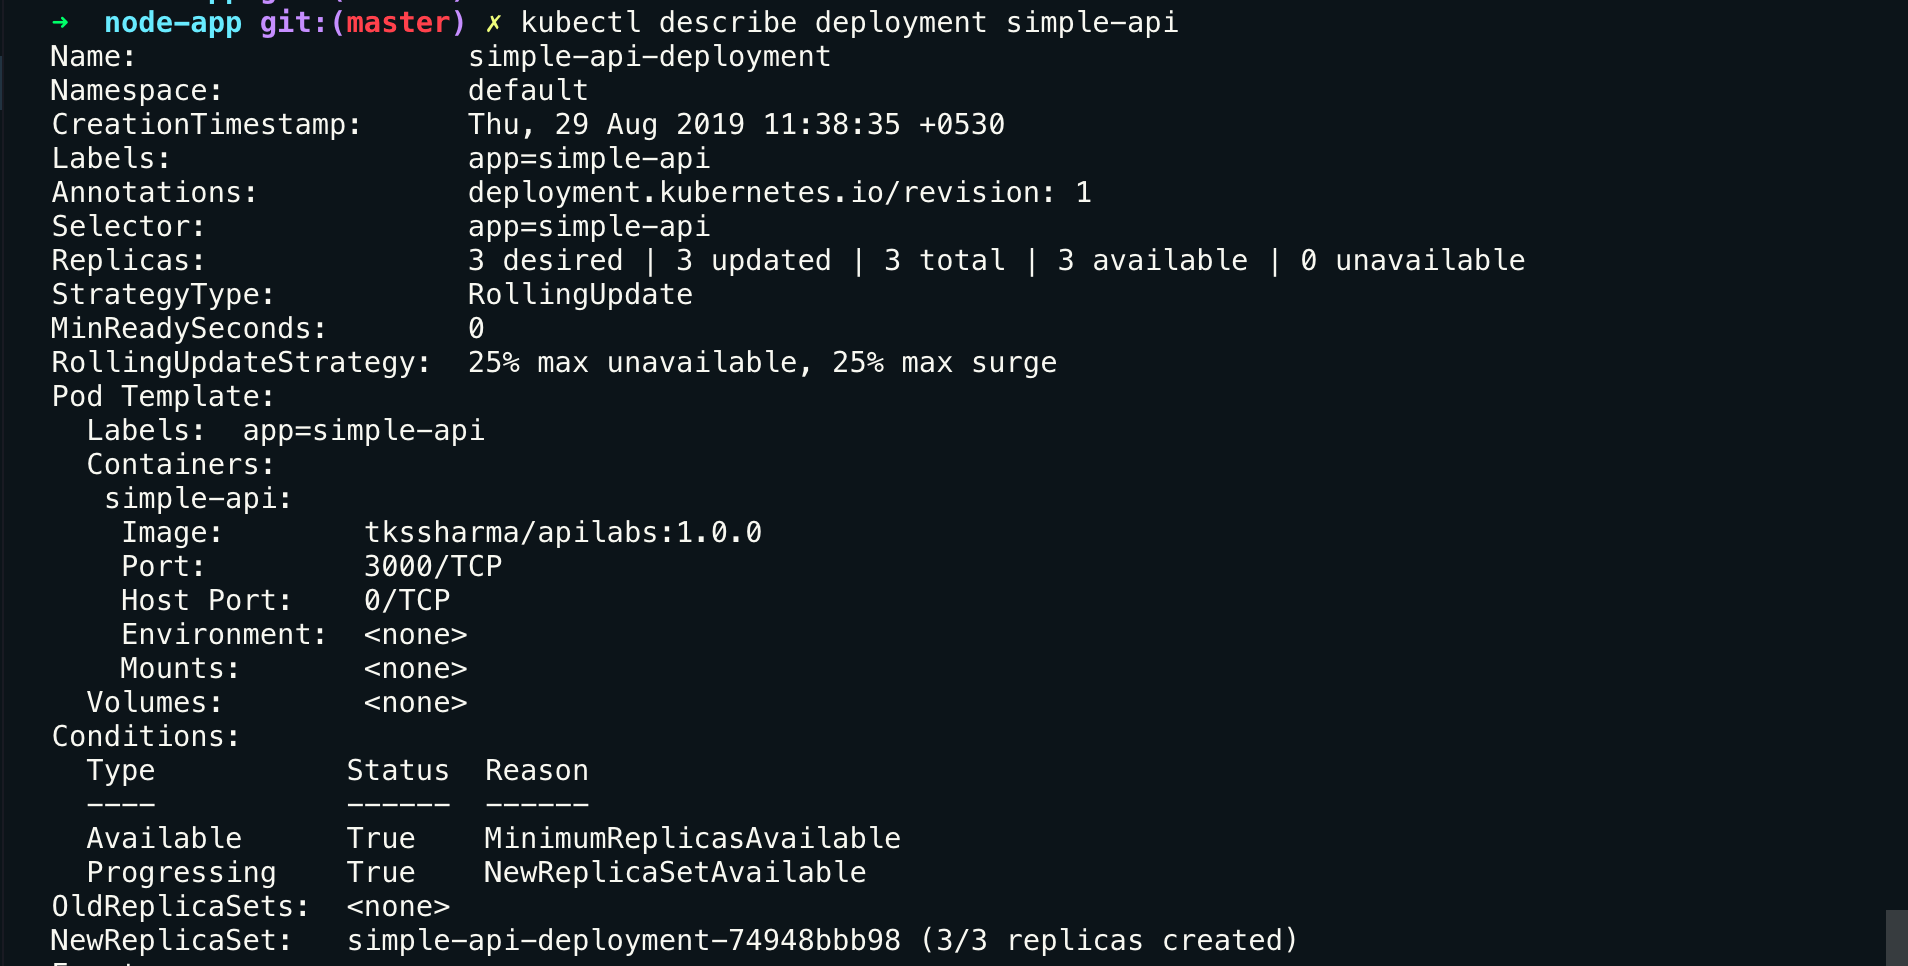
The** kubectl get** command provides very basic information regarding the health of your pod. When troubleshooting problems with the pod, as in why it isn’t starting successfully, we turn to the kubectl describe command.
kubectl describe pod simple-apiThe information provided by the kubectl describe command is helpful. However, there are times that a pod must be debugged via logs. Logs are available using the kubectl log command.
kubectl log simple-apiIn order for your application to populate its logs it must print everything to stdout.
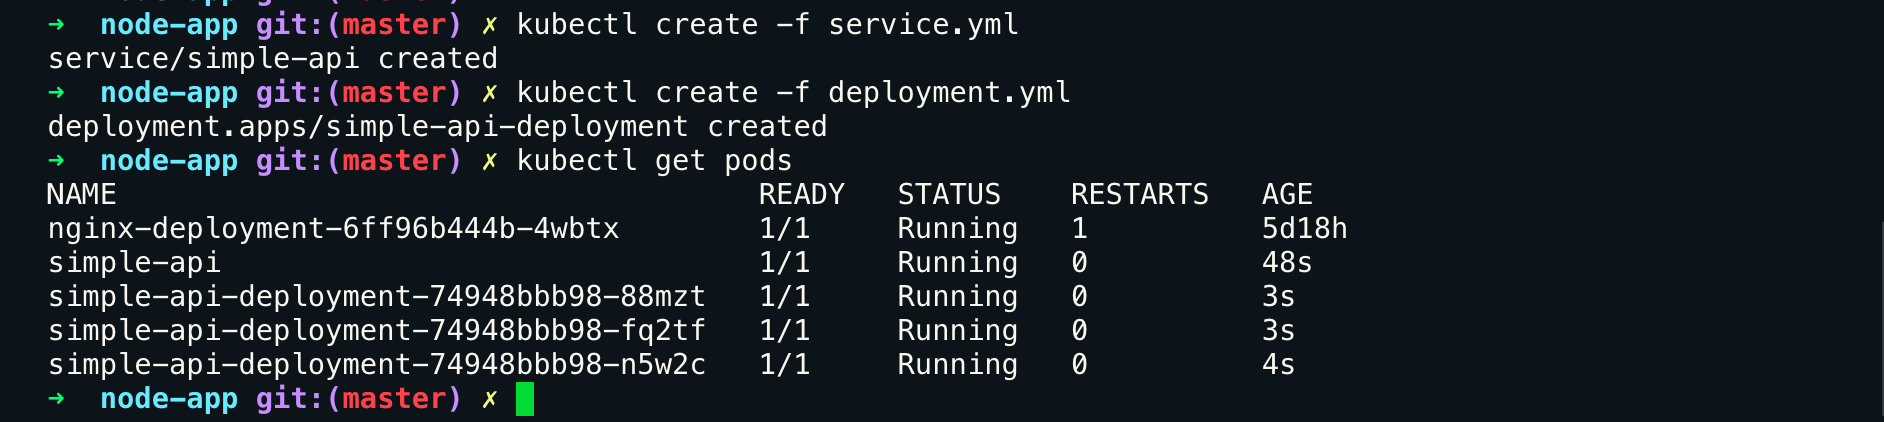
Exposing as a Service
Pods are ephemeral, and that means they are not expected to live long. This way of thinking matches the popular cattle, not sheep mantra often heard and repeated.
Service resources provide a static entryway into pods. They are not pods themselves, but resources that direct traffic to any pod attached to it.
Create .new YAML resource file named simple-api-service.yml.
touch simple-api-service.ymlAnd add the following contents to it.
apiVersion: v1
kind: Service
metadata:
  name: simple-api
spec:
  selector:
    app: simple-api
  ports:
  - protocol: TCP
    port: 3000
    targetPort: 3000
Create the service resource using the same command used for the pod.
kubectl apply -f simple-api-service.ymlWith the service created you can view basic information about it. You can do this by using the kubectl get command, which outputs basic health status.
kubectl get service simple-api-serviceWhen you need more details about the service, the kubectl describe command can be used. In fact, as you’ve seen, it can be used against any resource in Kubernetes.
kubectl describe service simple-api-serviceCreating a Deployment for Scaling
Pods are single constructs. They are not very useful for services that need to scale, which is where Deployment resources come in.
Create a new file named simple-api-deployment.yml
touch simple-api-deployment.ymlAnd then add the following contents to it.
apiVersion: apps/v1
kind: Deployment
metadata:
  name: simple-api-deployment
  labels:
    app: simple-api
spec:
  replicas: 3
  selector:
    matchLabels:
      app: simple-api
  template:
    metadata:
      labels:
        app: simple-api
    spec:
      containers:
      - name: simple-api
        image: tkssharma/apilabs:1.0.0
        ports:
         - containerPort: 3000
Create the new deployment resource using the kubectl apply command.
kubectl apply -f simple-api-deployment.yml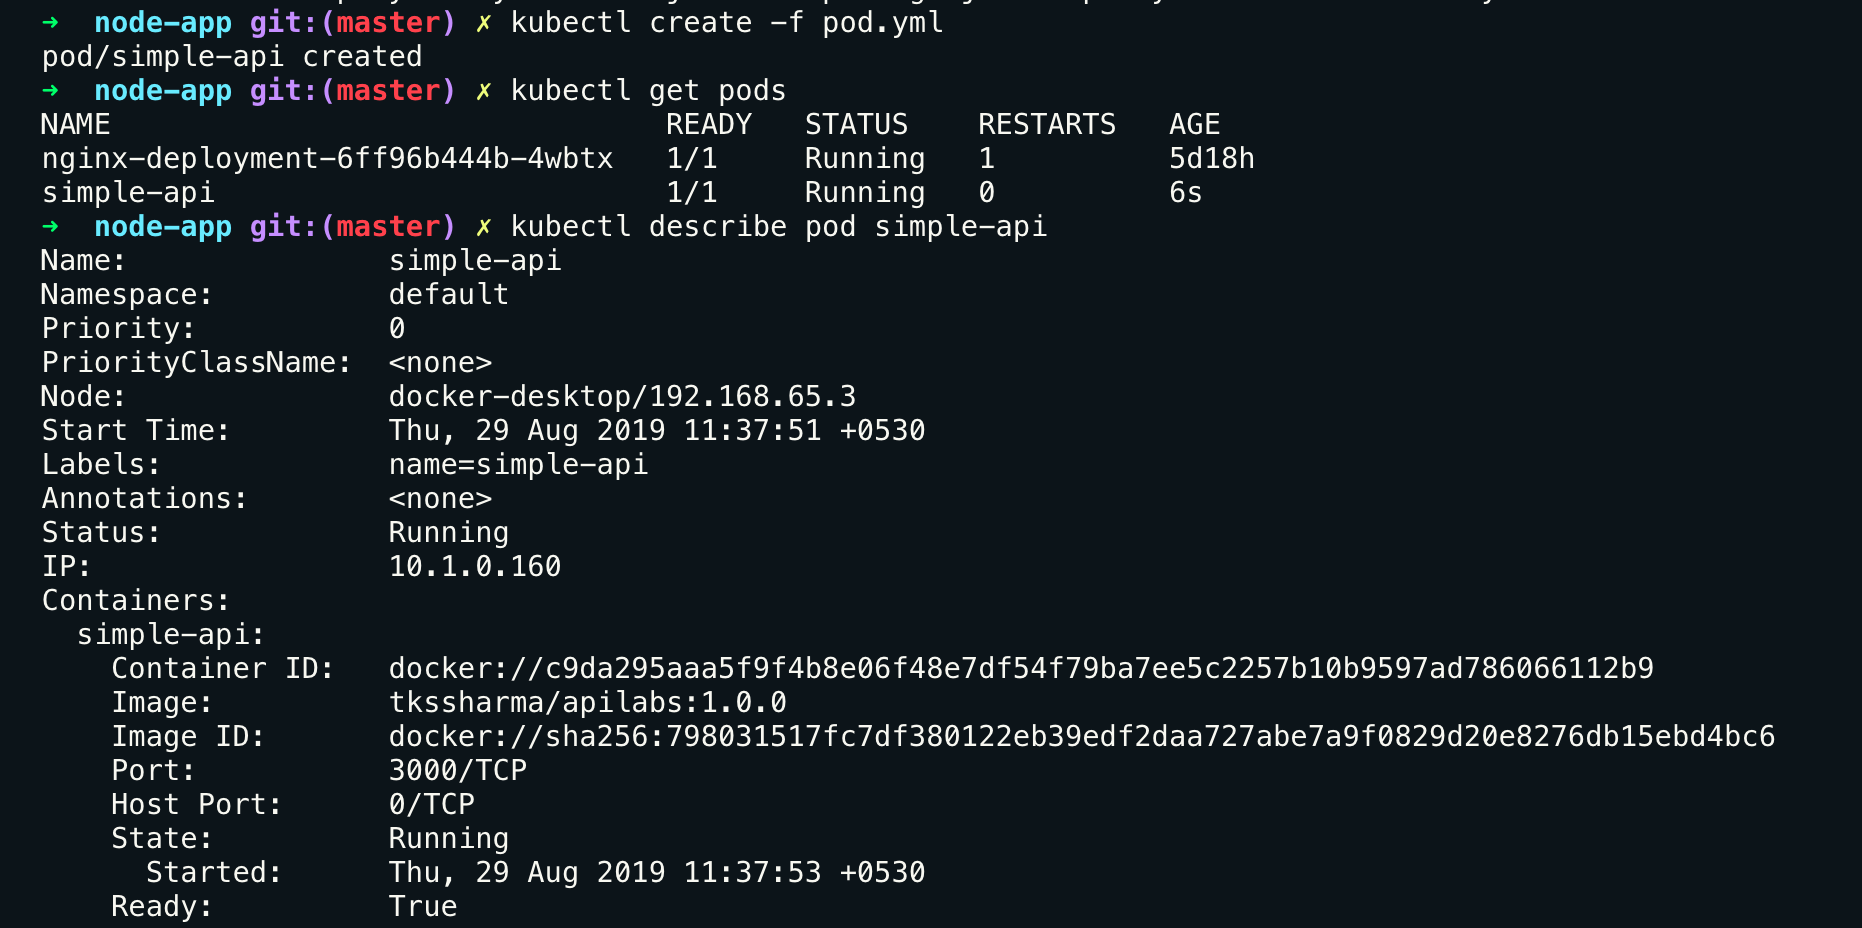
Comments