
Configure and Implement AWS Cognito using Nestjs
When I had to set up AWS Cognito for the first time, I found it pretty tricky. I looked everywhere for an easy-to-follow guide, but I couldn’t find one. I learned it by connecting pieces from different resources. Now, I want to share what I discovered to help others facing the same struggle.
In this article, I’ll guide you through the process of integrating AWS Cognito with NestJS in simple, easy-to-understand steps. Whether you’re new to AWS Cognito or just need a straightforward explanation, this guide is for you. Let’s make AWS Cognito less confusing and more accessible for everyone. Let’s get started!
What is AWS Cognito?
AWS Cognito, an AWS service, facilitates authentication and user management in applications, simplifying sign-up, sign-in, and access control, including multi-factor authentication. It empowers developers to securely manage user identities and access privileges, eliminating the need for complex authentication systems.
Prerequisites: Before we begin, make sure you have the following prerequisites:
- Node.js is installed on your machine.
- NestJS CLI installed globally (
npm install -g @nestjs/cli). - An AWS account with access to AWS Cognito.
- Basic knowledge of NestJS and AWS Cognito concepts.
Step 1: Nestjs Project Setup
Set Up a New NestJS Project Let’s start by creating a new NestJS project using the NestJS CLI. Open your terminal and run the following command:
nest new nest-cognito-example
cd nest-cognito-example
Step 2: Install Dependencies
Install Required Dependencies Next, install the necessary dependencies for integrating AWS Cognito. Run the following commands in your terminal:
npm install @aws-sdk/client-cognito-identity-provider
Step 3: Configure AWS Cognito
Configure AWS Cognito In the AWS Management Console, navigate to the Cognito service, and create a new user pool. Take note of the User Pool ID and Client ID.
We will go with the normal flow, just to let you understand the basics. You can play around with the configurations later on.
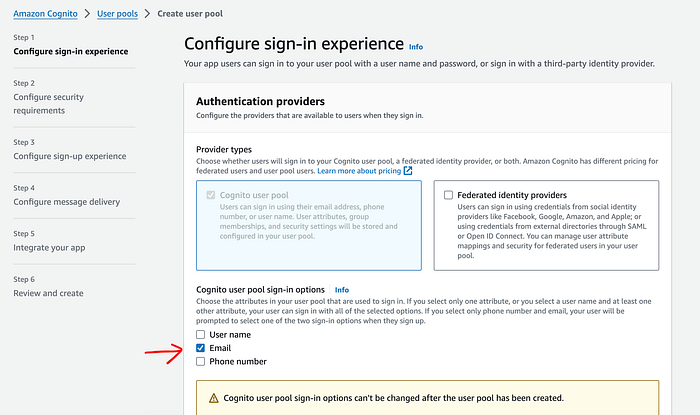
- Configure Sign-in Experience
Here, we would go with the email attribute and then click on the “Next” button.
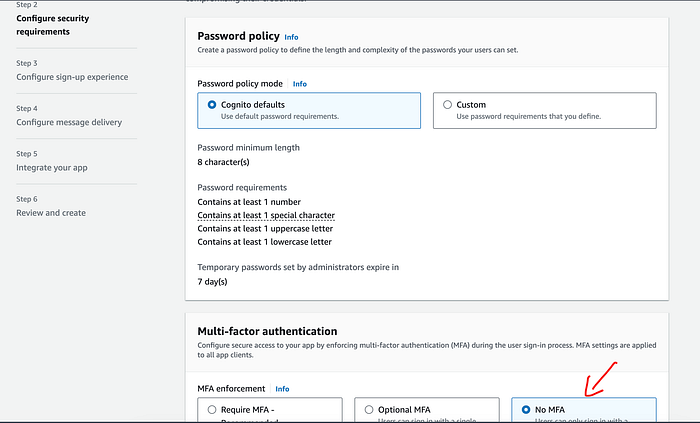
- Configure Security Requirements
Here we would go mostly with the default settings but just change the multiple-factor authentication to No MFA option and then click on the “Next” button given below.
- Configure Sign-up experience
No need to update anything, you can go with the default behavior and click on the “Next” button shown below.

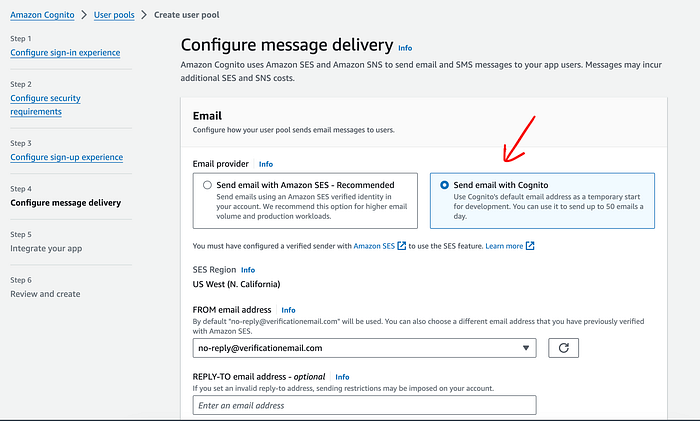
- Configure Message Delivery
In this step, select the option: Send email to Cognito. You can go with the other services like SES, but to start it is good to go with the Cognito and click on the “Next” button given below.
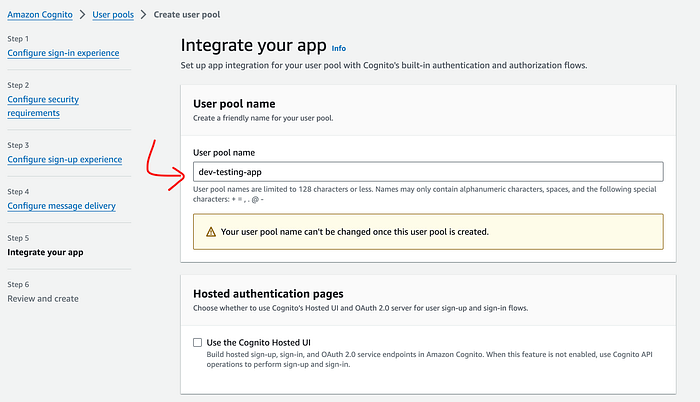
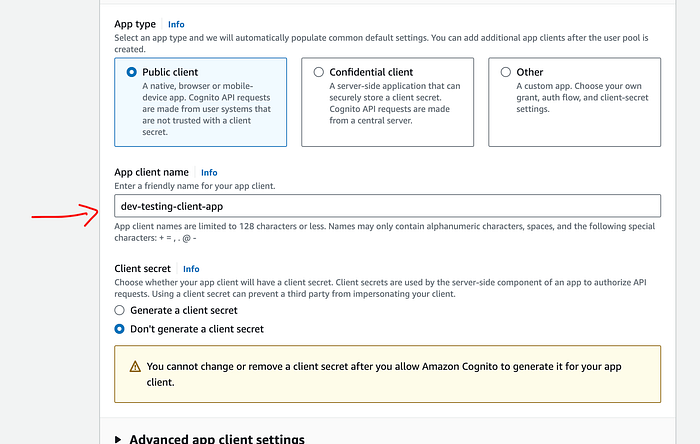
- Integrate your App
In this step, first, you need to enter the user pool name.
Now, enter the client App name and click on the “Next” button given below.
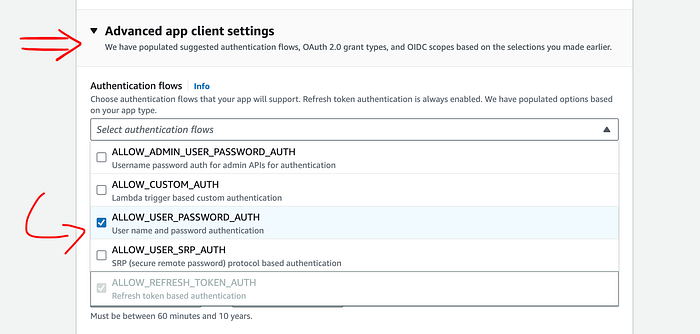
Open the Advance app client setting and select the
Auth Flow: ALLOW_USER_PASSWORD_AUTH
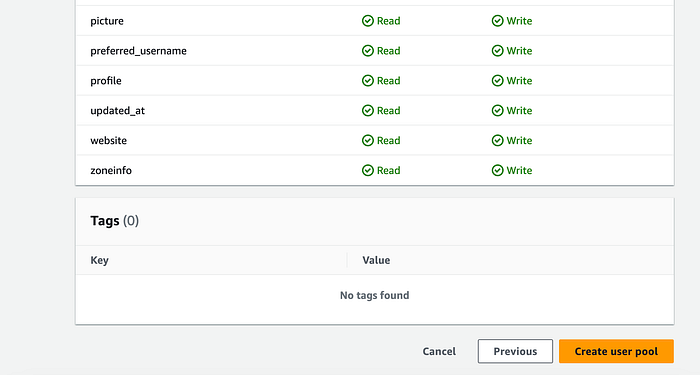
- Review and create
In this step, just review the configurations you have done in the previous steps and click on the “Create user pool” button to create it!
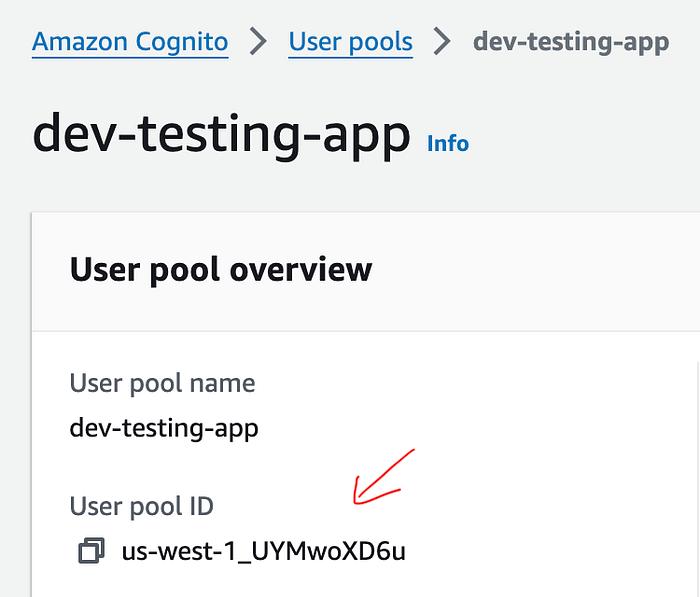
Perfect! Now you have successfully created an AWS Cognito user pool.
Now you have to get the User pool ID and client ID to connect it with the app.
User pool ID:
You can find it after clicking on the name of your user pool, in our case, it is named “dev-testing-app”. Copy it.
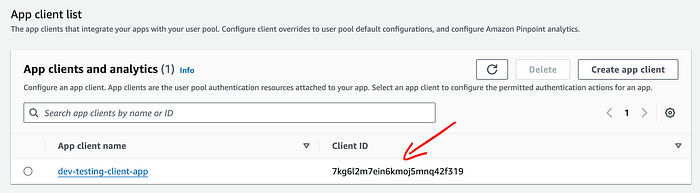
Client ID:
On the same page, navigate to the App Integration Tab.

Go down below and you will find a list of client apps against that user pool. Copy the Client ID and you are good to go.
Step 4: Implement Cognito service
First, we will configure the Cognito client in the file named cognito/index.ts
import { CognitoIdentityProviderClient } from '@aws-sdk/client-cognito-identity-provider';

interface ICognitoClient {
    region: string;
}

export const CognitoClient = ({
  region,
}: ICognitoClient) =>
  new CognitoIdentityProviderClient({
    region
  });

Implement Authentication Logic Create a new file named `cognito.service.ts` in your NestJS project and paste the following code into it:

import { Injectable } from '@nestjs/common';
import {
  CognitoIdentityProviderClient,
  ConfirmSignUpCommand,
  ResendConfirmationCodeCommand,
  ForgotPasswordCommand,
  ConfirmForgotPasswordCommand,
  ChangePasswordCommand,
  SignUpCommand,
  SignUpCommandInput,
  ConfirmSignUpCommandInput,
  ResendConfirmationCodeCommandInput,
  ForgotPasswordCommandInput,
  ConfirmForgotPasswordCommandInput,
  ChangePasswordCommandInput,
  InitiateAuthCommandInput,
  InitiateAuthCommand,
  RespondToAuthChallengeCommand,
  RespondToAuthChallengeCommandInput,
  GetUserCommand
} from '@aws-sdk/client-cognito-identity-provider';
import { ConfigService } from '@nestjs/config';
import { CognitoClient } from 'src/utils/aws/cognito';

@Injectable()
export class CognitoService {
    private readonly cognitoClient: CognitoIdentityProviderClient;

    constructor(private readonly configService: ConfigService) {
      // Initialize AWS Cognito SDK client
      this.cognitoClient = CognitoClient({
        region: this.configService.get('aws.cognito.region'),
      })
    }

// Signup command
  async signUpCommand(data) {
    const { email, password } = data;

    const params: SignUpCommandInput = {
      ClientId: this.configService.get('aws.cognito.clientId'),
      Username: email,
      Password: password,
      UserAttributes: [
        {
          Name: 'email',
          Value: email,
        },
      ],
    };

    return await this.cognitoClient.send(new SignUpCommand(params));
  }

// signin Command
  async signInCommand(data) {
    const { email, password } = data;

    const params: InitiateAuthCommandInput = {
      AuthFlow: "USER_PASSWORD_AUTH",
      ClientId: this.configService.get('aws.cognito.clientId'),
      AuthParameters: {
        USERNAME: email,
        PASSWORD: password,
      },
    };

    return await this.cognitoClient.send(
      new InitiateAuthCommand({ ...params }),
    );
  }

// Confirm signup command
  async confirmSignUpCommand(data) {
    const { email, confirmationCode } = data;
    const params: ConfirmSignUpCommandInput = {
      ClientId: this.configService.get('aws.cognito.clientId'),
      Username: email,
      ConfirmationCode: confirmationCode,
    };

    return await this.cognitoClient.send(new ConfirmSignUpCommand(params));
  }

// resend confirmation code
  async resendConfirmationCodeCommand(data) {
    const { email } = data;
    const params: ResendConfirmationCodeCommandInput = {
      ClientId: this.configService.get('aws.cognito.clientId'),
      Username: email,
    };

    return await this.cognitoClient.send(
      new ResendConfirmationCodeCommand(params),
    );
  }

// forgot Passowrd
  async forgotPasswordCommand(data) {
    const { email } = data;
    const params: ForgotPasswordCommandInput = {
      ClientId: this.configService.get('aws.cognito.clientId'),
      Username: email,
    };

    return await this.cognitoClient.send(new ForgotPasswordCommand(params));
  }

// confirm forgot password
  async confirmForgotPasswordCommand(data) {
    const { email, confirmationCode, newPassword } = data;
    const params: ConfirmForgotPasswordCommandInput = {
      ClientId: this.configService.get('aws.cognito.clientId'),
      Username: email,
      ConfirmationCode: confirmationCode,
      Password: newPassword,
    };

    return await this.cognitoClient.send(
      new ConfirmForgotPasswordCommand(params),
    );
  }

// change password using accessToken
  async changePasswordCommand(data) {
    const { accessToken, oldPassword, newPassword } = data;
    const params: ChangePasswordCommandInput = {
      AccessToken: accessToken,
      PreviousPassword: oldPassword,
      ProposedPassword: newPassword,
    };

    return await this.cognitoClient.send(new ChangePasswordCommand(params));
  }

}
Config Service: We have globally configured it in the app, to use environment variables using the config service provided by nestjs.
Step 5: Create the controller
Next, you need to develop the controller to establish the routes and utilize the service according to your requirements.
Step 6: Test your integration
Test Your Integration Test your AWS Cognito integration by registering users, logging in, changing passwords, etc.
Conclusion
Integrating AWS Cognito with NestJS provides a scalable and secure authentication solution for your applications. By following the steps outlined in this guide and leveraging the capabilities of the AWS SDK for JavaScript, v3, you can create a robust authentication system that meets the needs of your users. Remember to handle errors and edge cases appropriately and to follow best practices for security and performance.
Comments