The Document Object Model (DOM) is an application programming interface (API) for HTML and XML documents. It defines the logical structure of documents and the way a document is accessed and manipulated. In the DOM specification, the term “document” is used in the broad sense — increasingly
With the Document Object Model, programmers can build documents, navigate their structure, and add, modify, or delete elements and content. Anything found in an HTML or XML document can be accessed, changed, deleted, or added using the Document Object Model, with a few exceptions — in particular, the DOM interfaces for the XML internal and external subsets have not yet been specified.
What the Document Object Model is
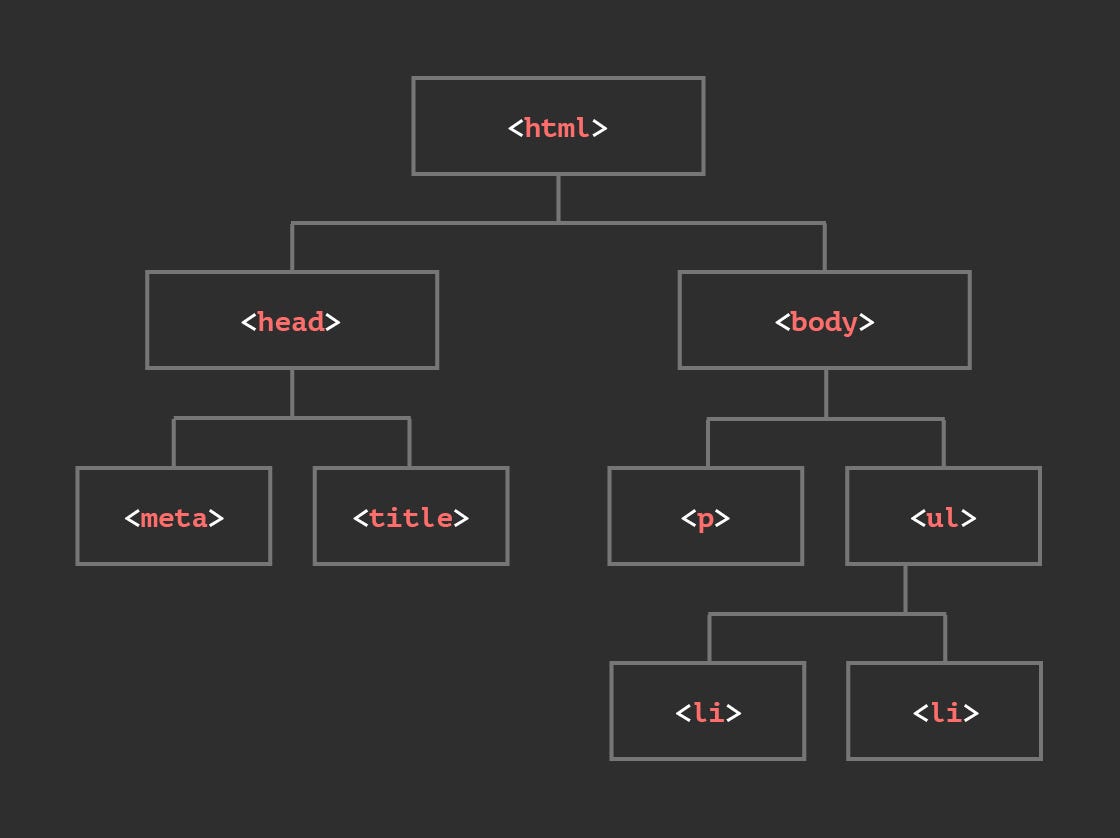
The DOM is a programming API for documents. It closely resembles the structure of the documents it models. For instance, consider this example
To start learning about DOM manipulation, let’s begin with a practical example.
Add a element just above the closing
tag.
To manipulate an element inside the DOM, you first need to select it and store a reference to it inside a variable. Inside your script element, add the following line:
var link = document.querySelector('a');
Now we have the element reference stored in a variable, we can start to manipulate it using properties and methods available to it (these are defined on interfaces like HTMLAnchorElement in the case of element, its more general parent interface HTMLElement, and Node — which represents all nodes in a DOM). First of all, let's change the text inside the link by updating the value of the Node.textContentproperty. Add the following line below the previous one:
We should also change the URL the link is pointing to so that it doesn’t go to the wrong place when it is clicked on. Add the following line, again at the bottom:
Note that, as with many things in JavaScript, there are many ways to select an element and store a reference to it in a variable. Document.querySelector() is the recommended modern approach, which is convenient because it allows you to select elements using CSS selectors. The above querySelector() call will match the first element that appears in the document. If you wanted to match and do things to multiple elements, you could use Document.querySelectorAll(), which matches every element in the document that matches the selector, and stores references to them in an array-like object called a NodeList.
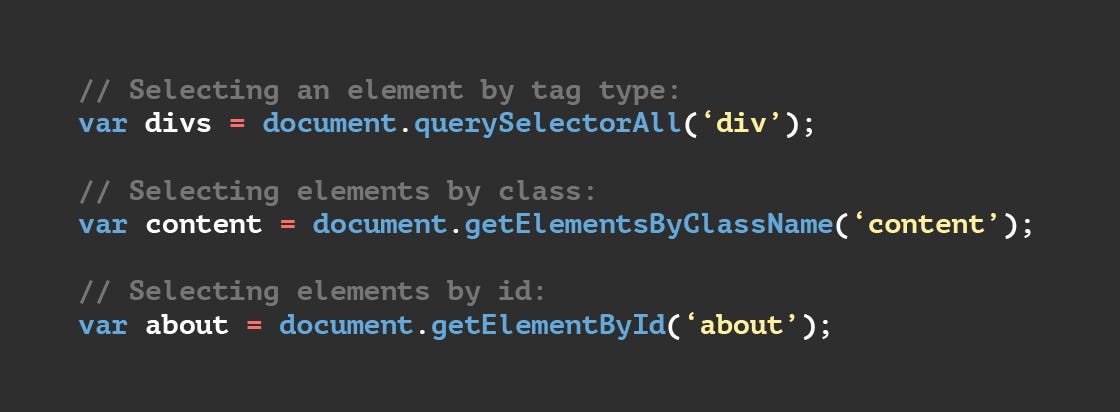
There are older methods available for grabbing element references, such as:
These two work in older browsers than the modern methods like, but are not as convenient. Have a look and see what others you can find!
Creating and placing new nodes Section
The above has given you a little taste of what you can do, but let’s go further and look at how we can create new elements.
Going back to the current example, let’s start by grabbing a reference to the our element — add the following code at the bottom of your existing script (do the same with the other lines too):
var sect = document.querySelector('section');
Now let’s create a new paragraph using Document.createElement() and give it some text content in the same way as before:
var para = document.createElement('p');
para.textContent = 'We hope you enjoyed the ride.';
You can now append the new paragraph at the end of the section using Node.appendChild():
sect.appendChild(para);
Finally for this part, let’s add a text node to the paragraph the link sits inside, to round off the sentence nicely. First we will create the text node using Document.createTextNode():
var text = document.createTextNode(' — the premier source for web development knowledge.');
Now we’ll grab a reference to the paragraph the link is inside, and append the text node to it:
var linkPara = document.querySelector('p'); linkPara.appendChild(text);
That’s most of what you need for adding nodes to the DOM — you’ll make a lot of use of these methods when building dynamic interfaces (we’ll look at some examples later).
Moving and removing elements section
There may be times when you want to move nodes or delete them from the DOM altogether. This is perfectly possible.
If we wanted to move the paragraph with the link inside it to the bottom of the section, we could simply do this:
sect.appendChild(linkPara);
This moves the paragraph down to the bottom of the section. You might have thought it would make a second copy of it, but this is not the case — linkPara is a reference to the one and only copy of that paragraph. If you wanted to make a copy and add that as well, you'd need to use Node.cloneNode() instead.
Removing a node is pretty simple as well, at least when you have a reference to the node to be removed and its parent. In our current case, we just use Node.removeChild(), like this:
sect.removeChild(linkPara);
It gets slightly more complex when you want to remove a node based only on a reference to itself, which is fairly common. There is no method to tell a node to remove itself, so you’d have to do the following.
linkPara.parentNode.removeChild(linkPara);
Have a go at adding the above lines to your code.
Manipulating style section
It is possible to manipulate CSS styles via JavaScript in a variety of ways.
To start with, you can get a list of all the stylesheets attached to a document using Document.stylesheets, which returns an array of CSSStyleSheet objects. You can then add/remove styles as wished. However, we're not going to expand on those features because they are a somewhat archaic and difficult way to manipulate style. There are much easier ways.
The first way is to add inline styles directly onto elements you want to dynamically style. This is done with the HTMLElement.style property, which contains inline styling information for each element in the document. You can set properties of this object to directly update element styles.
As an example, try adding these lines to our ongoing example:
Reload the page and you’ll see that the styles have been applied to the paragraph. If you look at that paragraph in your browser’s Page Inspector/DOM inspector, you’ll see that these lines are indeed adding inline styles to the document:
<p style="color: white; background-color: black; padding: 10px; width: 250px; text-align: center;">We hope you enjoyed the ride.</p>
Note: Notice how the JavaScript property versions of the CSS styles are written in lower camel case whereas the CSS versions are hyphenated (e.g. backgroundColor versus background-color). Make sure you don't get these mixed up, otherwise it won't work.
There is another common way to dynamically manipulate styles on your document, which we’ll look at now.
Delete the previous five lines you added to the JavaScript.
Add the following inside your HTML :
Now we’ll turn to a very useful method for general HTML manipulation — Element.setAttribute() — this takes two arguments, the attribute you want to set on the element, and the value you want to set it to. In this case we will set a class name of highlight on our paragraph:
para.setAttribute('class', 'highlight');
Refresh your page, and you’ll see no change — the CSS is still applied to the paragraph, but this time by giving it a class that is selected by our CSS rule, not as inline CSS styles.
Which method you choose is up to you; both have their advantages and disadvantages. The first method takes less setup and is good for simple uses, whereas the second method is more purist (no mixing CSS and JavaScript, no inline styles, which are seen as a bad practice). As you start building larger and more involved apps, you will probably start using the second method more, but it is really up to you.
The DOM Cheat Sheet
Here are some notes on what’s been covered in this chapter. Feel free to copy this and extend it to make your own cheat sheet.
The DOM
The browser pulls in HTML documents, parses them, and creates object models of the pages in its memory. This model is the Document Object Model (DOM).
DOM Node
Each element in the HTML document is represented by a DOM node. These nodes can be accessed and changed using JavaScript.
When the model is updated, those changes are reflected on the screen.
Accessing Elements
Before we can update a page, we need to find, or select, the element(s) that we want to update. In order to find an element, we need to search through the document. The syntax for the search looks something like this:
document.getElementById('main')
Here are the methods that can be used to select an element or elements:
MethodDescriptiongetElementById()Selects an individual element within a document using a specific idquerySelector()Uses CSS selector to select the first matching element within a documentgetElementsByClassName()Allows you to select all elements with a given class attributegetElementsByTagName()Locates all elements that match a given tag namequerySelectorAll()Uses CSS selector to select one or more elements
Cache
If we’d like to work with that element multiple times, a variable should be used to store, or cache, the results of our query.
var sidebar = document.getElementById('sidebar');
Traversing the DOM
The process of selecting another element based on its relationship to a previously selected element.
PropertyDescriptionparentNodeLocates the parent element of an initial selectionpreviousSiblingFinds the previous sibling of a selected elementnextSiblingFinds the next sibling of a selected elementfirstChildFinds the first child of a selected element
The syntax for using these properties looks like this:
document.querySelector('li').parentNode
NodeList
A NodeList is a list of node objects numbered similarly to arrays.
To locate the fourth item in this nodeList:
document.getElementsByTagName('li')[3];
Accessing and Updating Content
The innerHTML and textContent properties can be used to access or update content:
PropertyDescriptioninnerHTMLGet or set the HTML content of an element.textContentGet or set the text content of an element.
The syntax for getting content looks like this:
var firstListItem = document.querySelector('li').innerHTML;
*// Remember, `querySelector()` selects the first element that matches the provided selector.*
To add new elements to the page, we’ll need to use a three step process:
We will use the createElement() method to create a new element, which can then be added to the page. When this node is created, it will be empty. This element will be stored in a variable.
Next we will add content to the element using the innerHTML or textContent properties.
Now that our element has been created, we can add it as a child of an element using the appendChild() method. This will add an element as the last child of the parent element.
To add a sixth item to our list we can execute the following code:
*// First up, let's create a new list item and store it in a variable.*
var newListItem = document.createElement('li');

*// Now let's update the text content of that list item.*
newListItem.textContent = 'Jalapenos';

*// And finally, let's add that list item as a child of the ul.*
document.querySelector('ul').appendChild(newListItem);
Getting and Setting Attributes
PropertyDescriptionclassNameChange the value of the class attribute for an element
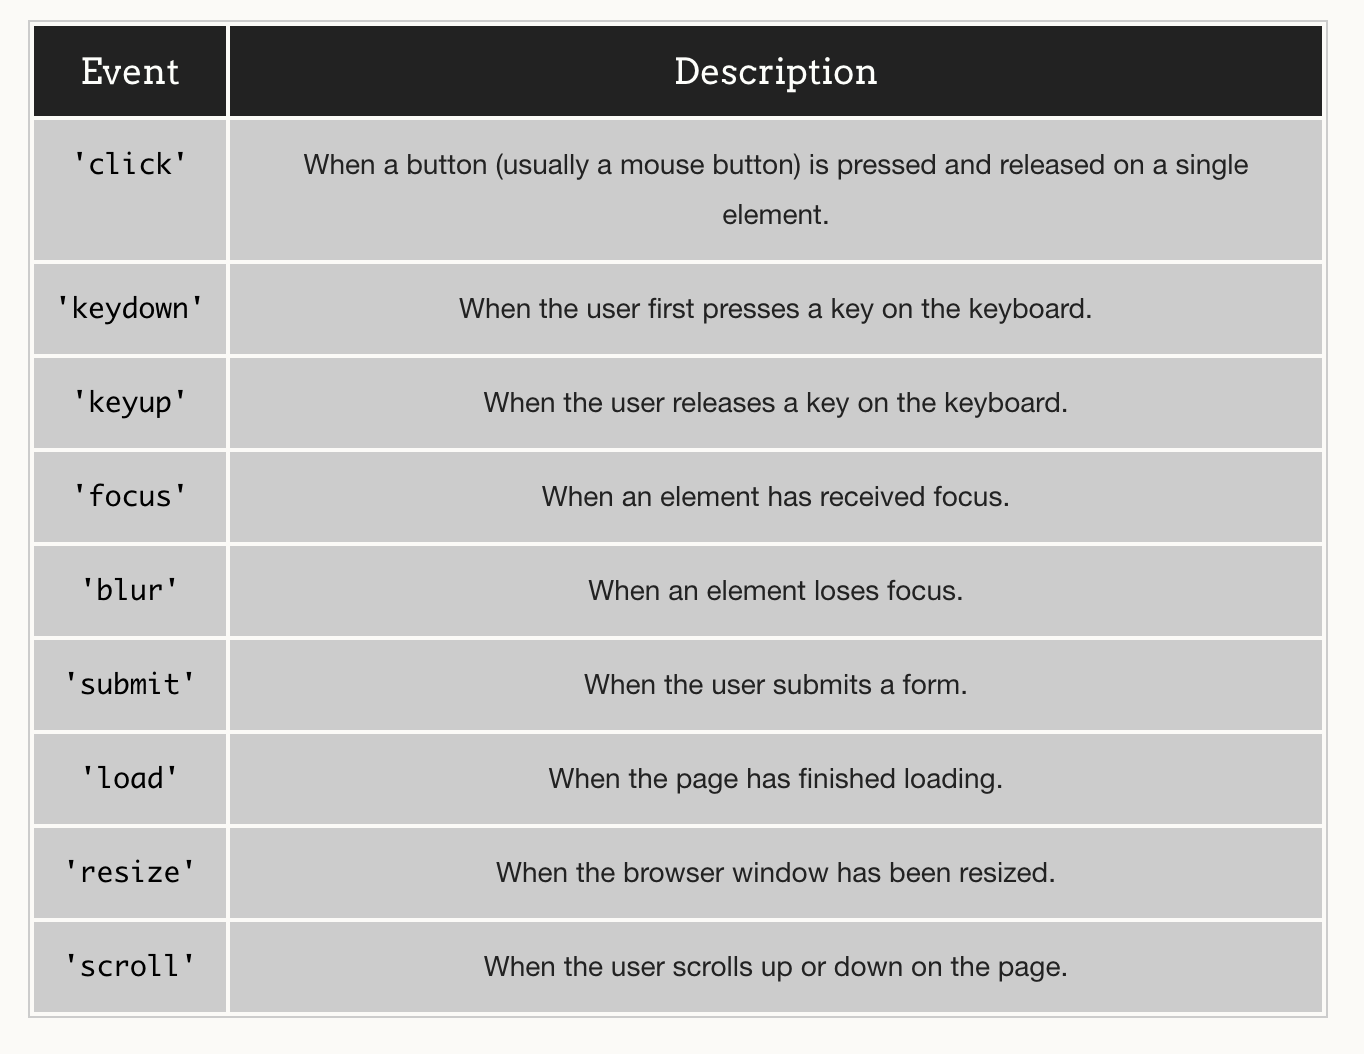
Actions were taken by a user that can trigger updates in the DOM.
For example, when a user clicks on a web site’s menu icon, a sidebar menu should slide out from the side of the page. Or, if the user has typed an incorrect format into a form field, the field should become outlined in red.
Event Handler
We can set up event handlers in our scripts that will listen, or wait, for an event to occur and then trigger a function.
The syntax for setting up an event handler looks like this:
This cheat sheet contains all elements that frequently occur in modern projects and most code. It won’t teach you JavaScript from scratch, but help you with basic knowledge and concepts. Moreover, the author has provided some personal tips that may be debatable, but I find them very helpful.

Comments