
Angular
Angular is a development platform for building mobile and desktop web applications using TypeScript/JavaScript and other languages.
@ngrx/store
Store is RxJS powered state management for Angular applications, inspired by Redux. Store is a controlled state container designed to help write performant, consistent applications on top of Angular.
WebSocket API
The WebSocket API is an advanced technology that makes it possible to open a two-way interactive communication session between the user's browser and a server. With this API, you can send messages to a server and receive event-driven responses without having to poll the server for a reply.
This is we want to get from application architecture, We have web socket service that will push data and at client side angular client will get data and using rx js subject we will spread this data to all components.
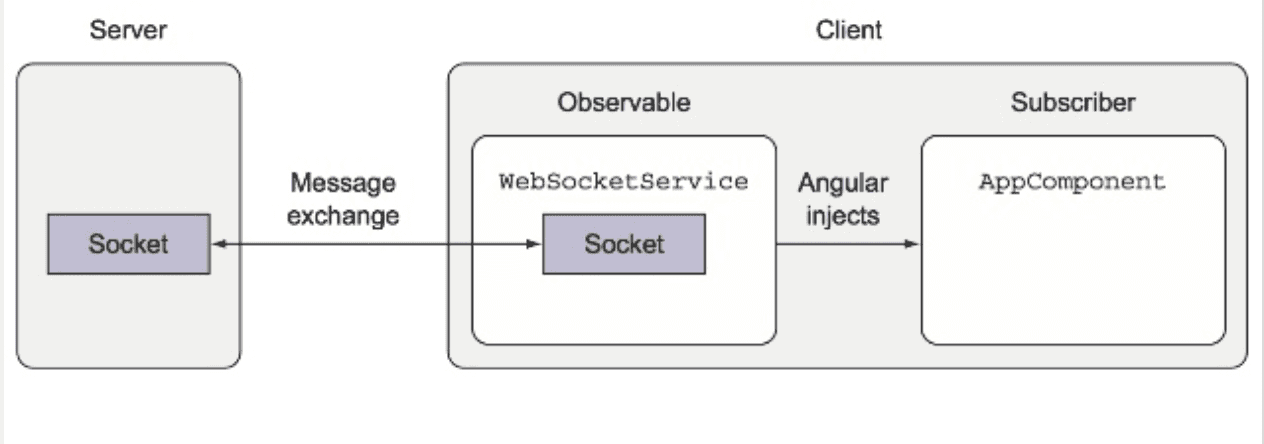 ngrx with web socket
Web Sockets can be used to push data to an Angular service. The general flow looks something like this:
Add Web Socket functionality on the server
- Create an Angular service that subscribes to the data stream provided by the server
- Return an observable from the Angular service that a component can subscribe to
- Emit data received in the Angular service (from the server) to observable subscribers
- Subscribe to the service observable in a component
- While it’s fairly easy to follow the flow described above, having an actual example makes it much easier to demonstrate the overall concept. As a result, I decided to create a simple Angular/Web Socket proof of concept project that I’ll briefly walkthrough here.
- Add Web Socket Functionality to the Server
There are a lot of options that can be used to add Web Socket functionality to the server – it really depends upon what language/framework you prefer. For the Angular/Web Socket example project, I went with Node.js and socket.io since it’s easy to get up and running on any OS. The overall server is extremely easy to get up and running (keep in mind that I purposely kept it very basic to demonstrate the overall concept). The server starts a timer (used to simulate data changing on the server) once a client connection is made and returns data to one or more clients as the timer fires.
const express = require('express'),
      app = express(),
      server = require('http').createServer(app);
      io = require('socket.io')(server);

let timerId = null,
    sockets = new Set();

//This example emits to individual sockets (track by sockets Set above).
//Could also add sockets to a "room" as well using socket.join('roomId')
//https://socket.io/docs/server-api/#socket-join-room-callback

app.use(express.static(__dirname + '/dist'));

io.on('connection', socket => {

  sockets.add(socket);
  console.log(`Socket ${socket.id} added`);

  if (!timerId) {
    startTimer();
  }

  socket.on('clientdata', data => {
    console.log(data);
  });

  socket.on('disconnect', () => {
    console.log(`Deleting socket: ${socket.id}`);
    sockets.delete(socket);
    console.log(`Remaining sockets: ${sockets.size}`);
  });

});
function startTimer() {
  timerId = setInterval(() => {
    if (!sockets.size) {
      clearInterval(timerId);
      timerId = null;
      console.log(`Timer stopped`);
    }
    let value = ((Math.random() * 50) + 1).toFixed(2);
    for (const s of sockets) {
      console.log(`Emitting value: ${value}`);
      s.emit('data', { data: value });
    }

  }, 2000);
}

server.listen(8080);
console.log('Visit http://localhost:8080 in your browser');
The key part of the code is found in the io.on(‘connection’, …) section. This code handles adding client socket connections into a set, starts the timer when the first socket connection is made and handles removing a given socket from the set when a client disconnects. The startTimer() function simulates data changing on the server and handles iterating through sockets and pushing data back to connected clients (note that there are additional techniques that can be used to push data to multiple clients – see the included comments).
The next 3 steps all relate to the Angular service.
-
Create an Angular Service that Subscribes to the Data Stream Provided by the Server 3. Return an Observable from the Angular Service that a Component can Subscribe to 4. Emit data received in the Angular Service (from the service) to Observable subscribers
-
The Angular service subscribes to the data being pushed from the server using a script provided by socket.io (the script is defined in index.html). The service’s getQuotes() function first connects to the server using the io.connect() call. It then hooks the returned socket to “data” messages returned from the server. Finally, it returns an observable to the caller. The observable is created by calling Observable.create() in the createObservable() function.
-
As Web Socket data is received in the Angular service, the observer object created in createObservable() is used to pass the data to any Angular subscribers by calling observer.next(res.data). In essence, the Angular service simply forwards any data it receives to subscribers.
import { Injectable } from '@angular/core';
import { Observable } from 'rxjs/Observable';
import { Observer } from 'rxjs/Observer';
import { map, catchError } from 'rxjs/operators';
import * as socketIo from 'socket.io-client';

import { Socket } from '../shared/interfaces';

declare var io : {
  connect(url: string): Socket;
};

@Injectable()
export class DataService {

  socket: Socket;
  observer: Observer;

  getQuotes() : Observable<number> {
    this.socket = socketIo('http://localhost:8080');

    this.socket.on('data', (res) => {
      this.observer.next(res.data);
    });

    return this.createObservable();
  }

  createObservable() : Observable<number> {
      return new Observable(observer => {
        this.observer = observer;
      });
  }

  private handleError(error) {
    console.error('server error:', error);
    if (error.error instanceof Error) {
        let errMessage = error.error.message;
        return Observable.throw(errMessage);
    }
    return Observable.throw(error || 'Socket.io server error');
  }
}
Subscribe to the Service Observable in a Component
The final step involves a component subscribing to the observable returned from the service’s getQuotes() function. In the following code, DataService is injected into the component’s constructor and then used in the ngOnOnit() function to call getQuotes() and subscribe to the observable. Data that streams into the subscription is fed into a stockQuote property that is then rendered in the UI.
Note that the subscription object returned from calling subscribe() is captured in a sub property and used to unsubscribe from the observable when ngOnDestroy() is called.
import { Component, OnInit, OnDestroy } from '@angular/core';
import { DataService } from './core/data.service';
import { Subscription } from 'rxjs/Subscription';

@Component({
  selector: 'app-root',
  templateUrl: './app.component.html'
})
export class AppComponent implements OnInit, OnDestroy {

  stockQuote: number;
  sub: Subscription;

  constructor(private dataService: DataService) { }

  ngOnInit() {
    this.sub = this.dataService.getQuotes()
        .subscribe(quote => {
          this.stockQuote = quote;
        });
  }

  ngOnDestroy() {
    this.sub.unsubscribe();
  }
}
Comments