
Amazon Elastic Container Service (Amazon ECS) is a highly scalable, high-performance container orchestration service that supports Docker containers and allows you to easily run and scale containerized applications on AWS. Amazon ECS eliminates the need for you to install and operate your own container orchestration software, manage and scale a cluster of virtual machines, or schedule containers on those virtual machines.
There are few alternatives out there; however, today, we will talk about Amazon ECS using AWS as your cloud provider.
Let’s get real: High-Overview Architecture.
For the sake of this example, I will design a VPC following all the basic best-practice that you should apply in a production environment.

In this article, we will focus just on the ECS component. However, this is a pretty standard architecture for a VPC where you do have a Public, Private/Application and Data-Subnet.
As you can see, the Private and Data subnet is secured, this means that no-one can access directly from outside if they are not passing from the application load balancer.
Let’s start: The importance of the Application Load Balancer.
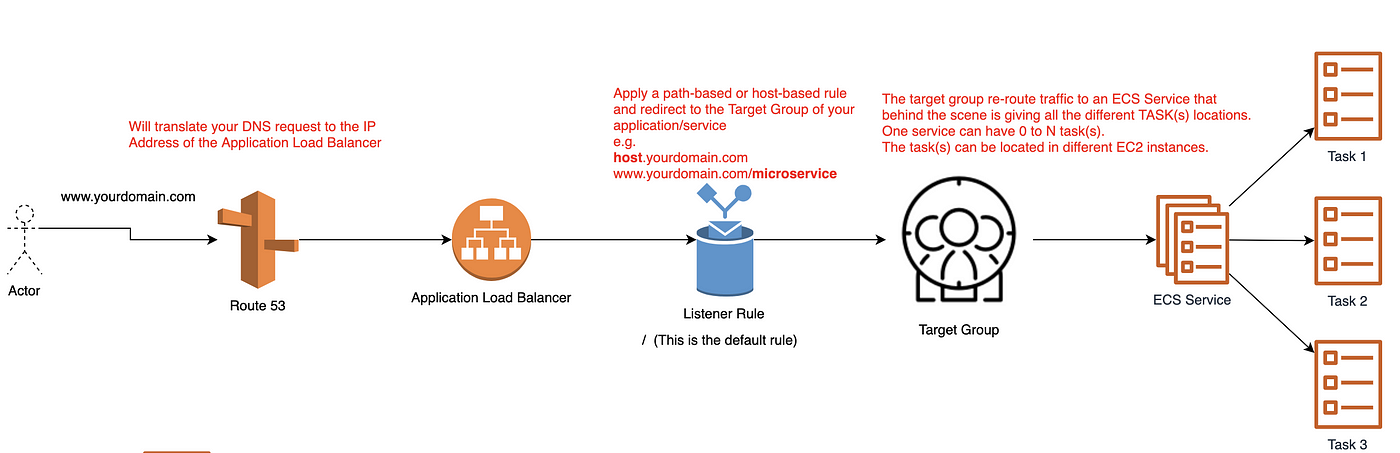
The ALB is the entry point for your application! Imagine typing (www.yourdomain.com); your DNS will translate the request to the IP of the Application Load Balancer. At this stage, the Application Load Balancer will have to analyse the different rule and re-route the request to a specific target group. A target group is used to re-route traffic to a particular service and behind the scene to all the different task (s)/container(s) that the service is running across your ECS cluster.
ECS Cluster
In this example, we are doing an old school EC2 Instance Cluster. Nevertheless, if you are into serverless, I will recommend using the FARGATE option.
An Amazon ECS cluster is a regional grouping of one or more container instances on which you can run task requests. Each account receives a default cluster the first time you use the Amazon ECS service. Clusters may contain more than one Amazon EC2 instance type.
To create a cluster jump on your “Amazon ECS” page and click Create Cluster.

From there you will be asked to choose a template: Fargate template (not covered in this guide) or a Standard Template (Linux / Windows). After you select the template you need to choose:
- Cluster Name
- Provisioning Model, Number of Instances, EC2 Image to be used, EBS Storage Size, Keypair
- Network Configuration, Security Group (never use the public subnet!)
- Container Instance IAM Role
- CloudWatch Container Insights
ECS Service
An ECS Service is responsible for launching, monitoring and recovering task (s)/Container(s) started in the ECS Cluster. You can define how many tasks you want to run and how to place them in the cluster (using task placement strategies and constraints to customise task placement decisions).

ECS Service spawning three tasks set in the ECS Cluster across 3 EC2 Instance
To allow the ECS Service to manage your task (s), you need to provide a task definition, that in the docker world will be the equivalent of a docker-compose.yml file.
ECS Service — Task Definition
The Task Definition is a requirement to run Docker container(s)/task(s) in AWS ECS as it defines:
- The image to use (generally hosted in AWS ECR/DOCKER HUB or your preferred Registry)
- Memory and CPU limits
- The launch type
- The logging configuration
- And much more
You can refer to this gist to have an idea:
For create a task definition, go to your ECS console and create a new one, this will be needed whenever we will start up a Service:
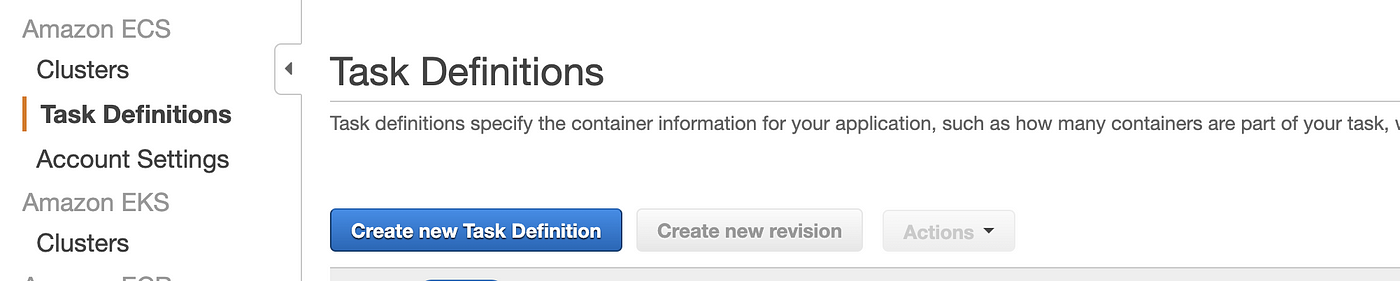

Select EC2 as we are using an old-school EC2 ECS Cluster
At this stage, you can configure everything by the UI, or copy/paste a JSON file.
ECS Service — Service Creation
Jump on your ECS Console and after that, select your cluster and click Create a New Service.
From there, select the task definition you’ve created and read the instruction to complete the task.

Congratulation your docker container is up and running, with a service taking care of the health check and the cluster behind, ready to host more and more of your projects!
Let’s talk about features?
Auto-heal container: Using the target group, you can specify a path for checking the status of your application:
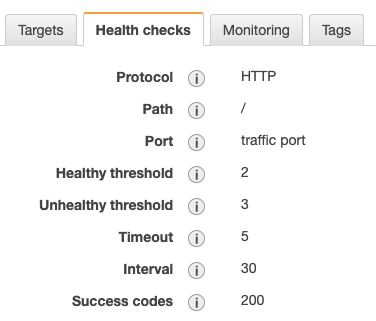
In this example, the health-check is pinging the homepage at an interval of 30 seconds, making sure that it is returning a status code of 200. In the reverse scenario, the health-check fails, and your container will be re-deployed automatically!
Demon Scheduling: Have you ever need to run a demon across your cluster? Well, if the answer is yes, you do know how painful is to manage (what happens if the container dies for a health-check for example?), this is the AWS managed way to deploy demon such a logging system.

Task Scheduling: Batch jobs? Event-driven Jobs? All-in-one solution, the task scheduling allows you to start a task(s) based on a time interval (cronjob like), from a queue job (event-driven) or start manually!
Task Placement: Even if it sounds something “1–0–1” placing the container across your cluster is not an easy job, you want to make sure that, e.g. that you do have an even distribution, therefore, if one of your ec2 instances stop or get restarted by mistake, your service will continue to stay up and running.

AZ Balanced Spread_:_ Availability Zone across EC2 instance (try to place each of the container in an EC2 instance that reside in a different az).
AZ Balanced BinPack_:_ Availability Zone across EC2 instance choosing the one with the least available memory
BinPack_: EC_2 instance selecting the one with the least available memory
One Task Per Host_:_ As per the description
Custom: This is the best feature; you can specify custom rules like Which kind of instance, you need to run the task, the AMI-id, the region, etc.etc
AWS EKS Fundamentals: Architecture & Components
Learn about Managed EKS and Create EKS Cluster using eksctl

When it comes to set up a production-grade container orchestration to automate deployment, scaling, and management of containerized applications, Kubernetes is your true mate.
I have already covered Kubernetes fundamentals and architectural components in detail in my article given below:
[
Kubernetes Fundamentals For Absolute Beginners: Architecture & Components
Learning Kubernetes architecture & components
medium.com
](/the-programmer/kubernetes-fundamentals-for-absolute-beginners-architecture-components-1f7cda8ea536)
I recommend that you brush up on the K8s concepts if not done yet.
Today we will learn
- What Is AWS EKS & Why You Should Consider It?
- How To Setup EKS?
- How to create a K8S cluster in AWS?
- EKS Core Components
Let’s Get Started:
What Is AWS EKS?
If you want to manage production-grade deployments, start, run, and scale the same on AWS Cloud or on-premises, Amazon’s Elastic Kubernetes services(EKS) can help you achieve the same.
“AWS EKS provides you the cluster which is highly secure and available. It automates key tasks such as patching, node provisioning, and updates”
In a nutshell:
Amazon EKS is a managed service that makes it easy for you to run Kubernetes on AWS without needing to install and operate your own Kubernetes control plane or worker nodes.
Why EKS?
High Availability :
When you set up EKS on AWS, it gives you a control plane that is available across multiple availability zones, if there is an issue with any of the control planes EKS automatically detects and replaces those unhealthy control plane nodes, and provides on-demand, zero downtime upgrades, and patching.
EKS offers a 99.95% uptime SLA. At the same time, the EKS console provides observability of your Kubernetes clusters so you can identify any issue quickly and get it resolved.
Provision Your Resources For Scale:
EKS managed services come pre-configured with the required compute (Server resources)provisioning which is designed to scale your K8S app. You don’t need to manage those configurations manually.
EKS also supports AWS Fargate to automatically provision on-demand serverless compute for your applications.
Highly Secure K8s Environment :
The Clusters deployed using EKS is highly secured and automatically apply the latest security patches to your cluster’s control plane.
What are the EKS Core Components?

An Amazon EKS cluster consists of the following core objects
- EKS control plane
- EKS nodes(Worker Nodes) that are registered with the control plane
- AWS Fargate Profiles
- VPC
Let’s get into the details of each one
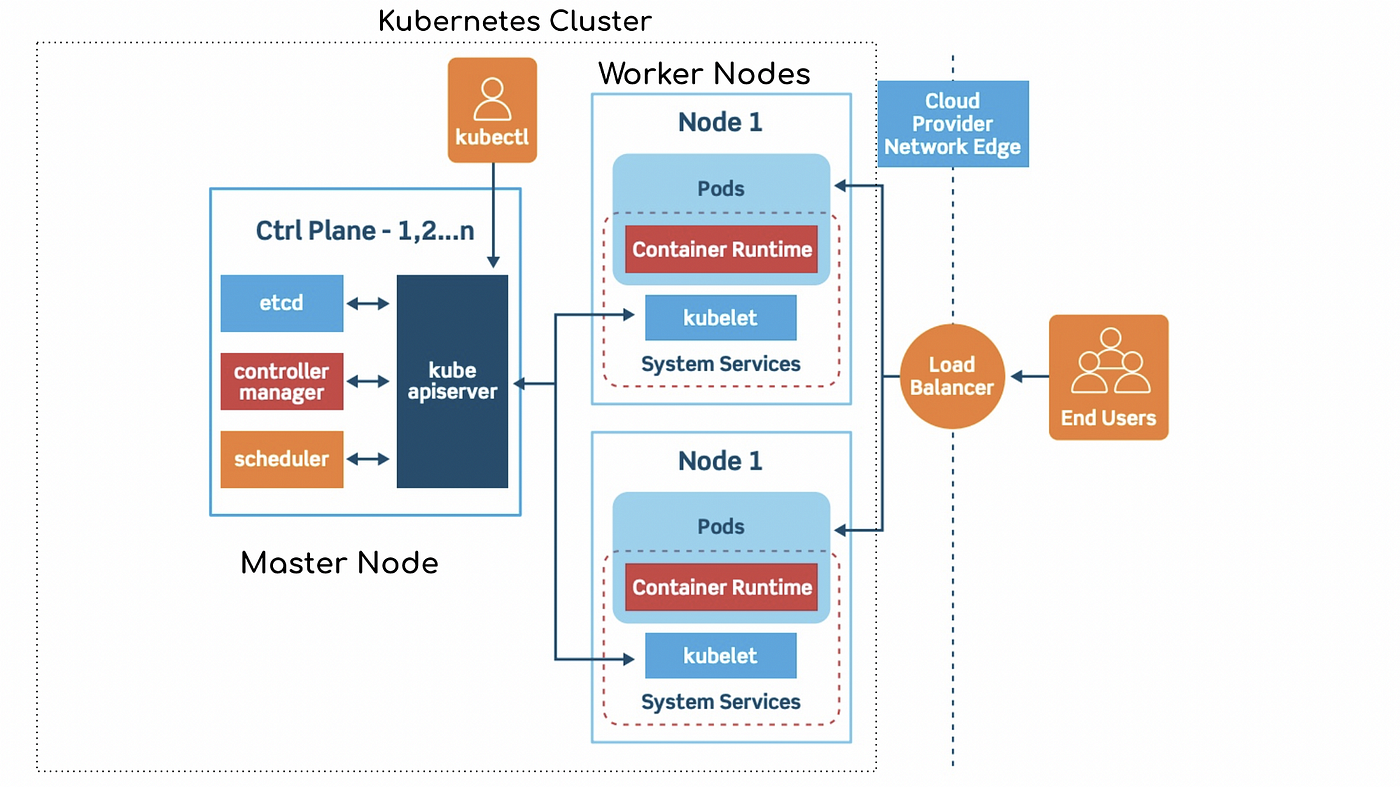
fig 1.0
EKS control plane:
This is one of the core functionality which EKS provides as managed service. The control plane act as a master node for our K8S architecture.
The master node is also known as a control plane that is responsible to manage worker/slave nodes efficiently. They interact with the worker node to
- Schedule the pods
- Monitor the worker nodes/Pods
- Start/restart the pods
- Manage the new worker nodes joining the cluster
The control plane runs in an account managed by AWS, and the Kubernetes API is exposed via the Amazon EKS endpoint associated with your cluster. Each Amazon EKS cluster control plane is single-tenant and unique and runs on its own set of Amazon EC2 instances.
Master Node Processes:
Every master node in the K8s cluster runs the following key processes
- kube-apiserver
- kubectl: kube-controller-manager
- kube-scheduler
- etcd
To understand each of the above terms in detail, do refer to my article on K8S architecture
[
Kubernetes Fundamentals For Absolute Beginners: Architecture & Components
Learning Kubernetes architecture & components
medium.com
](/the-programmer/kubernetes-fundamentals-for-absolute-beginners-architecture-components-1f7cda8ea536)
EKS Worker Nodes:
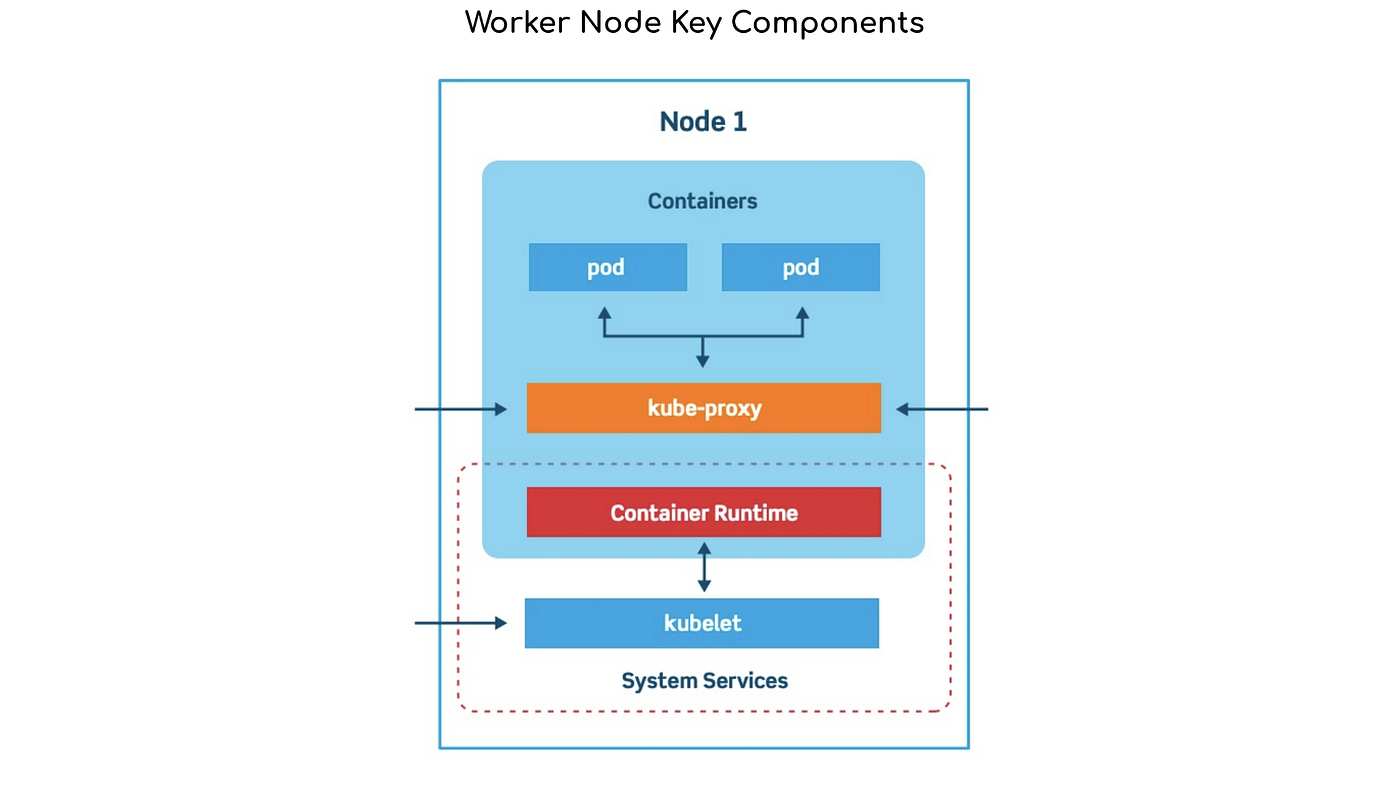
fig 2.0
Amazon EKS hosts worker nodes :
Where all our workloads(pods/deployments/services etc) regarding front-end or backend in the form of YAML files, are deployed and managed. These nodes are a group of EC2 instances provisioned by AWS. Each Amazon EC2 node is deployed to one subnet. Each node is assigned a private IP address from a CIDR block assigned to the subnet.
As a developer or K8s administrator most of the time you will deal with worker nodes, whether you have to deploy your containerized app or you have to autoscale it, or you have to roll out any new app update on your production-grade server, you will often deal with worker nodes.
If the subnets were created using one of the Amazon EKS provided AWS CloudFormation templates, then nodes deployed to public subnets are automatically assigned a public IP address by the subnet.
Worker node can have one or more pods, these pods are your abstraction of a containerized application. Every worker as shown in the fig:2.0 runs these 3 key processes
- Container Runtime
- kubelet
- kube-proxy
If you want to further understand all these worker node components, do refer to my article below:
[
Kubernetes Fundamentals For Absolute Beginners: Architecture & Components
Learning Kubernetes architecture & components
medium.com
](/the-programmer/kubernetes-fundamentals-for-absolute-beginners-architecture-components-1f7cda8ea536)
AWS Fargate Profiles :
Here instead of EC2 nodes, EKS helps us to provision our workloads to be deployed on AWS Fargate (A serverless component). In the case of Fargate, our workloads are deployed to private subnets only.
Each pod is assigned a private IP address from the CIDR block assigned to the subnet. Fargate does not support all pod networking options. For more information, see AWS Fargate considerations.
EKS VPC: Virtual Private Cloud
EKS Virtual Private Cloud (VPC) is used for secure pod(workload) networking. With EKS VPC we can follow a secured networking standard to run production-grade workloads to run within the VPC environment.
In your EKS clusters running in an AWS VPC, it allows you to use your own VPC security groups and network ACLs. No compute resources are shared with other customers. This provides a high level of isolation and helps you use Amazon EKS to build highly secure and reliable applications.
Now that we have understood the basics of all EKS components, its time to learn how to setup EKS on AWS cloud
How Does EKS Works?

Amazon EKS in the cloud:
The above fig 3.0 depicts the architecture for deploying the workloads in the amazon cloud using EKS managed service.
This process covers the following key steps
Provision EKS Cluster, where EKS will automatically deploy the master node for us. This master node will provide the required control plan to manage the networking and resource requirements for our worker nodes
Deploy Workloads:
Once the master node is deployed via EKS, we need to provide worker nodes in our K8s cluster, which is nothing but the group or EC2 instances.
Connect To EKS:
In order to deploy our workloads in the worker nodes, we need to connect to EKS, to do so we rely on Kubectl(CLI), which is used to create and deploy the workloads (YAML files )
Now App can be run in the cluster
Once the workloads are deployed in the worker nodes, it will be up and ready to be exposed outside the cluster via service(via NodePort) or to be consumed within the cluster
Let’s see all this happening in action, to so so we need to first create our EKS cluster
Installing EKS CLuster on AWS Using eksctl
Now if you are interested to get your hands dirty with some cool EKS functionality and features, the very first thing we need to do is to get started with setting up an EKS cluster on AWS using eksctl CLI, so let’s jump into discussing the steps for the same
_eksctl is_ a simple command-line utility for creating and managing Kubernetes clusters on Amazon EKS.
What are the prerequisites?
Before we go on to create our first k8s cluster, we need must install and configure the following tools and resources
- Installing & Configuring AWS CLI
kubectl– A command-line tool for working with Kubernetes clusters.eksctl– A command-line tool for working with EKS clusters that automates many individual tasks.- Configure IAM permissions — The IAM security principal that you’re using must have permissions to work with Amazon EKS IAM roles and service-linked roles, AWS CloudFormation, and a VPC and related resources.
- Installing AWS CLI & Configuring IAM user
It is a command-line tool for working with AWS services, including Amazon EKS.
Step1: Download AWS CLI binary
- For the latest version(on macOS):
$ curl “https://awscli.amazonaws.com/AWSCLIV2.pkg" -o “AWSCLIV2.pkg”$ sudo installer -pkg AWSCLIV2.pkg -target /
- For any specific version of the AWS CLI, append a hyphen and the version number to the filename. For this example the filename for version
_2.0.30_would beAWSCLIV2-2.0.30.pkgresulting in the following command:
$ curl "https://awscli.amazonaws.com/AWSCLIV2-2.0.30.pkg" -o "AWSCLIV2.pkg"$ sudo installer -pkg AWSCLIV2.pkg -target /
Step 2: Verify that AWS CLI is installed
$ aws --version
aws-cli/2.1.29 Python/3.7.4 Darwin/18.7.0 botocore/2.0.0

For any other OS, follow the official AWS link below:
Installing, updating, and uninstalling the AWS CLI version 2 on Windows
Python 2.7, 3.4, and 3.5 are deprecated for the AWS CLI version 1. For more information see the AWS CLI version 1…
docs.aws.amazon.com https://docs.aws.amazon.com/cli/latest/userguide/install-cliv2-windows.html
Installing, updating, and uninstalling the AWS CLI version 2 on Linux
This section describes how to install, update, and remove the AWS CLI version 2 on Linux. The AWS CLI version 2 has no…
docs.aws.amazon.com
(https://docs.aws.amazon.com/cli/latest/userguide/install-cliv2-linux.html)
Now that we have successfully installed AWS CLI, it is time to
Configure AWS Command Line using IAM Security Credentials
- Go to AWS Management Console → Services → IAM
- Create & Select the IAM User
- It is highly recommended that you use only IAM users to generate Security Credentials. Never ever use root User
- Click on the Security credentials tab
- Click on Create access key
- Copy Access ID and Secret access key
- Go to the command line and key in the following details
$ aws configureAWS Access Key ID [None]: ABCDEFGHIAZBERTUCNGG (Replace your access key when prompted)AWS Secret Access Key [None]: uMe7fumK1IdDB094q2sGFhM5Bqt3HQRw3IHZzBDTm (Replace your secret key when prompted)Default region name [None]: ap-south-1(you can put your own availability zone here )Default output format [None]: json
- Check if AWS CLI is working after configuring IAM security cred
$ aws ec2 describe-vpcs
The output will look something like this:(It will vary for you)

2. Installing Kubectl:
I am going to do the kubectl installation on MacOS :
Step1: We need to download the kubectl binary from the preferred eks k8s version(1.21/1.20/1.19/1.18), we will go with the 1.21 version of k8s, to do so, run the following curl command, in the macOS terminal.
We will do all installation step for Kubernetes version 1.21:
$ curl -o kubectl https://amazon-eks.s3-us-west-2.amazonaws.com/1.21.2/2021-07-05/bin/darwin/amd64/kubectl
Step 2: (Optional) Verify the downloaded binary with the SHA-256 sum for your binary.
$ curl -o kubectl.sha256 https://amazon-eks.s3-us-west-2.amazonaws.com/1.21.2/2021-07-05/bin/darwin/amd64/kubectl.sha256
Once the SHA-256 is downloaded,we need to check the SHA-256 sum
$ openssl sha1 -sha256 kubectl
Compare the generated SHA-256 sum in the command output against your downloaded SHA-256 file. The two should match.
Step 3: Apply to execute permissions to the binary.
$ chmod +x ./kubectl
Step 4:
Copy the binary to a folder in your PATH. If you have already installed a version of, then we recommend creating a $HOME/bin/kubectl and ensuring that $HOME/bin comes first in your $PATH.
$ mkdir -p $HOME/bin && cp ./kubectl $HOME/bin/kubectl && export PATH=$HOME/bin:$PATH
Step 5:
Add the $HOME/bin path to your shell initialization file so that it is configured when you open a shell.
$ echo ‘export PATH=$PATH:$HOME/bin’ >> ~/.bash_profile
Step 6:
After you install kubectl, let’s check the Kubectl version
$ kubectl version — short — client
The output will look like shown in the pic below:
That means you have successfully installed Kubectl CLI .

2. Installing or upgrading eksctl:(For macOS)
One of the quickest ways to get started with Amazon EKS and macOS is by installing eksctl with Homebrew.
The _eksctl_ Homebrew recipe installs _eksctl_ and any other dependencies that are required for Amazon EKS, such as _kubectl_.
Step 1: Install Homebrew if you have done that, we can use the below-given command
$ /bin/bash -c “$(curl -fsSL https://raw.githubusercontent.com/Homebrew/install/master/install.sh)"
Step 2:
Install the Weaveworks Homebrew tap.
$ brew tap weaveworks/tap
Step 3 : Install or upgrade eksctl(if it exists with an older version)
Install eksctl :
$ brew install weaveworks/tap/eksctl
Upgrade eksctl if it already exists with the following command
$ brew upgrade eksctl && brew link --overwrite eksctl
Step 4: Check whether eksctl is installed
(or upgraded) successfully by the following command
$ eksctl version
The output will look like shown in the image below

Note!
If you are installing kubectl and eksctl on any other OS like Linux or windows
Follow the links given below
For kubectl:
Installing kubectl
Kubernetes uses a command line utility called kubectl for communicating with the cluster API server. The kubectl binary…
docs.aws.amazon.com
](https://docs.aws.amazon.com/eks/latest/userguide/install-kubectl.html)
For eksctl:
[
The eksctl command line utility
This topic covers eksctl , a simple command line utility for creating and managing Kubernetes clusters on Amazon EKS…
docs.aws.amazon.com
](https://docs.aws.amazon.com/eks/latest/userguide/eksctl.html)
Now that we have set up all the pre-requisite tools required to create our EKS cluster, its time to:
Create EKS cluster:
- We will make use of eksctl CLI to create our EKS cluster with the command as shown below:
- Create a cluster with the Amazon EKS latest Kubernetes version in your default Region. Replace the
_<example-values>_(including_<>_) with your own values. You can replace_<1.20>_with any supported version.
$ eksctl create cluster \
--name Democluster\
--version <1.21> \
--without-nodegroup
- Check if the cluster is created:
$ eksctl get cluster

Summing It Up :
We have learned about the key EKS object and how to set up a quick EKS cluster, as this article is going big in length, it will be wise to cover more details about the EKS cluster in Part 2 of
“EKS fundamentals for absolute beginners”
We will cover the following in part 2 :
- How to create EKS managed Node Group?
- How to Create & Associate IAM OIDC Provider for our EKS Cluster?
In order to use the IAM roles we created for the k8s service account on our EKS cluster, we need to create & associate OIDC identity provider.
- We will deploy our first workloads in the form or pod, into our created cluster
So stay tuned and come back later to continue this EKS K8S learning journey with me.
Would like to end this article with this food for thought
Kubernetes has to be at the core of every startup and emerging tech companies who are looking to adopt DevOps in order build the robust backend infrastructure which will be highly scalable, secure, and reliable.
Comments