
Deploying EC2 Instance using Nested Stack AWS CDK Part-8
In this Blog we will cover all these Topics
- Create a VPC using CDK
- Pass the VPC to another Stack
- Create EC2 Instance and pass subnet from VPC Stack
Lets first create VPC using CDK
this.vpc = new ec2.Vpc(this, 'nested-stack-vpc', {
  cidr: '10.0.0.0/16',
  natGateways: 0,
  maxAzs: 3,
  subnetConfiguration: [
    {
      name: 'public-subnet-1',
      subnetType: ec2.SubnetType.PUBLIC,
      cidrMask: 24,
    },
    // 👇 added isolated subnets
    {
      name: 'isolated-subnet-1',
      subnetType: ec2.SubnetType.PRIVATE_ISOLATED,
      cidrMask: 24,
    },
  ],
});
Amazon Virtual Private Cloud (Amazon VPC) enables you to launch AWS resources into a virtual network that you've defined. This virtual network closely resembles a traditional network that you'd operate in your own data center, with the benefits of using the scalable infrastructure of AWS.
The following diagram shows an example VPC. The VPC has one subnet in each of the Availability Zones in the Region, EC2 instances in each subnet, and an internet gateway.
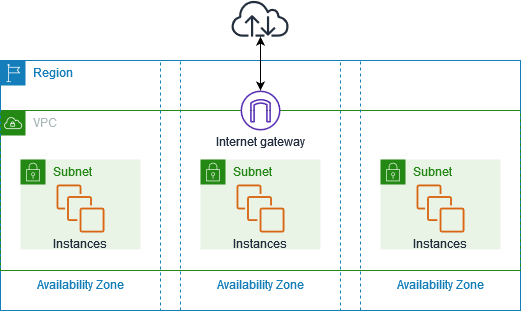
A network’s division is known as a subnet. Subnetting is the process of dividing a network into smaller subnets or subnetworks. We’ll now discuss public and private subnets.
Public subnets
They are frequently used when the resources need to be connected to the internet, such as when web servers are involved. The primary route table routes subnet traffic intended for the internet to the internet gateway. As a result, this kind of subnet is known as a public subnet Private subnets are utilized, on the other hand, for resources that don’t require an internet connection.
Subnet size: Typically, private subnets have twice as many instances as public subnets.
Route Table:
As was already noted, AWS’s VPC offers total control over the traffic. You can achieve that by using route tables. A routing table is made up of rules that specify how and where traffic in a network will be directed.
Each subnet in the Amazon Virtual Private Cloud has to have a routing table that governs the routing for that subnet. In a network, a routing table may be connected to various subnets.
Now Lets use VPC is EC2 Instance
- How to provision and setup an ec2 instance
- How to setup terminal access to the instance via SSH key.
- How to update the ec2 instance with a user script and update the deployed cdk stack
================================================
export class EC2Stack extends cdk.Stack {
  constructor(scope: cdk.App, id: string, props?: cdk.StackProps) {
    super(scope, id, props);

    const { vpc } = new VpcNestedStack(this, 'nested-stack');

    const webserverSG = new ec2.SecurityGroup(this, 'webserver-sg', {
      vpc,
    });

    webserverSG.addIngressRule(ec2.Peer.anyIpv4(), ec2.Port.tcp(80), 'allow HTTP traffic from anywhere');

    const ec2Instance = new ec2.Instance(this, 'ec2-instance', {
      vpc,
      vpcSubnets: {
        subnetType: ec2.SubnetType.PUBLIC,
      },
      securityGroup: webserverSG,
      instanceType: ec2.InstanceType.of(ec2.InstanceClass.BURSTABLE2, ec2.InstanceSize.MICRO),
      machineImage: new ec2.AmazonLinuxImage({
        generation: ec2.AmazonLinuxGeneration.AMAZON_LINUX_2,
      }),
    });

    ec2Instance.addUserData(
      'sudo su',
      'yum install -y httpd',
      'systemctl start httpd',
      'systemctl enable httpd',
      'echo "<h1>It works :)</h1>" > /var/www/html/index.html'
    );

    const { vpc: vpcLambda } = new VpcNestedStack(this, 'nested-stack-lambda');

    const lambdaFunction = new lambda.Function(this, 'lambda-function', {
      runtime: lambda.Runtime.NODEJS_16_X,
      vpc: vpcLambda,
      vpcSubnets: {
        subnetType: ec2.SubnetType.PUBLIC,
      },
      allowPublicSubnet: true,
      memorySize: 1024,
      timeout: cdk.Duration.seconds(5),
      handler: 'index.main',
      code: lambda.Code.fromAsset(path.join(__dirname, '/../src/my-lambda')),
      environment: {
        VPC_CIDR: vpcLambda.vpcCidrBlock,
        VPC_ID: vpcLambda.vpcId,
      },
    });
  }
}
Here we are adding VPC stack in out local stack
const { vpc } = new VpcNestedStack(this, 'nested-stack');we can configure our EC2 instance with all these configurations
const webserverSG = new ec2.SecurityGroup(this, 'webserver-sg', {
  vpc,
});

webserverSG.addIngressRule(ec2.Peer.anyIpv4(), ec2.Port.tcp(80), 'allow HTTP traffic from anywhere');

const ec2Instance = new ec2.Instance(this, 'ec2-instance', {
  vpc,
  vpcSubnets: {
    subnetType: ec2.SubnetType.PUBLIC,
  },
  securityGroup: webserverSG,
  instanceType: ec2.InstanceType.of(ec2.InstanceClass.BURSTABLE2, ec2.InstanceSize.MICRO),
  machineImage: new ec2.AmazonLinuxImage({
    generation: ec2.AmazonLinuxGeneration.AMAZON_LINUX_2,
  }),
});
In EC2 instance we are passing vpc configurations
const ec2Instance = new ec2.Instance(this, 'ec2-instance', {
  vpc,
  vpcSubnets: {
    subnetType: ec2.SubnetType.PUBLIC,
  },
  securityGroup: webserverSG,
  instanceType: ec2.InstanceType.of(ec2.InstanceClass.BURSTABLE2, ec2.InstanceSize.MICRO),
  machineImage: new ec2.AmazonLinuxImage({
    generation: ec2.AmazonLinuxGeneration.AMAZON_LINUX_2,
  }),
});
We instantiated the nested stack and grabbed the VPC resource
-
We created a t2.micro EC2 instance, which serves as a webserver and exposed port 80 on the security group.
-
The instance is launched in a public subnet of the VPC from the nested stack.
-
We then added a user data script that installs and starts an apache web server.
ec2Instance.addUserData(
  'sudo su',
  'yum install -y httpd',
  'systemctl start httpd',
  'systemctl enable httpd',
  'echo "<h1>It works :)</h1>" > /var/www/html/index.html'
);
Deploy API Gateway with Authorizer
cdk synth
cdk bootstrap
cdk deploy
cdk destroy
When we synthesize our CloudFormation stack, it gets generated in the cdk.out directory. This is also where the asset files for our Lambda functions are stored. Let's run the synth command to generate the lambda assets:
npx aws-cdk synthIf we now take a look at the assets folder in the cdk.out directory, we can see that our Lambda function's code has been compiled down to JavaScript.
Deploy the Lambda function
The next step is to bootstrap an environment. This action is required only if it is the first time you want to deploy with the CDK; you can skip this if you have already done it before.
This command will create a stack that includes resources used for the toolkit's operation, like an S3 bucket to store templates and assets during the deployment process.
cdk bootstrap

⏳  Bootstrapping environment aws://123456789012/eu-west-1...
Once done, we can deploy our app:
``

```sh
npx aws-cdk deploy
Cleanup
To delete the stack from your account, run the destroy command:
npx aws-cdk destroy
Comments