
In this blog, we will talk about deploying the application on s3 which is static build having the static file and other application and having JS APIs having server-side logic with Mysql Data.
-
hosting a website using S3 and Route 53
-
Hosting website using S3, cloud front and Route 53
-
Hosting website using EC-2 instance and Route 53
Before all this lets first setup Application pipeline to deploy Code to S3 Bucket
https://github.com/tkssharma/code-deployment-s3-React-app.git
Part 1 — Setting up CI/CD For React Application on AWS & gitlab Repository
For this article, I am going to assume that you have already created a React application using create-react-app and are now ready to set up with GitLab’s continuous deployment.
Although this article shows how to deploy a react js app, it is the basic structure for using GitLab’s CI/CD to deploy anything to S3.
First things first, let’s set up an AWS account and create a new S3 bucket! Any new AWS accounts go under their free tier which will allow us to deploy to S3 for free (for the first year, under certain request constraints).
-
React application using create-react-app
-
AWS Account and log in with non-root user having administrator access
-
gitlab account and code has been pushed on gitlab Repo
These are basic steps, You can get free tier subscription from AWS and can play with AWS Managed services. create gitlab account and push code to the repository
gitlab CI CD using gitlab.yml
login to AWS Console and create S3 Bucket
Once signed up, head over to the S3 console and click “Create Bucket”
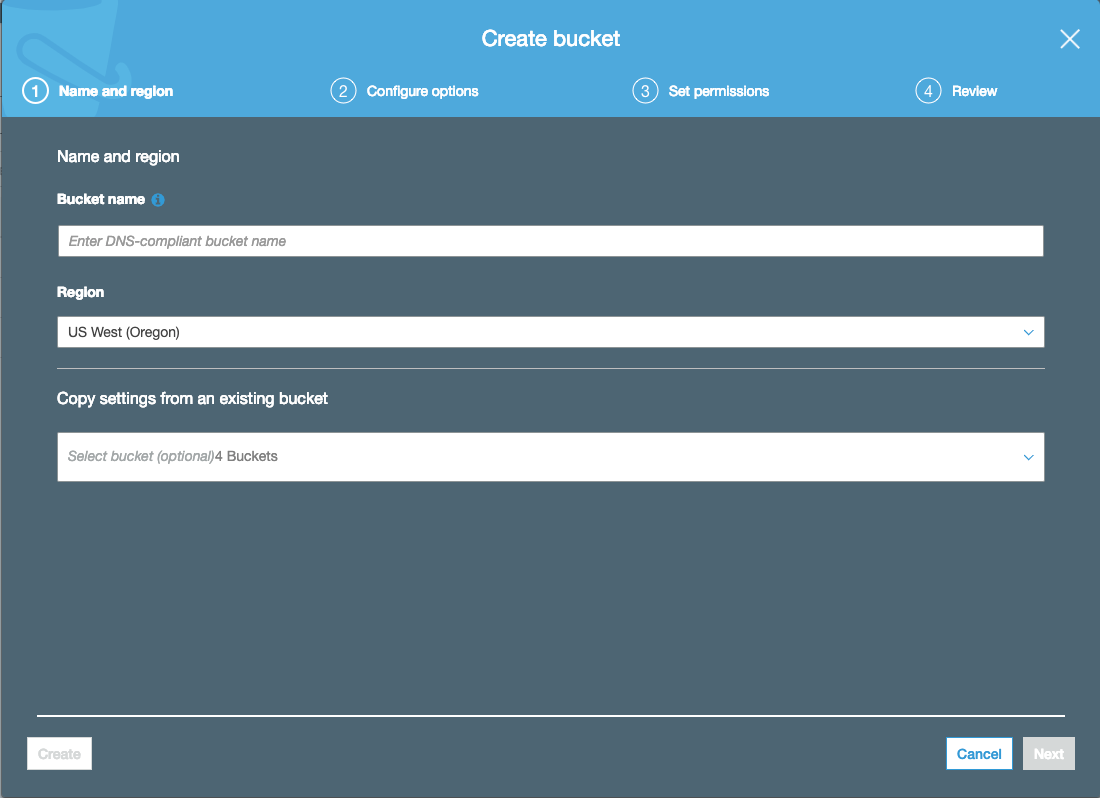 Create bucket modal
You will be shown this modal. Enter in a bucket name (remember this will be required to be unique across AWS). On the “Set Permissions” tab, ensure you uncheck “Block new public bucket policies” and “Block public and cross-account access if bucket has public policies”:

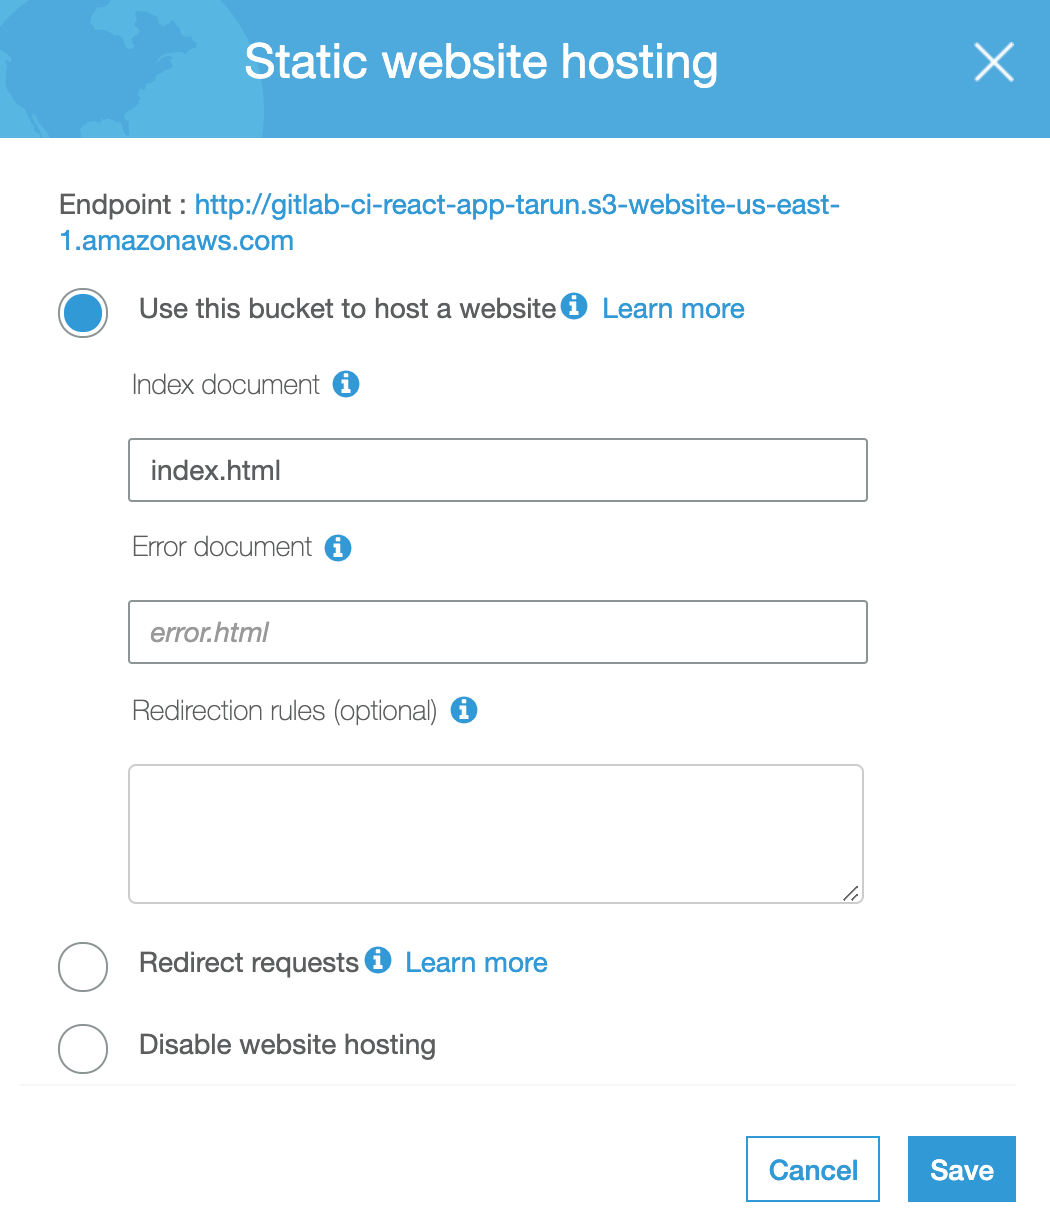
After the bucket has been created, click into the bucket and click the second tab called “Properties”. You will see a card called “Static website hosting”. Click that and enable “use this bucket to host a website” and fill in index.html for the index document as so:
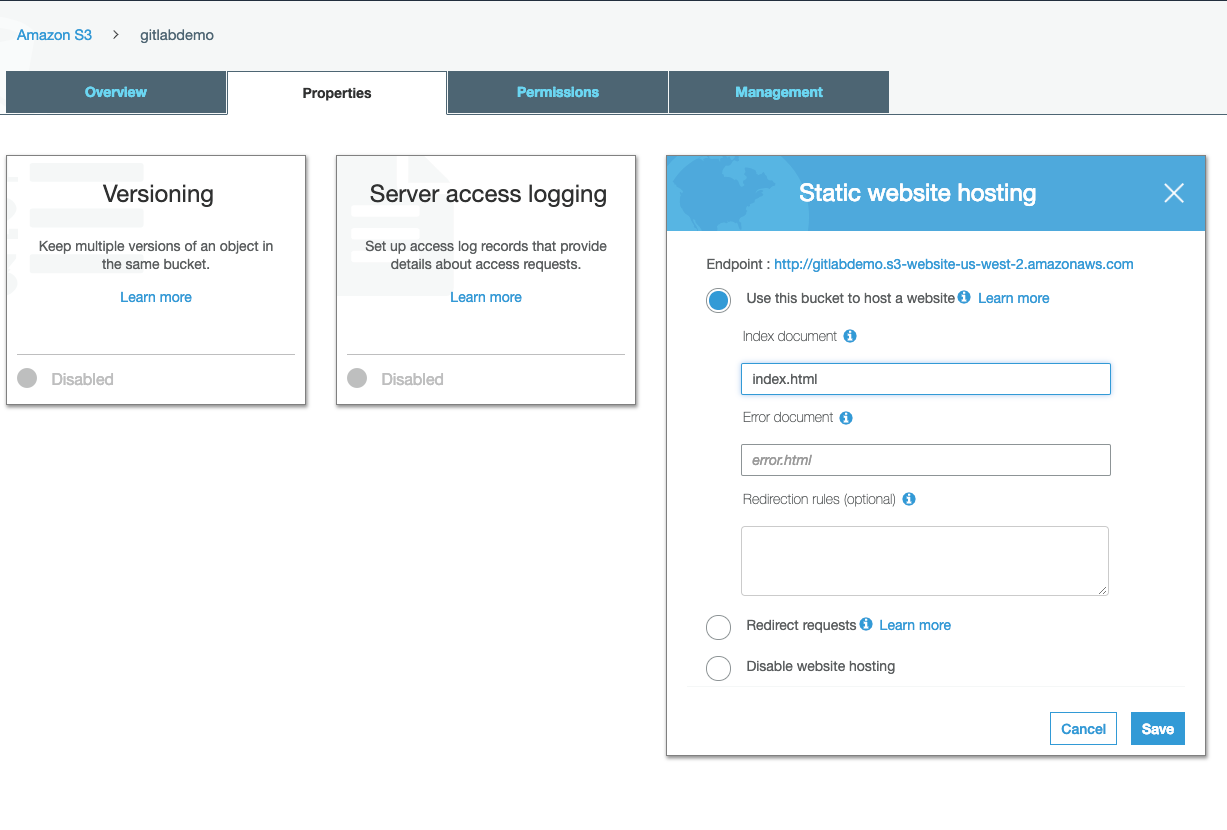
Note: The endpoint at the top of the modal will be the URL you can use to access your website!
Now for the final part, allow read permissions to your S3 bucket (so your users can see your awesome website!). Navigate to the third tab that says “Permissions” and then click “Bucket Policy”. You will need to add the following policy in the editor:
{
    "Version": "2012-10-17",
    "Statement": [
        {
            "Effect": "Allow",
            "Principal": "*",
            "Action": "s3:GetObject",
            "Resource": "arn:aws:s3:::YOUR_BUCKET_NAME/*"
        }
    ]
}
Don’t forget to replace YOUR_BUCKET_NAME with the bucket name that you used when creating. This allows any user to GET from your bucket.
Head back over to the “Public Access Settings” tab and re-enable blocking new bucket policies:
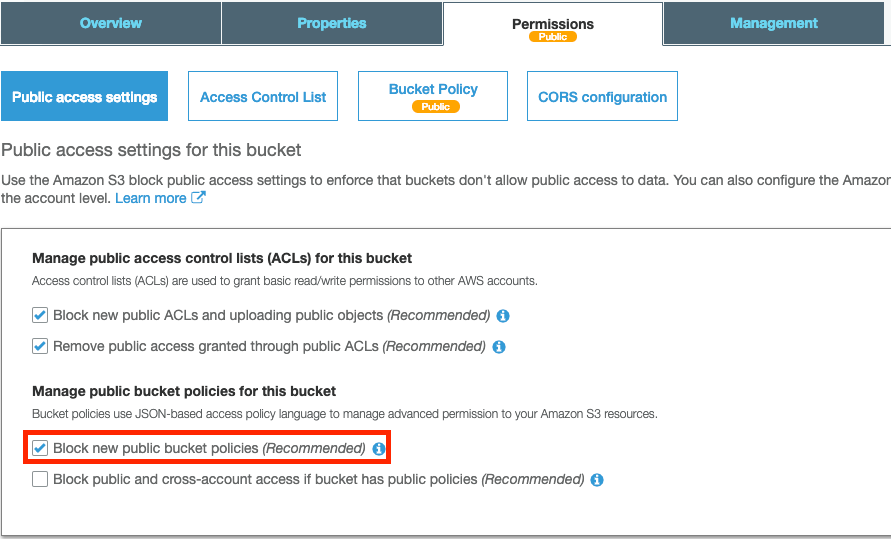 This ensures the bucket policy cannot be updated
Now if we go to the URL that Amazon assigned this bucket, you should see a… 404! That’s because we haven’t pushed your project from GitLab!
The final thing we must do in the AWS dashboard is to create an IAM user so that we can safely allow GitLab to access and upload data to this bucket. This allows us to revoke access if we ever need to.
IAM User:
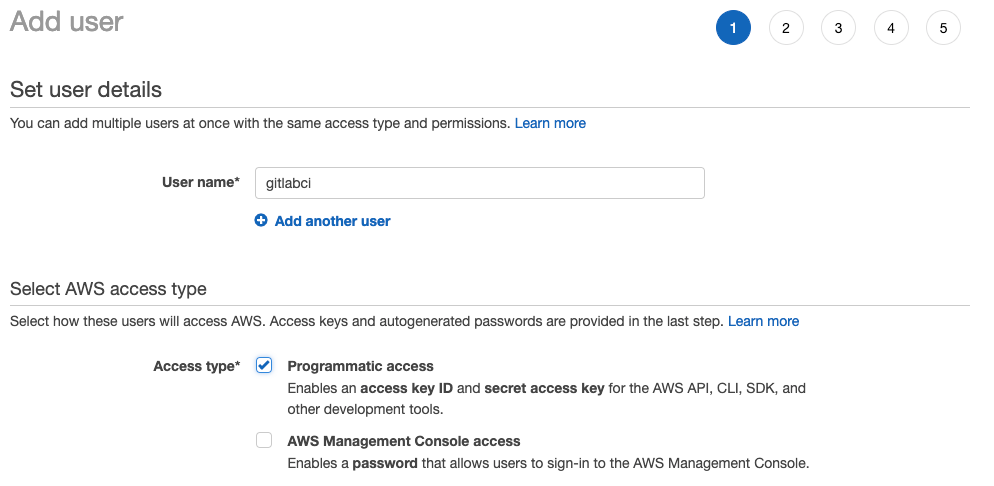
Navigate to the IAM Management Console and click the blue “Add user” button at the top. Give a descriptive username such as gitlabci and select “Programmatic access”
You will next create a group if you haven’t already done so and attach a policy. For the means of this demo, we will use AmazonS3FullAccess — however, you may want to change policies based on your security needs.
After the final step when you click “create user” you will be shown a success screen, which will house two very important pieces of information: Access Key and Secret Key. Note: Once you leave this screen, you will no longer have access to the Secret Key. You can either write it down or download the .csv and then ensure you delete later. Whatever you do, make certain that no one gains access to the keys.
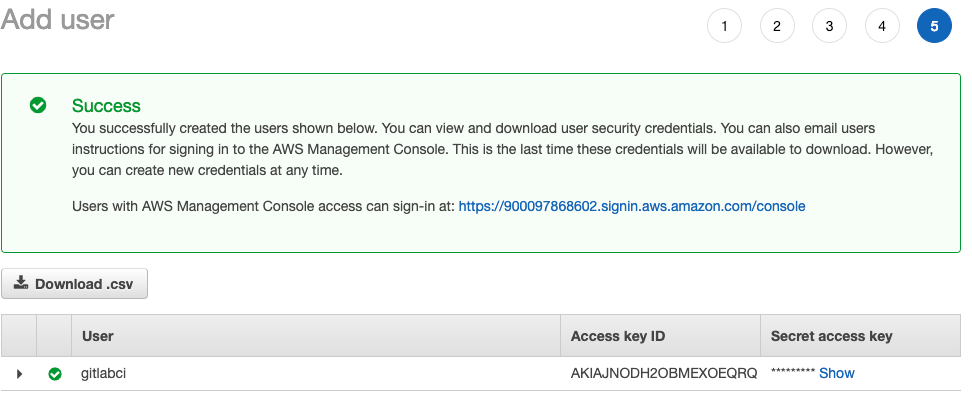 Either download the .csv or click show secret key and copy and paste somewhere
We’re almost there! Now we just need to setup GitLab to push to our S3 bucket.
GitLab:
Welcome, GitLab CI/CD. Prior to testing out GitLab CI/CD I always hosted my code on GitHub. GitHub did an amazing job at keeping my source code secure and widely available, however, I noticed that without some elbow grease, it did pretty much just that. I told myself that I wanted to be able to make a code change, commit, push, and then see my new code deployed on the internet.
Head over to GitLab, signup for an account, and create a new project. GitLab acts just as GitHub in the sense that you will need to add its remote origin to your local project. Once the project is setup you will rename/add this as a new remote to your local .git :
git remote rename origin old-origin
git remote add origin [https://github.com/tkssharma/awesome-create-react-app](https://github.com/tkssharma/awesome-create-react-app).git
git push -u origin --all
Now for the key file that you need in order to get CI/CD setup with GitLab:
Go to the root directory of your app and add this file .gitlab-ci.yml and copy the content of the above Gist; once pushed, GitLab will automatically recognize and begin it’s “dev-ops” process.
So what exactly does this file do?
stages:
   - build
   - deploy
This tells GitLab what “steps” to run during your CI/CD process. You can easily forsee adding more steps such as test, etc. Let’s take a look at the first stage — build:
build prod:
   image: node:10.15.0-stretch
   stage: build
   only:
      - tags
   script:
      - npm install
      # Build App
      - npm run build
   artifacts:
      paths:
         # Build folder
         - dist/
expire_in: 1 hour-
image: Since we are building our Vue.js app, we will want to set the docker image to be some version (preferably latest) of Node.
-
stage: This should coincide with one of the stages that we described at the very top of the file. This let’s GitLab know how stages are associated.
-
only: This is very key if you want GitLab to run these scripts conditionally based on a specific branch or tag. For me, I like to set up a stage and production environment. When I merge changes into master, it will run the stage scripts, and when I create a tag, it will run the prod scripts.
-
script: download all the dependencies, and then run our build script from our package.json — which for me looks something like:
-
artifacts: Now this is what got me tripped up in the beginning. Since we have two stages in our deployment process (build and deploy) and they are both on two different images, we need a way for the second stage (deploy) to have access to our build folder — dist/ . With artifacts, we can set a path to “store” for other stages to reference. Thus, I set my path for the dist/folder and set an expiration for 1 hour.
Now for the final stage in the pipeline — deploy:
deploy prod:
   image: python:latest
   stage: deploy
   only:
      - tags
   script:
      - pip install awscli
      - aws s3 sync ./dist s3://YOUR_BUCKET_NAME
Python is the supported CLI for AWS, so we set our image to python:latest. When this runs, it will install the latest AWS CLI and sync the dist folder with the bucket we created in the beginning. Ensure YOUR_BUCKET_NAME is the same as the bucket we created in the S3 console.
Note: If you want both stage and production environments, you will need to create a second bucket in S3 (with the same configuration as the first) and use that as the staging bucket.
Last Step:
How does AWS know that it should allow this user to sync to the S3 bucket? From the IAM user we created in the beginning half of the article! Since I mentioned that it is an extremely bad technique to expose/commit your keys we will add them to GitLab’s environment variables. Navigate to the CI/CD in the Settings tab and expand “Environment Variables”
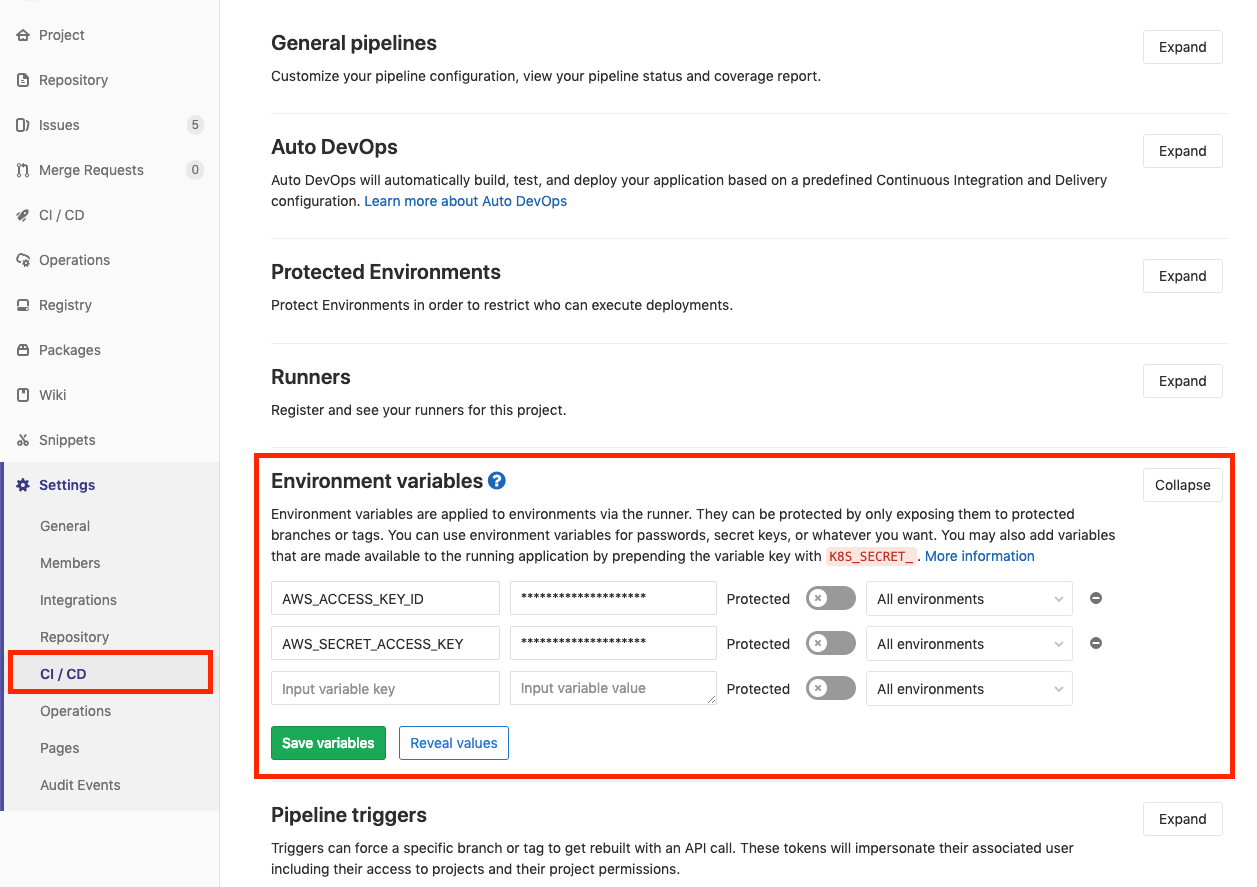 GitLab AWS Environment Variables
You will add two variables: AWS_ACCESS_KEY_ID and AWS_SECRET_ACCESS_KEY . Fill in the values with the associated keys that you downloaded/copied when created the user in the IAM management console.
We’re all set to test it out!
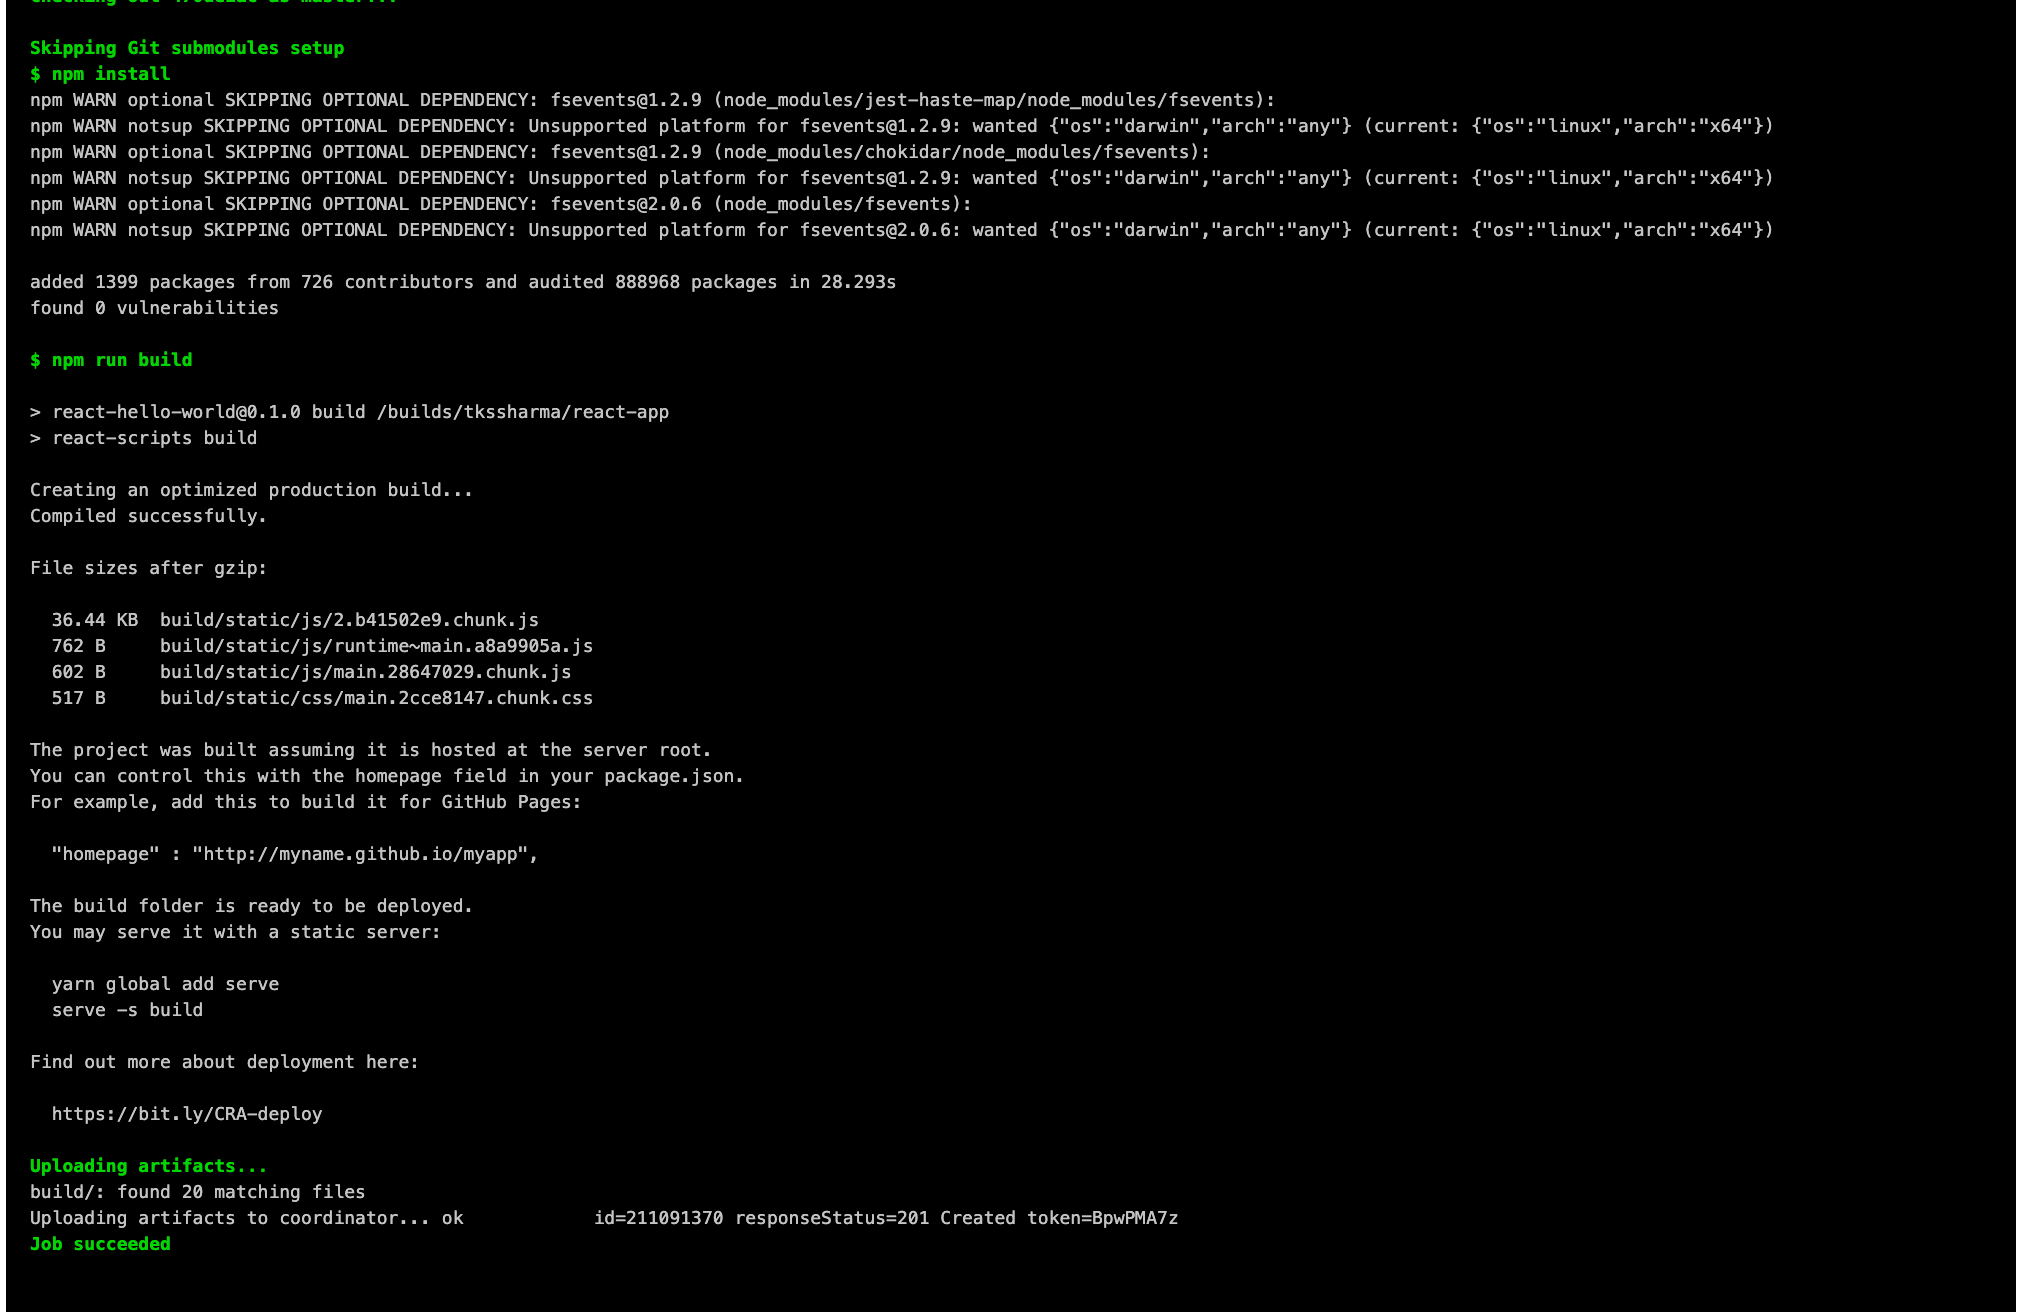
Push some code to master and watch GitLab automatically kick off the CI/CD process. You can watch the stages execute and see your completed pipelines:

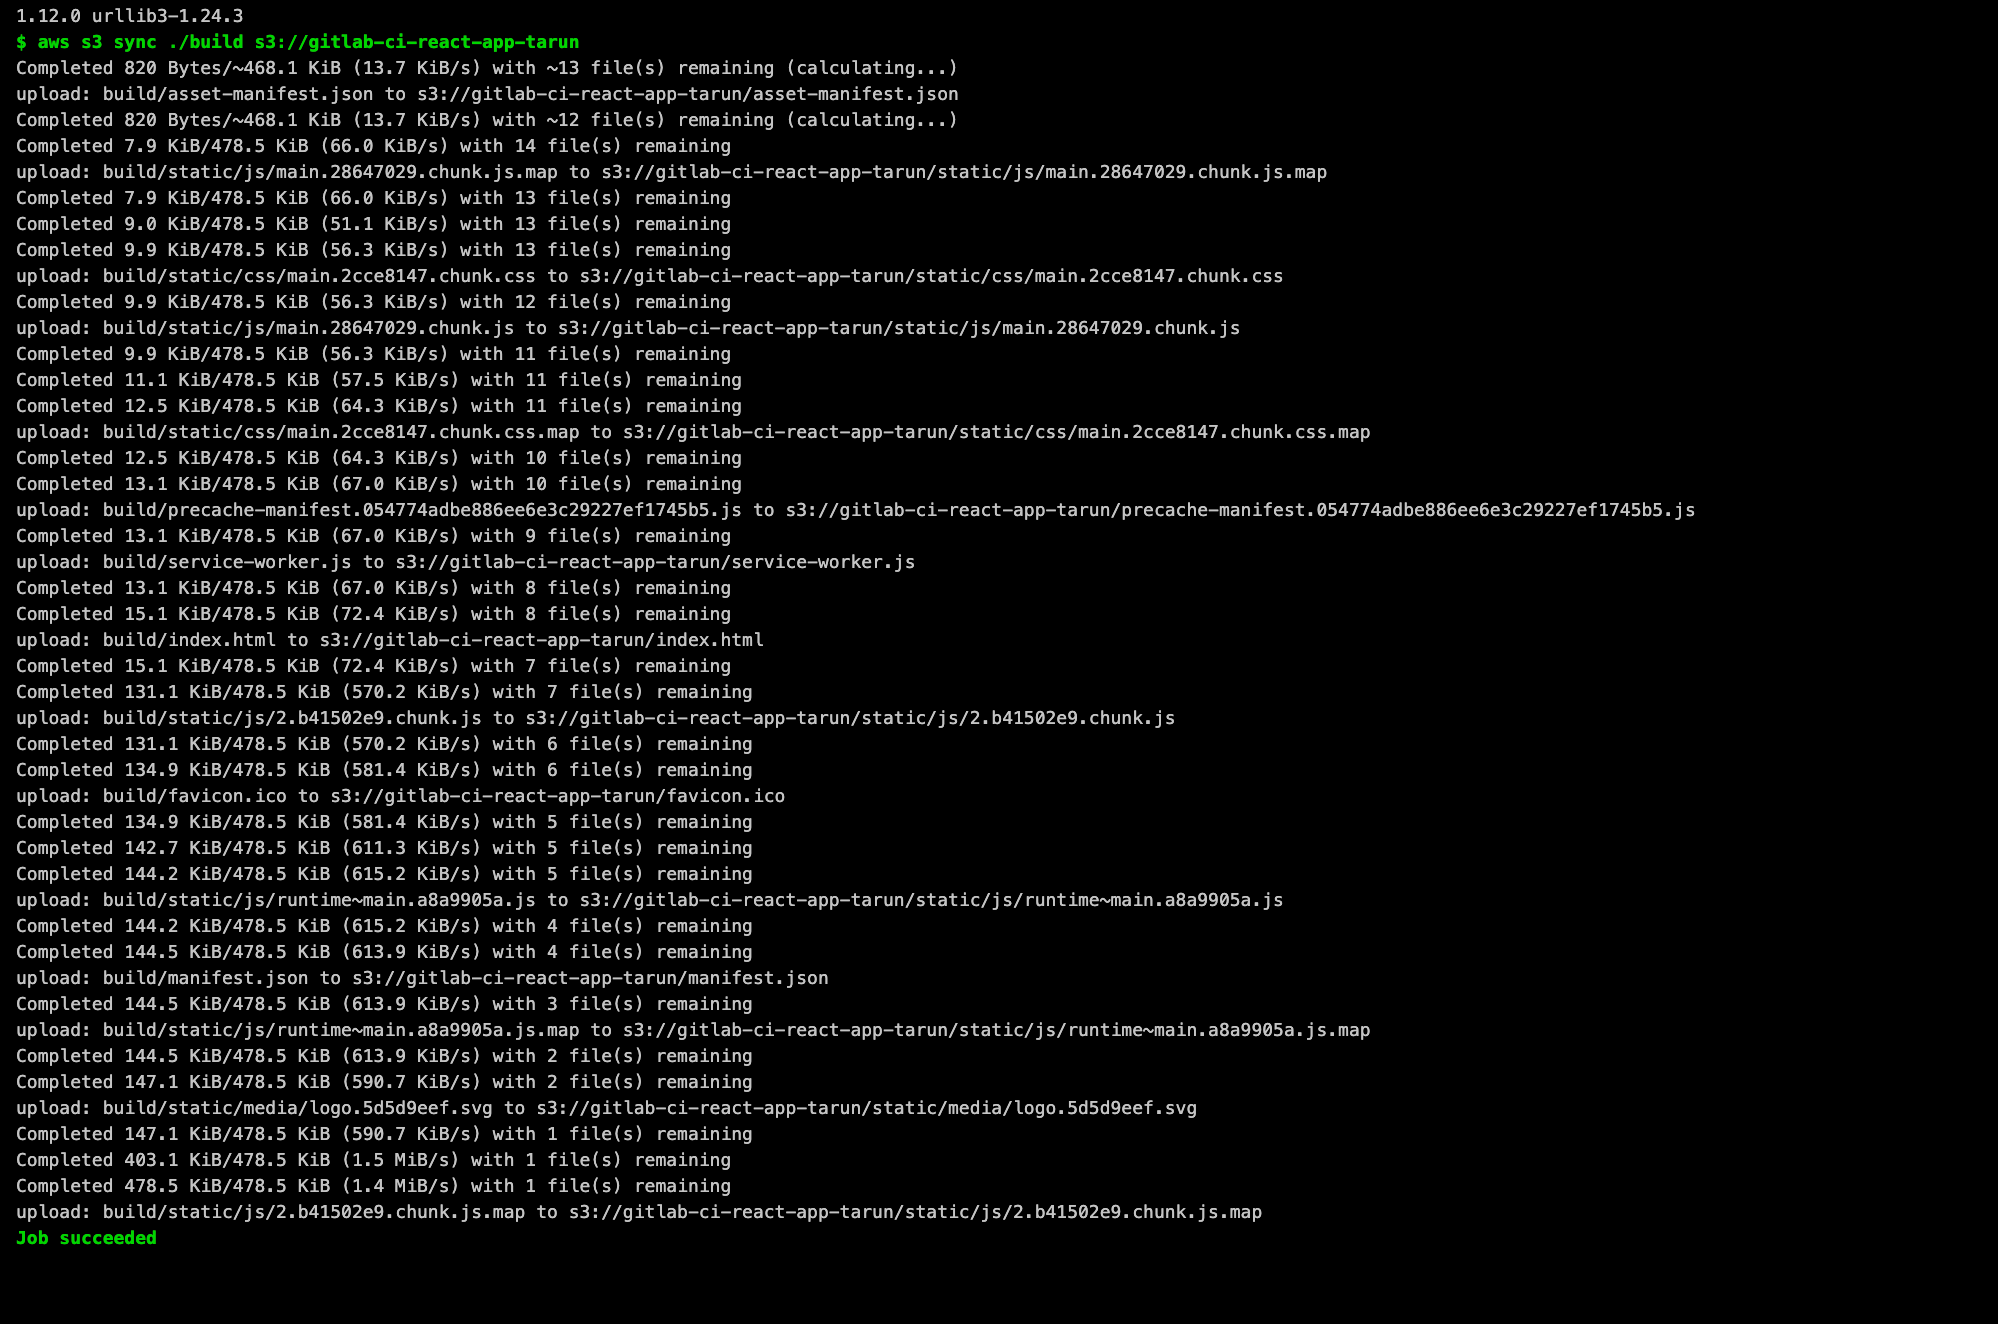
Take a look at GitLabs CI/CD documentation to see how you can extend your jobs to accomplish anything you may need.
Summed up:
After completing these steps, you should in essence have:
-
Created an AWS account
-
Created an S3 bucket and set permissions to public access
-
Created an IAM user for GitLab to use
-
Create a GitLab account/project
-
Add our .gitlab-ci.yml and fill with our CI/CD stages
-
Add our IAM credentials as environment variables
-
Sit back, smile, and watch as your code is automatically deployed to S3 via GitLab’s CI/CD process
Github CI CD using Github travis.yml
Continuous Integration (CI) and Continous Delivery(CD) are the two acronyms mostly used when people talk about modern development practices.
Developers often merge their changes back to the main branch as often as possible in order to avoid the integration hell that usually happens when people wait for the release day to merge their changes into release branches. Continuous Integration emphasis on testing automation to check the application is not broken whenever new commits are integrated into the main branch.
Continuous Delivery is the development practice where every change that passes the stages of the production pipeline is released to the customer without human intervention, and only failed test will prevent a new change to be deployed to production.
This post is about how we can achieve CI and CD of our public create-react-app project with the help of TravisCI.
Installing Create-React-App
Assuming we already have node/npm installed, we can jump right into installing create-react-app! We’ll want to run the following command in our terminal:
$ npm install -g create-react-appAlternatively, if you’re big on using Yarn, you can use Yarn to install create-react-app globally instead!
$ yarn global add create-react-appWe’ll verify that our install of create-react-app is working with:
$ create-react-app --version
create-react-app version: 1.5.2
Great! Let’s get started by making a react application.
Creating Our First React App
First, start off by moving into wherever you want to develop your application. In that directory, we’re going to create an app called “survey-app”:
$ create-react-app survey-app

(...tons of output)

Success! Created survey-app at /Users/suman/workspace/survey-app
Inside that directory, you can run several commands:

yarn start
    Starts the development server.

yarn run build
    Bundles the app into static files for production.

yarn test
    Starts the test runner.

yarn run eject
    Removes this tool and copies build dependencies, configuration files
    and scripts into the app directory. If you do this, you can’t go back!

We suggest that you begin by typing:

cd survey-app
yarn start

Happy hacking!
The instructions at the end are really the important part. There are four default commands bundled into create-react-app: start, build, test, and eject. Also, notice that create-react-app now uses Yarn by default instead of just standard NPM. The descriptions are pretty self-explanatory, but let’s explore them in a little more detail:
yarn start
This will start up a little development web server and give you a place to start working on your application. Running this will start up a development server at http://localhost:3000/ and give you a nice little starter template:
yarn run build
“Bundles the app into static files for production.” If you’re comfortable with webpack/brunch and the build process for production sites, then you probably know what this all means. However, if all of this is Greek to you, then we’ll explain a little more. Basically, this means it’s going to take all of the Javascript code that the browser can’t interpret without any help and turn it into a smaller (“minified”) version that the browser can read and understand. It shrinks the file down as much as it possibly can to reduce the download time (probably doesn’t matter when you’re sitting on a good internet connection, but the minute you drop to 3G or worse speeds you’ll be very thankful for this!) while keeping your application running!
yarn test
“Starts the test runner.” create-react-app now ships with a bunch of tools all ready to go for you to start testing your app as you’re building it via Jest. The first time you run it you’ll probably see something like:
PASS  src/App.test.js
  ✓ renders without crashing (18ms)

Test Suites: 1 passed, 1 total
Tests:       1 passed, 1 total
Snapshots:   0 total
Time:        4.277s
Ran all test suites related to changed files.

Watch Usage
 › Press p to filter by a filename regex pattern.
 › Press t to filter by a test name regex pattern.
 › Press q to quit watch mode.
 › Press Enter to trigger a test run.
It’s always a great idea to run your tests as you go along, and now you get a really nice built-in way to do so (and trust me, trying to set all of this up on your own is a huge pain in the butt, so major props to the create-react-app team for this!)
Setting up Continuous Integration Builds
First, make sure your react project is pushed into the GitHub and you have an account in TravisCI.
Travis CI also supports build and deploy for open source project. Read here.
The very first step in integrating Travis CI is to create a file named .travis.ymlwhich will contain the essential information about the environment and configurations for the build to run. For simplicity, we will just include the programming environment and the version. In our simple project, it is NodeJS version 8.0 which has LTS recently provided by NodeJS The final contents of the file .travis.yml will be as follows:
We will add this file in our project root folder like this and push it to our github repository.
In order to make this build file working, we need to link up our project to Travis. For that, we can go to our logged in account in Travis
And then click the + icon near to the My Repositories which will open a new window.
Then toggle the settings to enable the project. It will start the build process.
Setting up auto deployment to GitHub Pages
In order to deploy to the github pages, we need to provide access_token to our build file. To obtain a new access_token we can go to.
https://github.com/settings/tokens/new
About permission, we need repo level access.
Copy the value of this token. This is a private token that gives access to your GitHub repos.
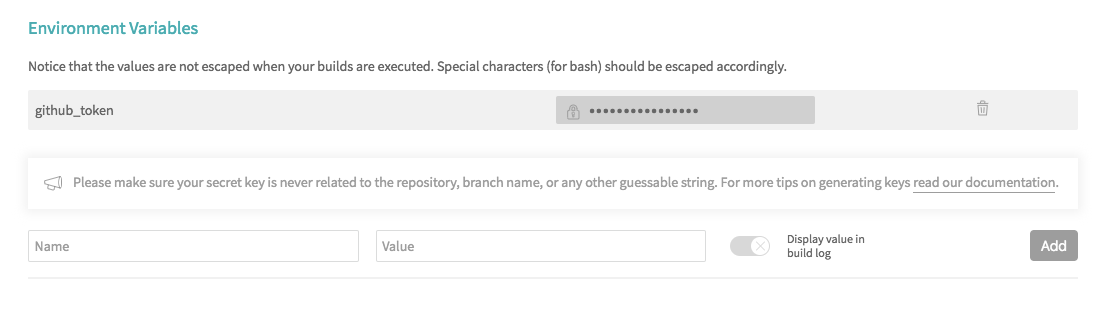
Now we can go to our project build screen. Then navigate to the settings page and add the environment variables and paste the copied token as its value. Here I have named my variable as github_token.
To make our deployment work we need to add deployment script in our .travis.yml. Now, let’s add it.
Here, $github_token will read the access token value from our environment variables that we set previously.
We need to let our app know which URL that it should look for. We can set the URL in our app package.json. In my case, it goes like
It could vary on others but the format is like this.
https://
Now, we can commit and push our changes to our repo in Github. It will automatically trigger the build. After successful completion of our build, it will deploy our project into the gh-pages. Thus resulting our app running in the URL which in my case is
This allows you to get info about your code coverage in your build.
You can configure a custom domain with GitHub Pages by adding a CNAME file to the public/ folder. For further information about custom domain read here. Deploying Application on S3 or ES2 Instance using Route 53/Cloudfront -Part-1 || Gitlab *In this blog, we will talk about deploying the application on s3 which is static build having the static file and other…*medium.com
Lets Host application running on S3 Bucket, In the previous part we have created an S3 bucket and did the setup for CI /CD
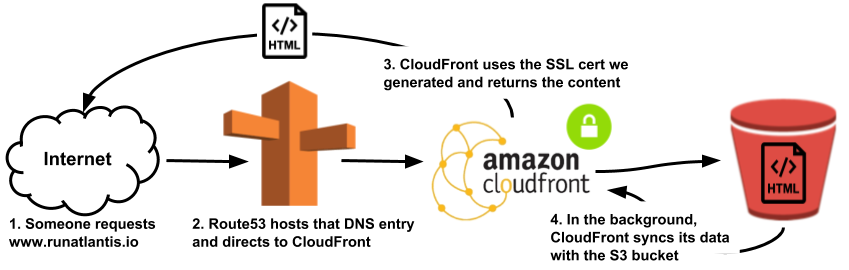
If you paste your endpoint into your browser’s URL, you should see your website, but you’ll notice it’s being served over HTTP. On it’s own, S3 cannot serve your site over HTTPS. So, in the next section we will configure CloudFront to sit in front of our S3 bucket and serve your site over HTTPS.
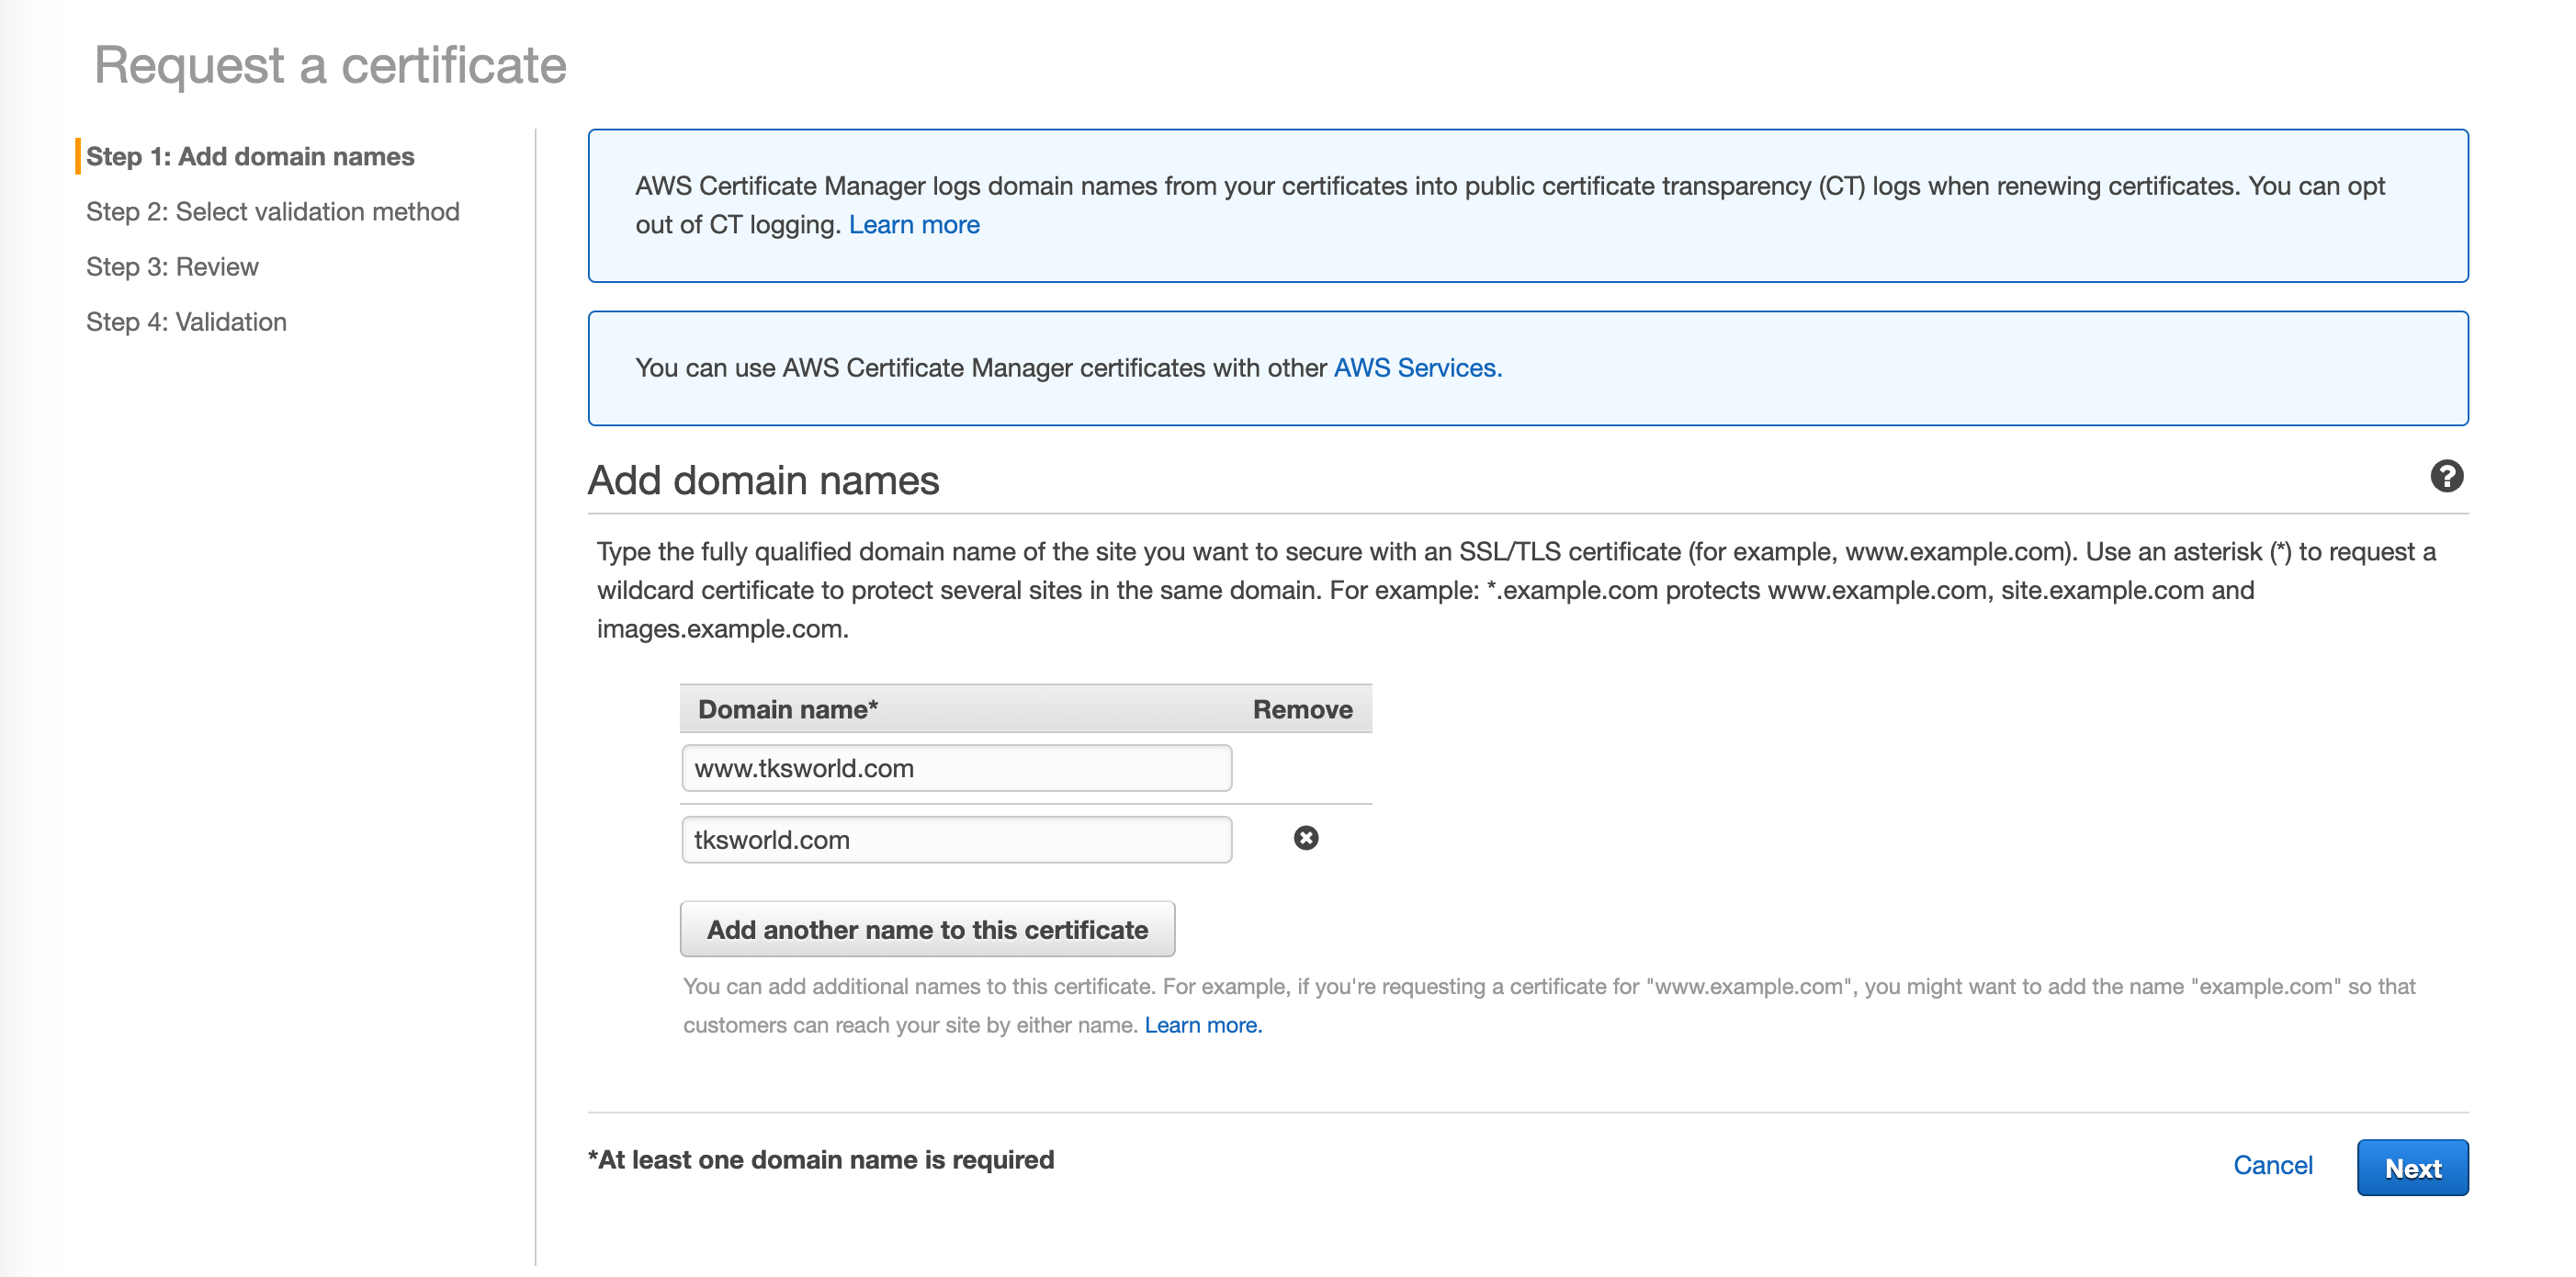
II. Obtaining a Free SSL Certificate with AWS Certificate Manager
In order to enable HTTPS you’ll need to have a SSL certificate. The certificate allows your users’ browsers to verify they are on your real site and it also enables the encryption of data transferred between the user and your website. These certificates cost money, often quite a bit, but you can get free ones using AWS Certificate Manager. Go back to the main AWS console and select or search for “Certificate Manager.” On the Certificate Manager console, select “Get Started.” You will be taken to the “Request a certificate” page where you will enter the details of your custom domain. You need to enter the name of the domain that you purchased from your DNS hosting service (like GoDaddy). Click “Add another name to this certificate” so you can include both the www prefixed domain name and the so called naked domain name. This will allow us to setup forwarding in our DNS hosting service so that users can omit the “www” and still reach our site correctly. Click “Next” to continue to validation.
In order for AWS to grant your SSL certificate you need to prove that you actually own the domain name for which you are requesting a certificate. You will have the option of selecting DNS validation or Email validation. Email validation is simpler, but you must ensure that you have access to email address tied to your DNS hosting service account. Select email validation and click “Next.” You will receive 2 emails from AWS, one for each domain name we added to our certificate request. You need to click on the approval link in both emails. Now, if you return to the AWS Certificate Manager console you should see your new certificates. Next, we will configure CloudFront intercept requests to our bucket and utilize our new certificates to enable HTTPS.
III. Configuring CloudFront
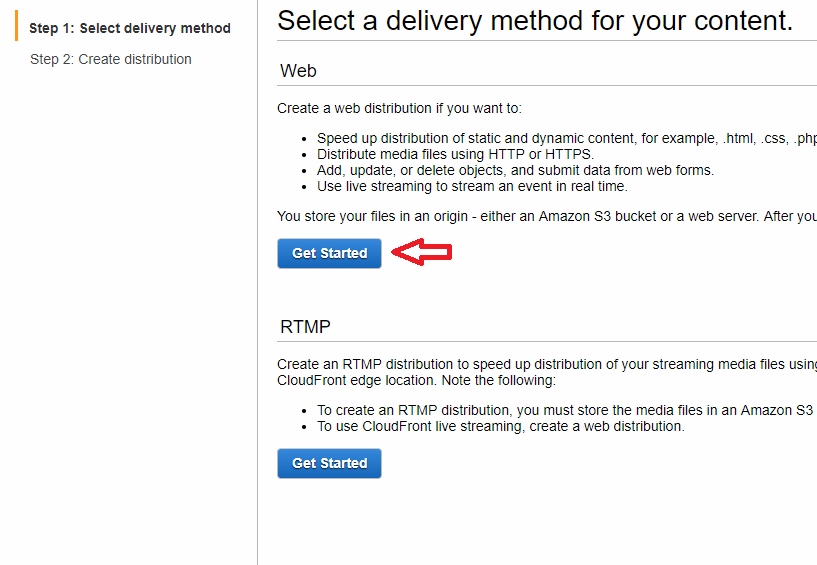
CloudFront is a content delivery network (CDN). It caches your content on Amazon’s globally distributed network of proxy servers and then intercepts your user’s requests in order to route them to their closest proxy server. CloudFront also enables you to easily deliver your content via HTTPS utilizing free SSL certificates provided by Amazon.
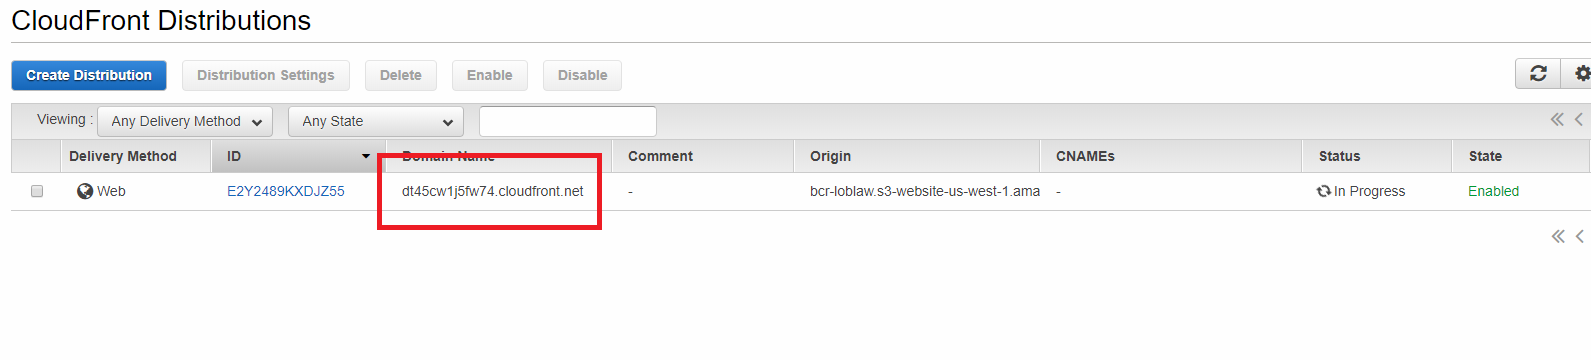
Return back to the main AWS console and this time select the CloudFront service. Again, if you don’t see it, just search for “CloudFront” and it should be the very first result. Once on the CloudFront console, click “Create Distribution.” We’re going to create a web distribution, so under the section labeled “Web” select “Get Started.”
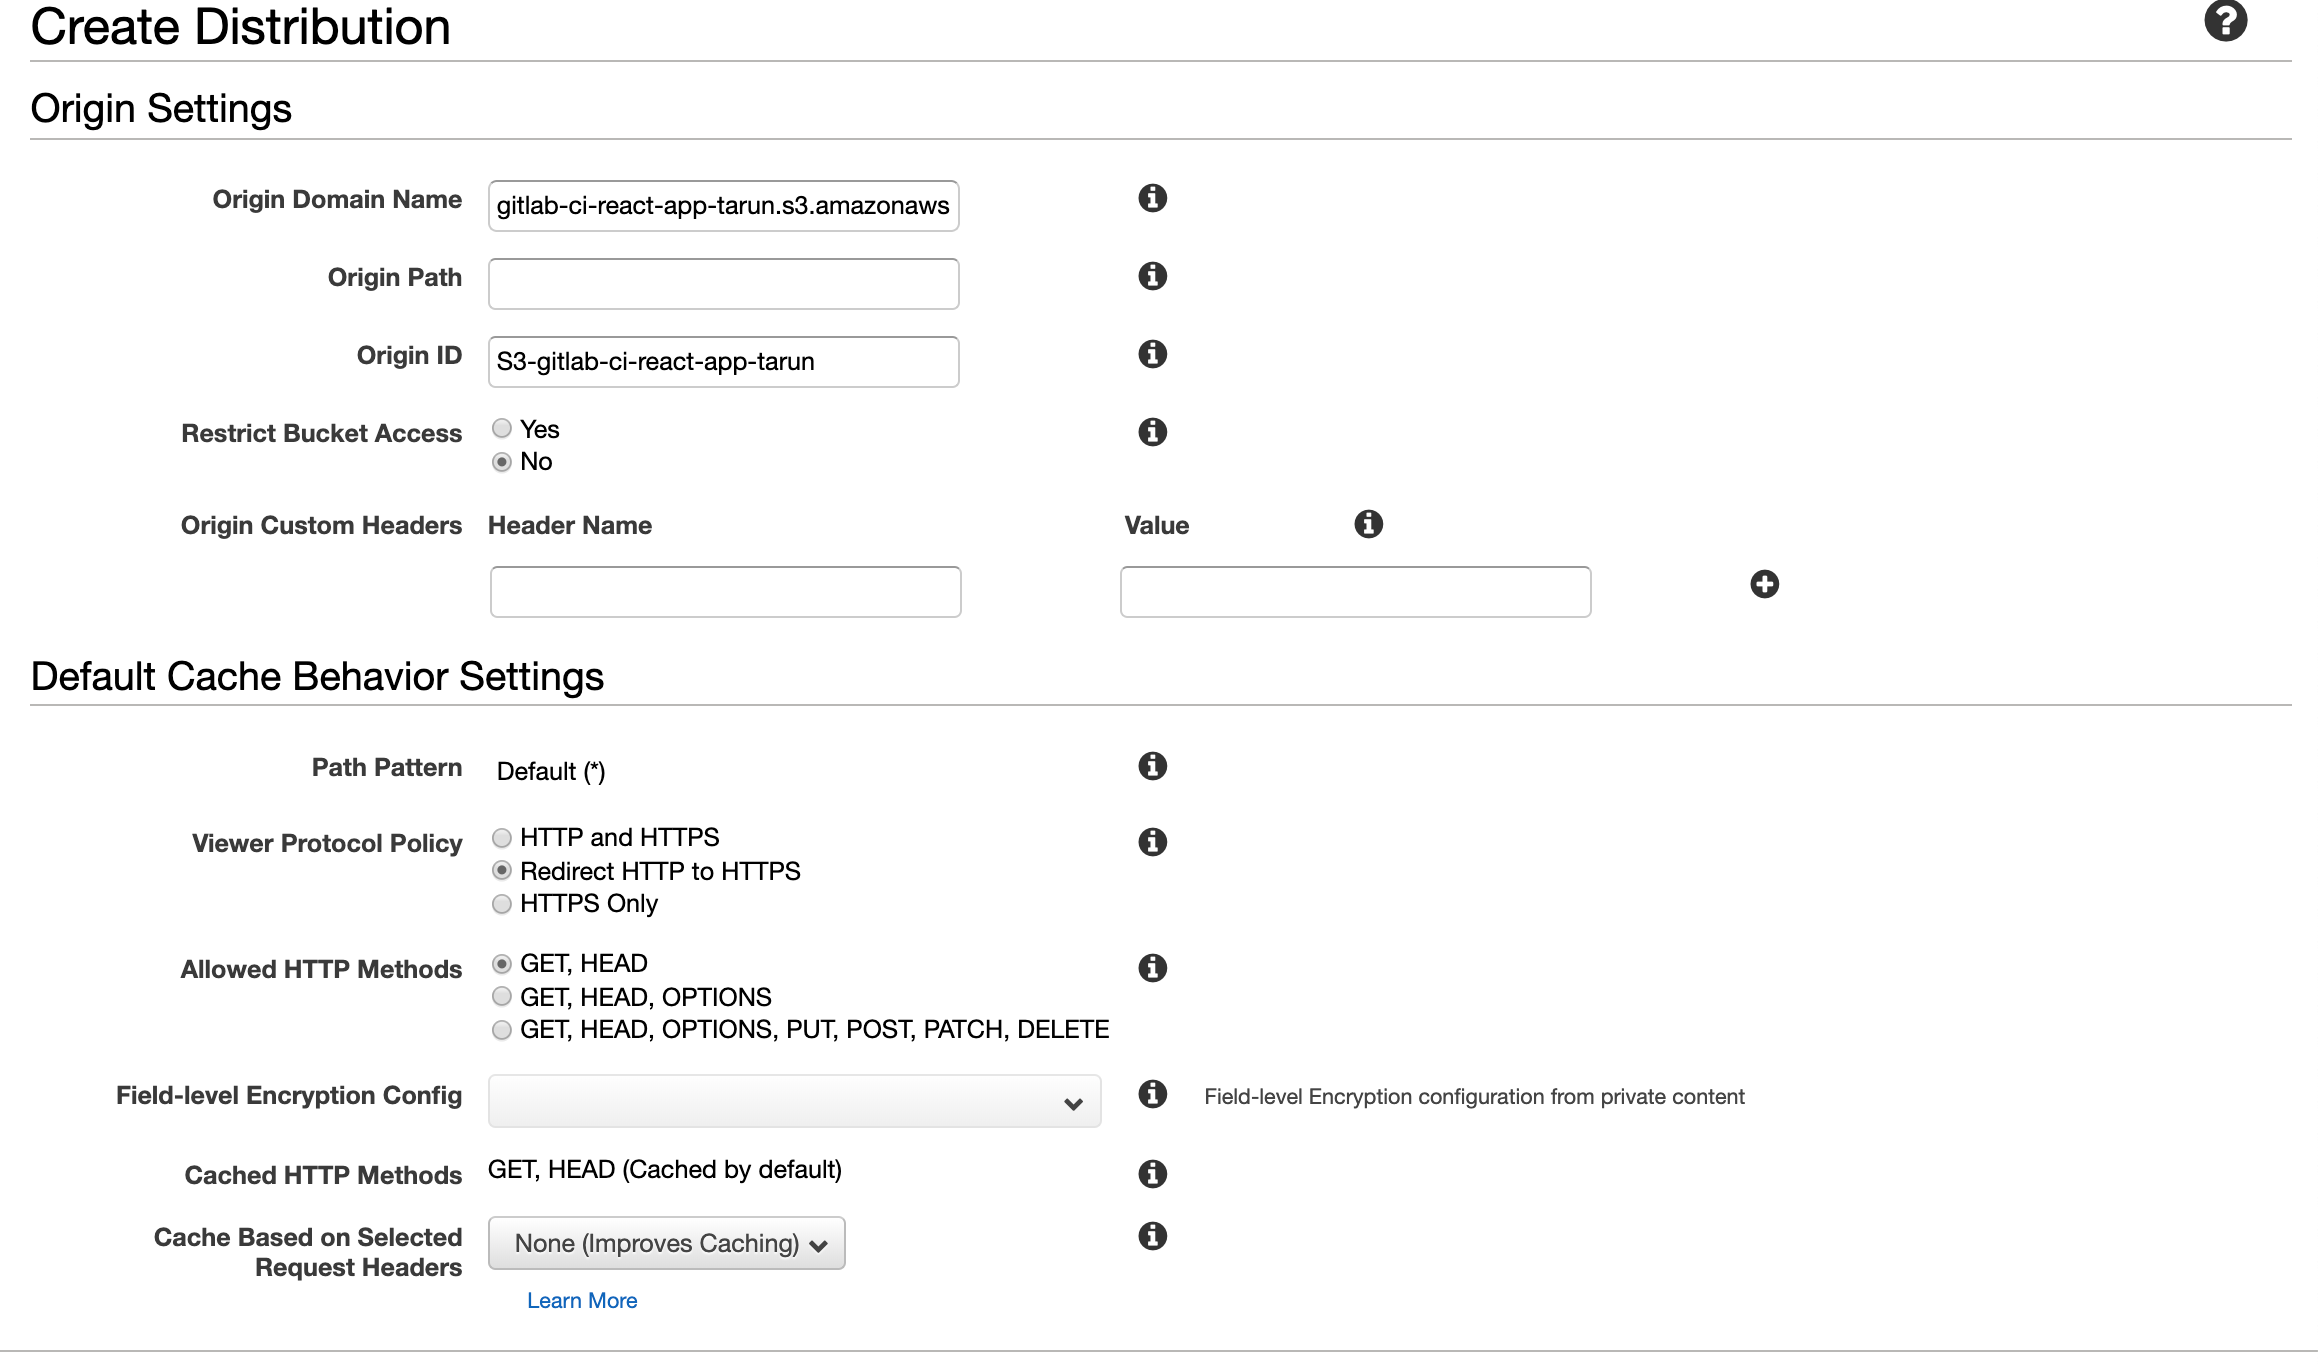
The next screen will have several sections. Under the section for “Origin Settings” you need to enter your bucket’s endpoint URL (the one you copied earlier when enabling static hosting) as the “Origin Domain Name”. When you click on the input for “Origin Domain Name” some auto-complete options will appear and you will see your bucket listed but do not select your bucket. You need to paste in your bucket’s endpoint URL as the Origin Domain Name. Selecting from the drop-down list can lead to issues with CloudFront redirecting to your bucket’s endpoint URL instead of forwarding (typically if your bucket was very recently created). Since, we want to ultimately use our custom domain name, we do not want this behavior. The “Origin ID” will be automatically populated for you after you enter your “Origin Domain Name.” You can leave the rest of the “Origin Settings” alone. In the “Default Cache Behavior Settings,” select Redirect HTTP to HTTPS to ensure all users utilize secure connections. You can leave everything else in the “Default Cache Behavior Settings” alone.
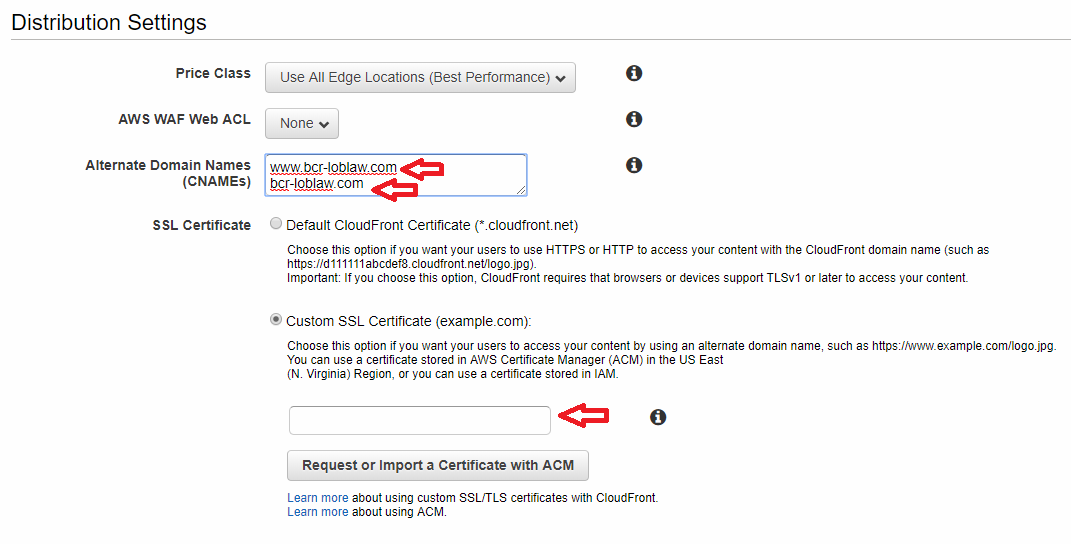
In the next section titled “Distribution Settings,” you need to enter your custom domain name. This is the domain name that you purchased from your DNS Hosting Provider (like GoDaddy) which is the same domain name we requested certificates for in Step 2 of this guide. Make sure to list both the www prefixed domain name and the naked domain name. For SSL Certificate type choose Custom SSL Certificate, now you should be able to click on the text input field just below your selection. When you click on the input, you should see a drop-down list which will include the certificate you requested in Step 2. Select your certificate and scroll all the way to the bottom of the page to click “Create Distribution.”
AWS will get to work on creating your new distribution. While we wait, we will set up our DNS hosting provider (I’ll use Route 53 or Go daddy) to point to our CloudFront domain name. Copy your CloudFront domain name and head over to your DNS hosting provider’s website.
Now lets configure Domain name in Route-53
Configuring Amazon Route 53 as Your DNS Service
You can use Amazon Route 53 as the DNS service for your domain, such as example.com. When Route 53 is your DNS service, it routes internet traffic to your website by translating friendly domain names like www.example.com into numeric IP addresses, like 192.0.2.1, that computers use to connect to each other. When someone types your domain name in a browser or sends you an email, a DNS query is forwarded to Route 53, which response with the appropriate value. For example, Route 53 might respond with the IP address for the web server for example.com.

we explain how to configure Route 53 to route your internet traffic to the right places. We also explain how to migrate DNS service to Route 53 if you’re currently using another DNS service, and how to use Route 53 as the DNS service for a new domain.
Topics
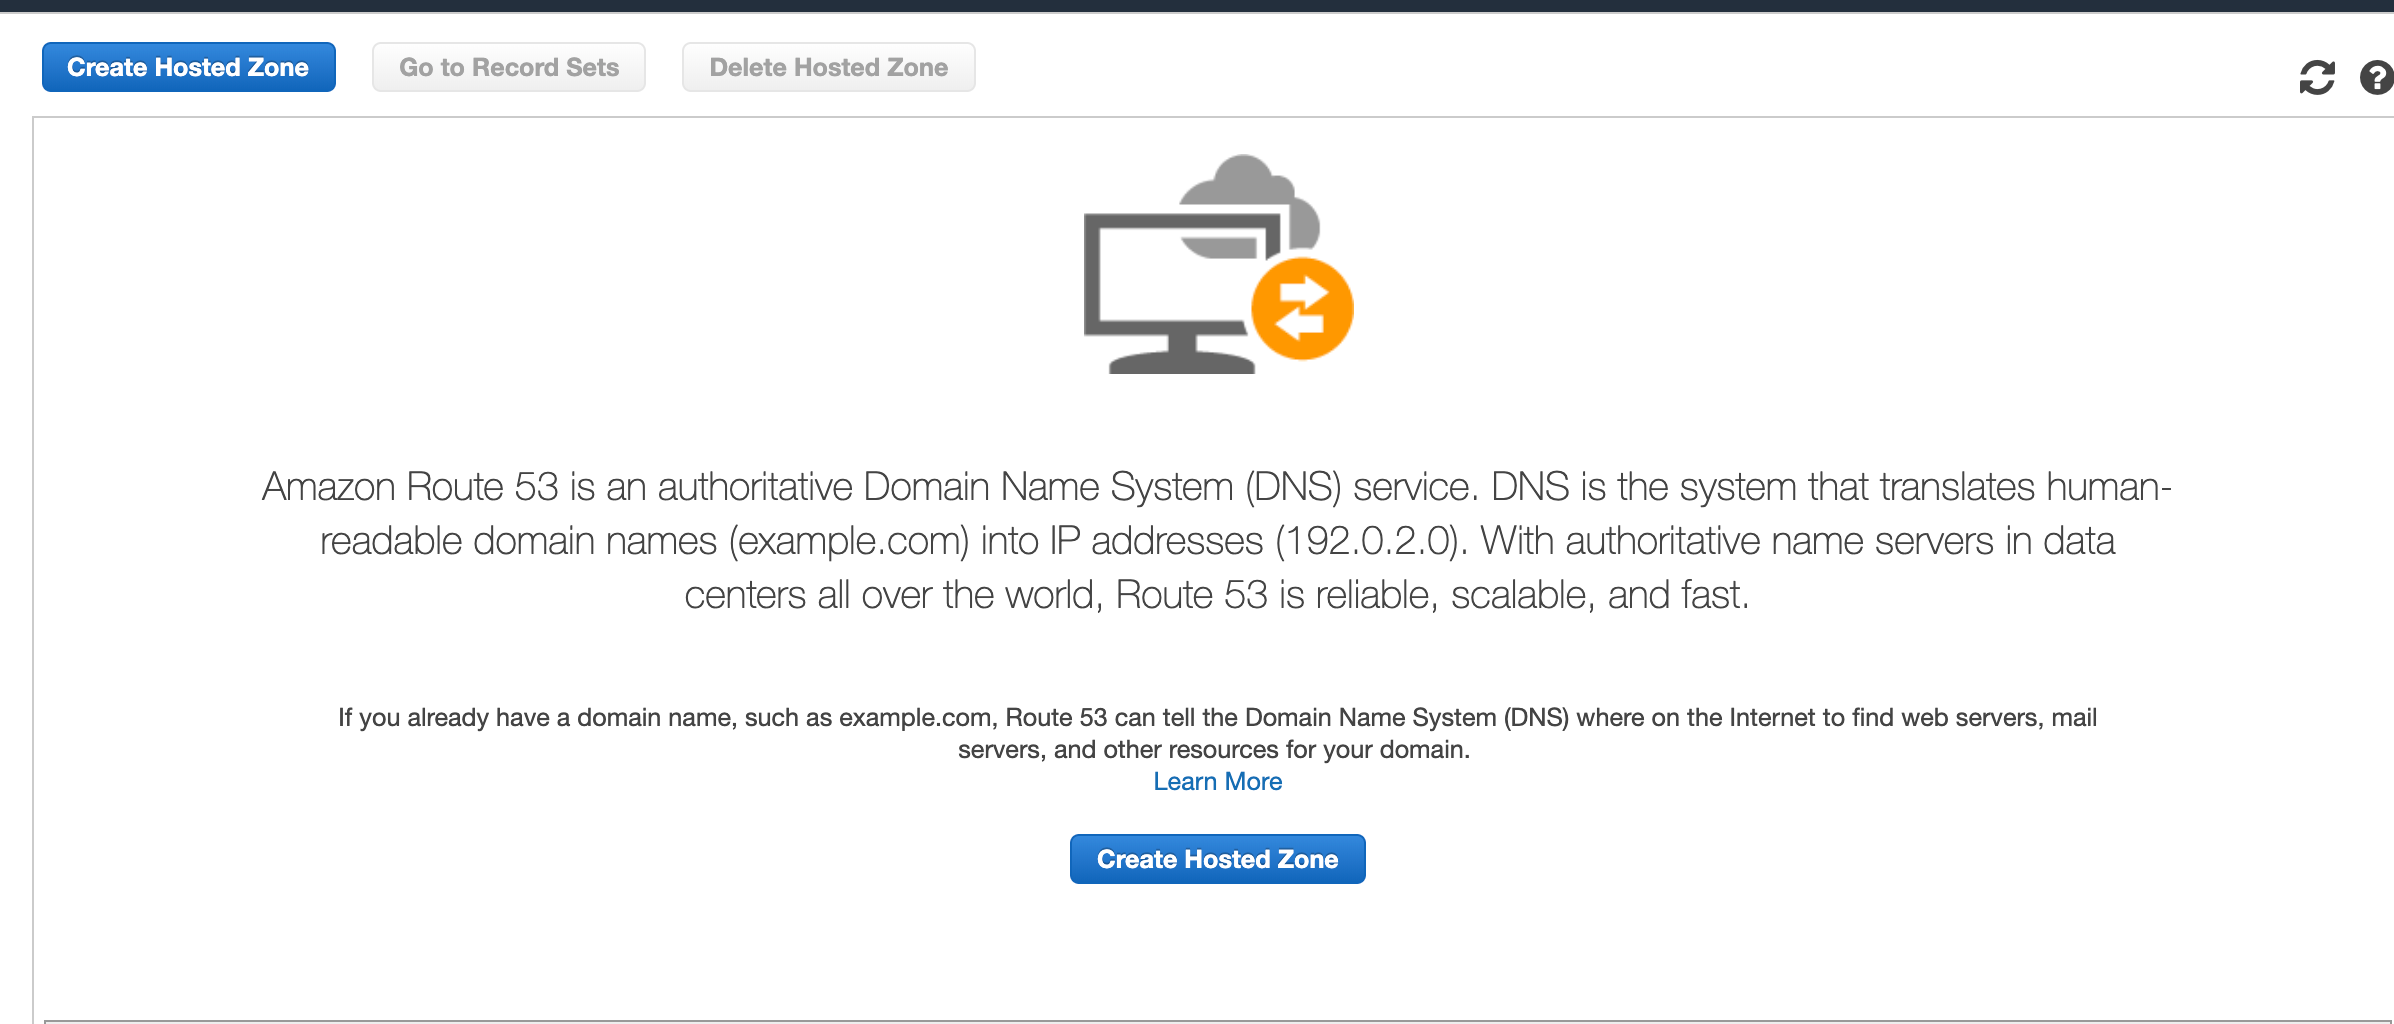

Setting Route 53
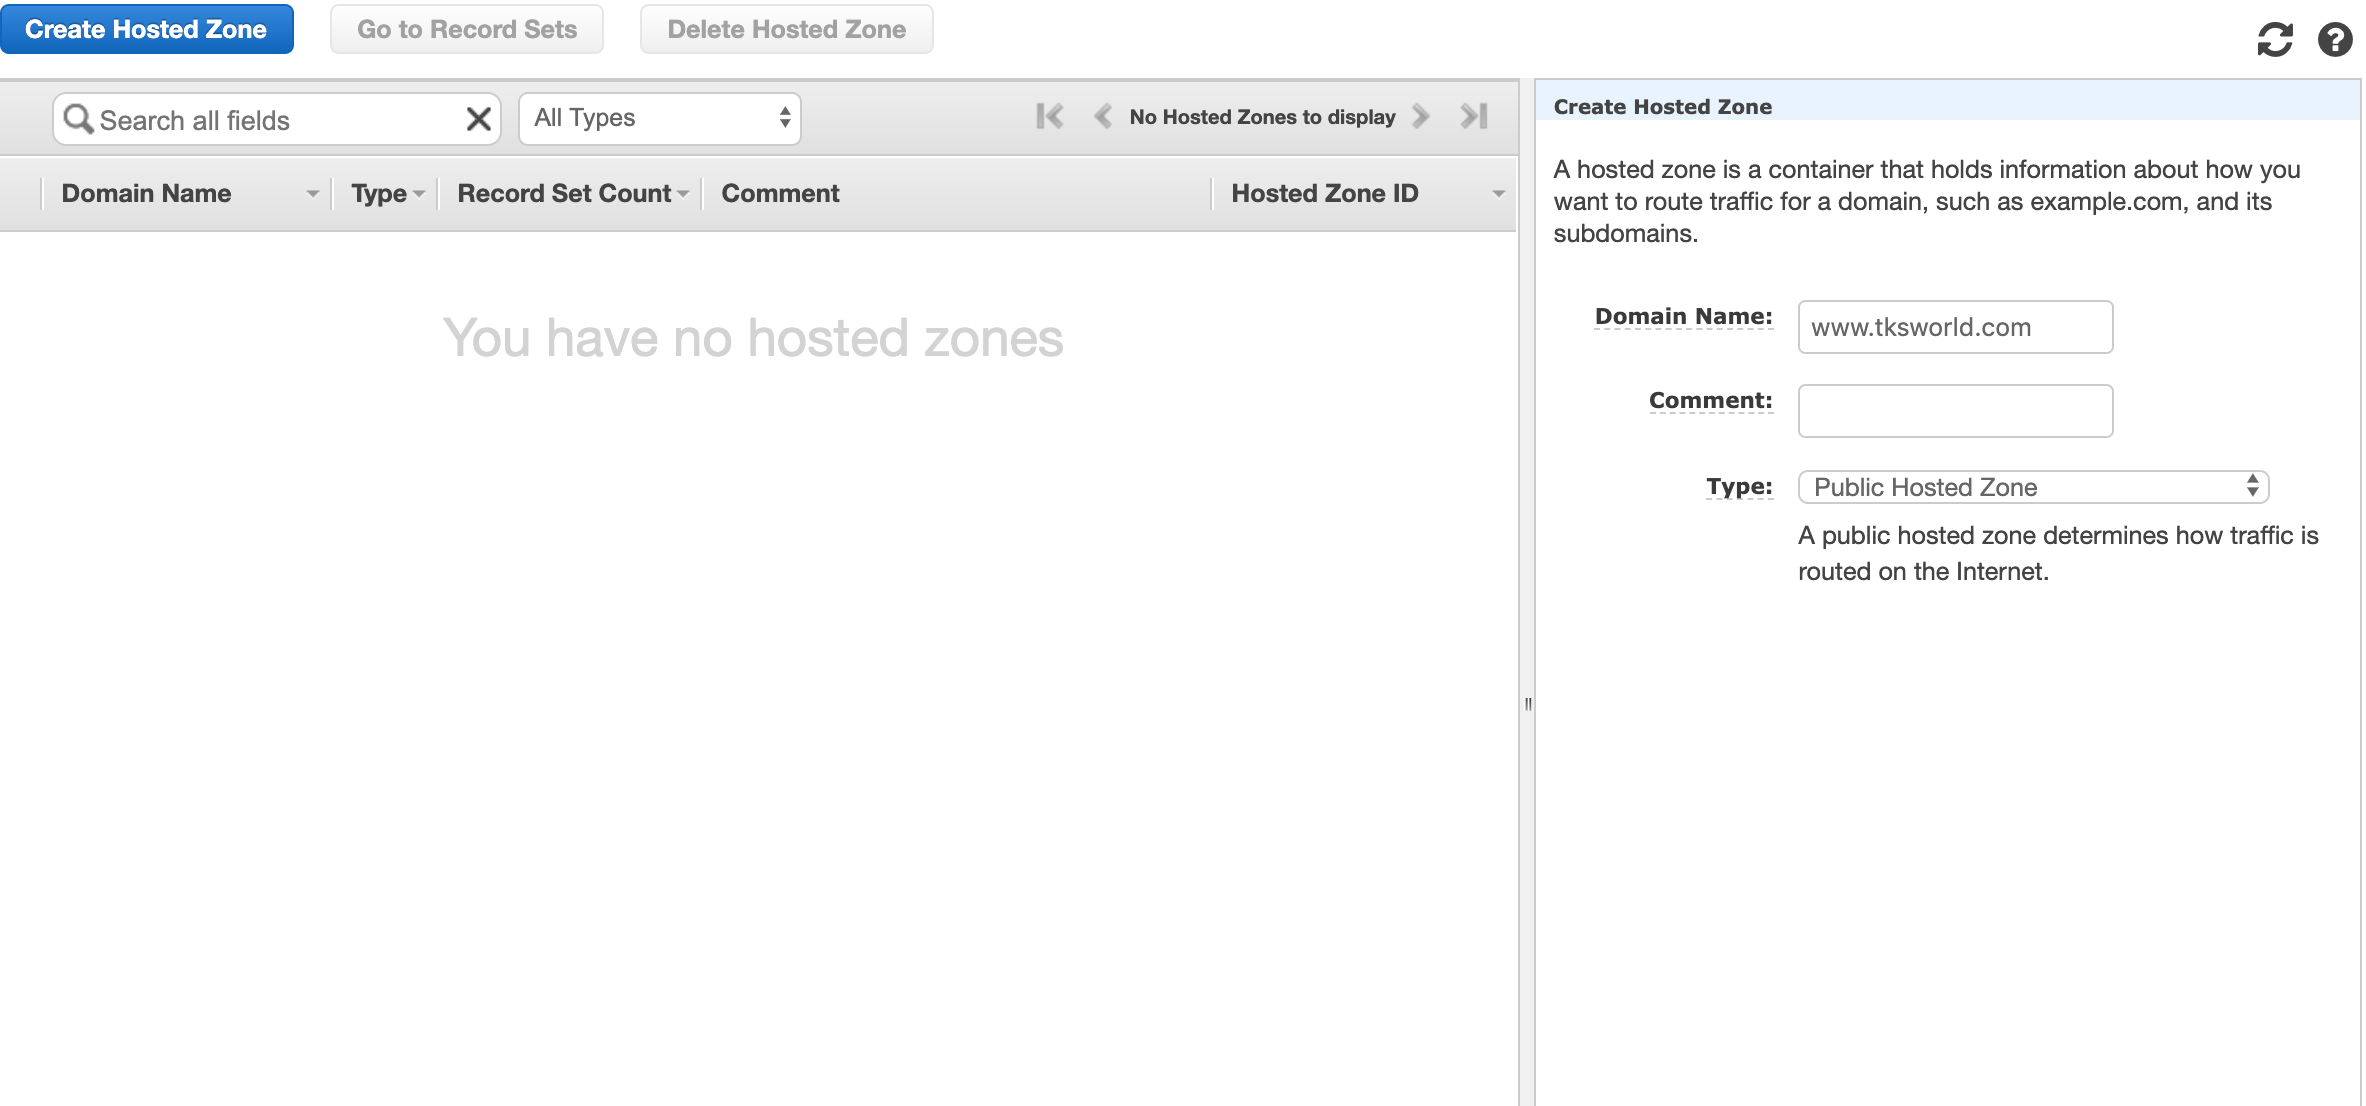
Open the Route 53 tab, and click on “Create hosted zone”. The domain name you need to enter is always the naked domain.
Select your newly created hosted zone, and click on “Go to record sets”. The NS entries that were automatically generated by Route 53 should be entered in your domain provider (check their documentation to learn how to do it). You will need to wait between 24 and 72 hours before all the DNS propagated correctly.
In the meantime, we are going to properly configure Route 53. Since June 2013, Route 53 supports to alias CloudFront distribution to APEX domain (also called naked domains). This is very useful because we will be able to “attach” both the APEX domain and the www the domain name to the CloudFront distribution, hence making your website accessible from those two URL, without having to launch a small web server to redirect it.
-
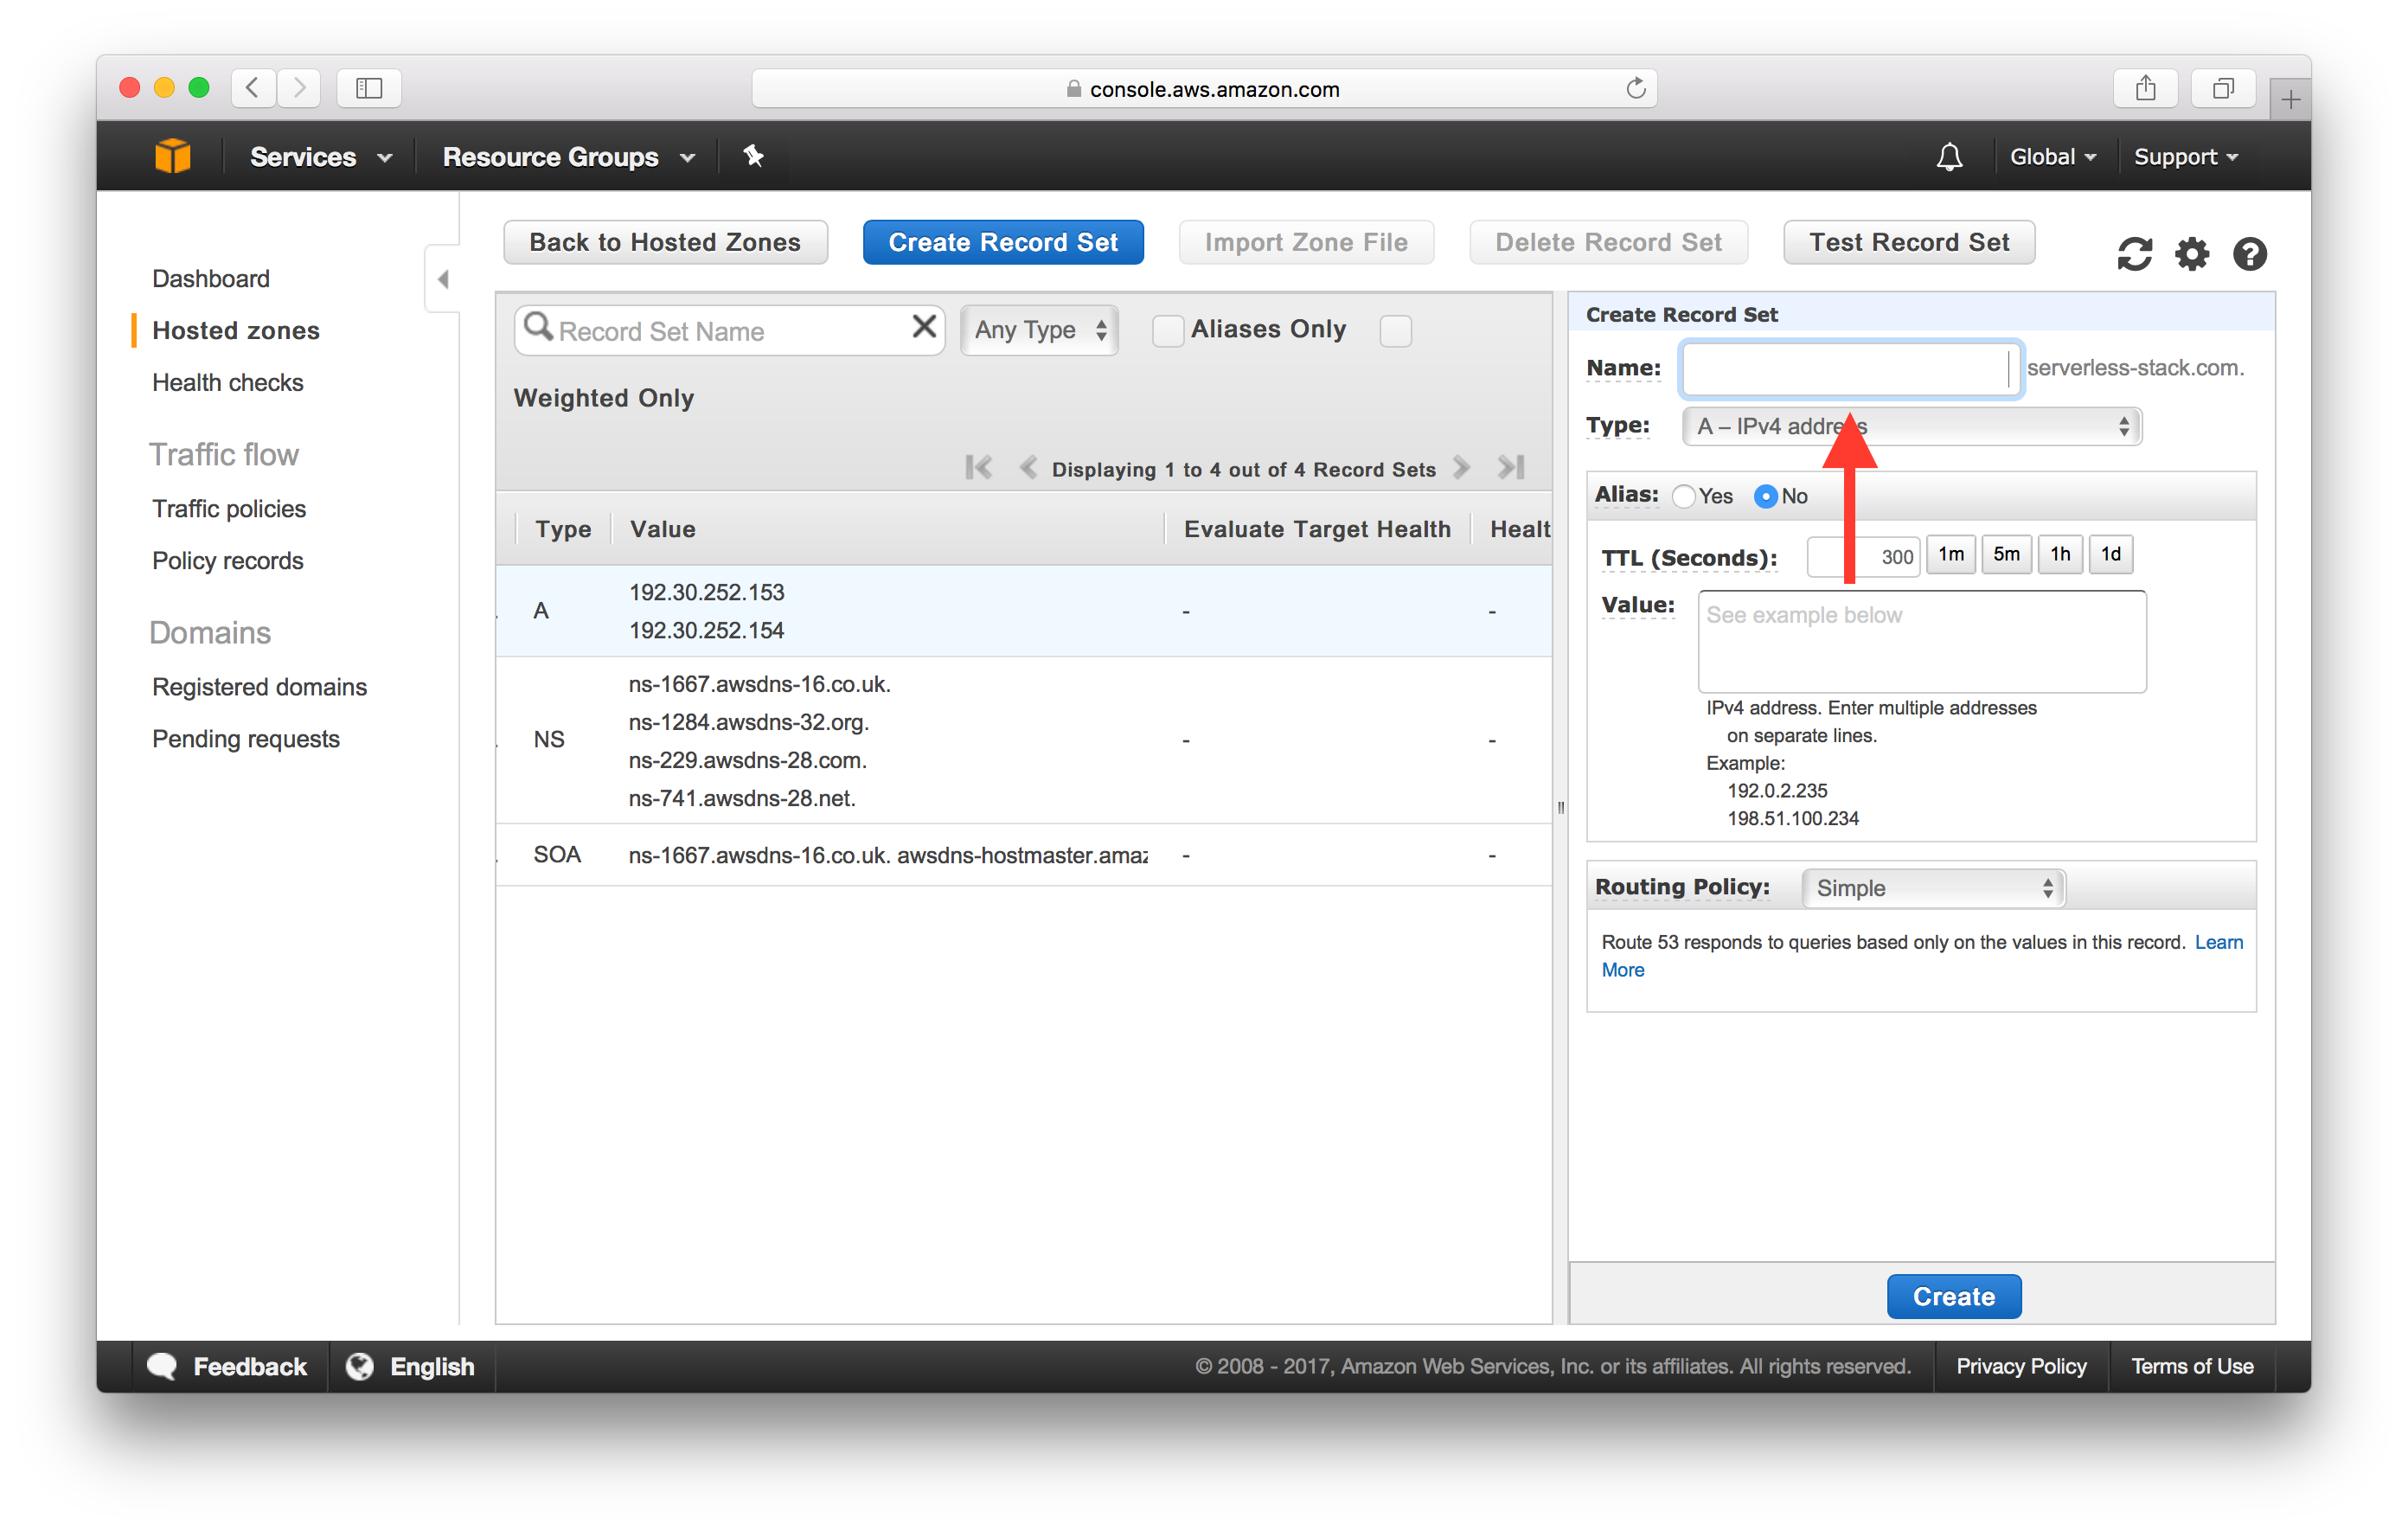
Click on “Create Record Set”.
-
In the “Name”, enters nothing, and make sure “Type” is to “A — IPv4 address”.
-
Click on “Yes” for Alias, and set the CloudFront distribution as “Alias target” (it should be automatically auto-completed for you).
-
Leave the Routing Policy to “Simple”, and validate the record set.
-
Go back to 1, but this name enters “www” for name.
Point Domain to CloudFront Distribution
Head back into Route 53 and hit the Hosted Zones button. If you don’t have an existing Hosted Zone, you’ll need to create one by adding the Domain Name and selecting Public Hosted Zone as the Type.

Select your domain from the list and hit Create Record Set in the details screen.
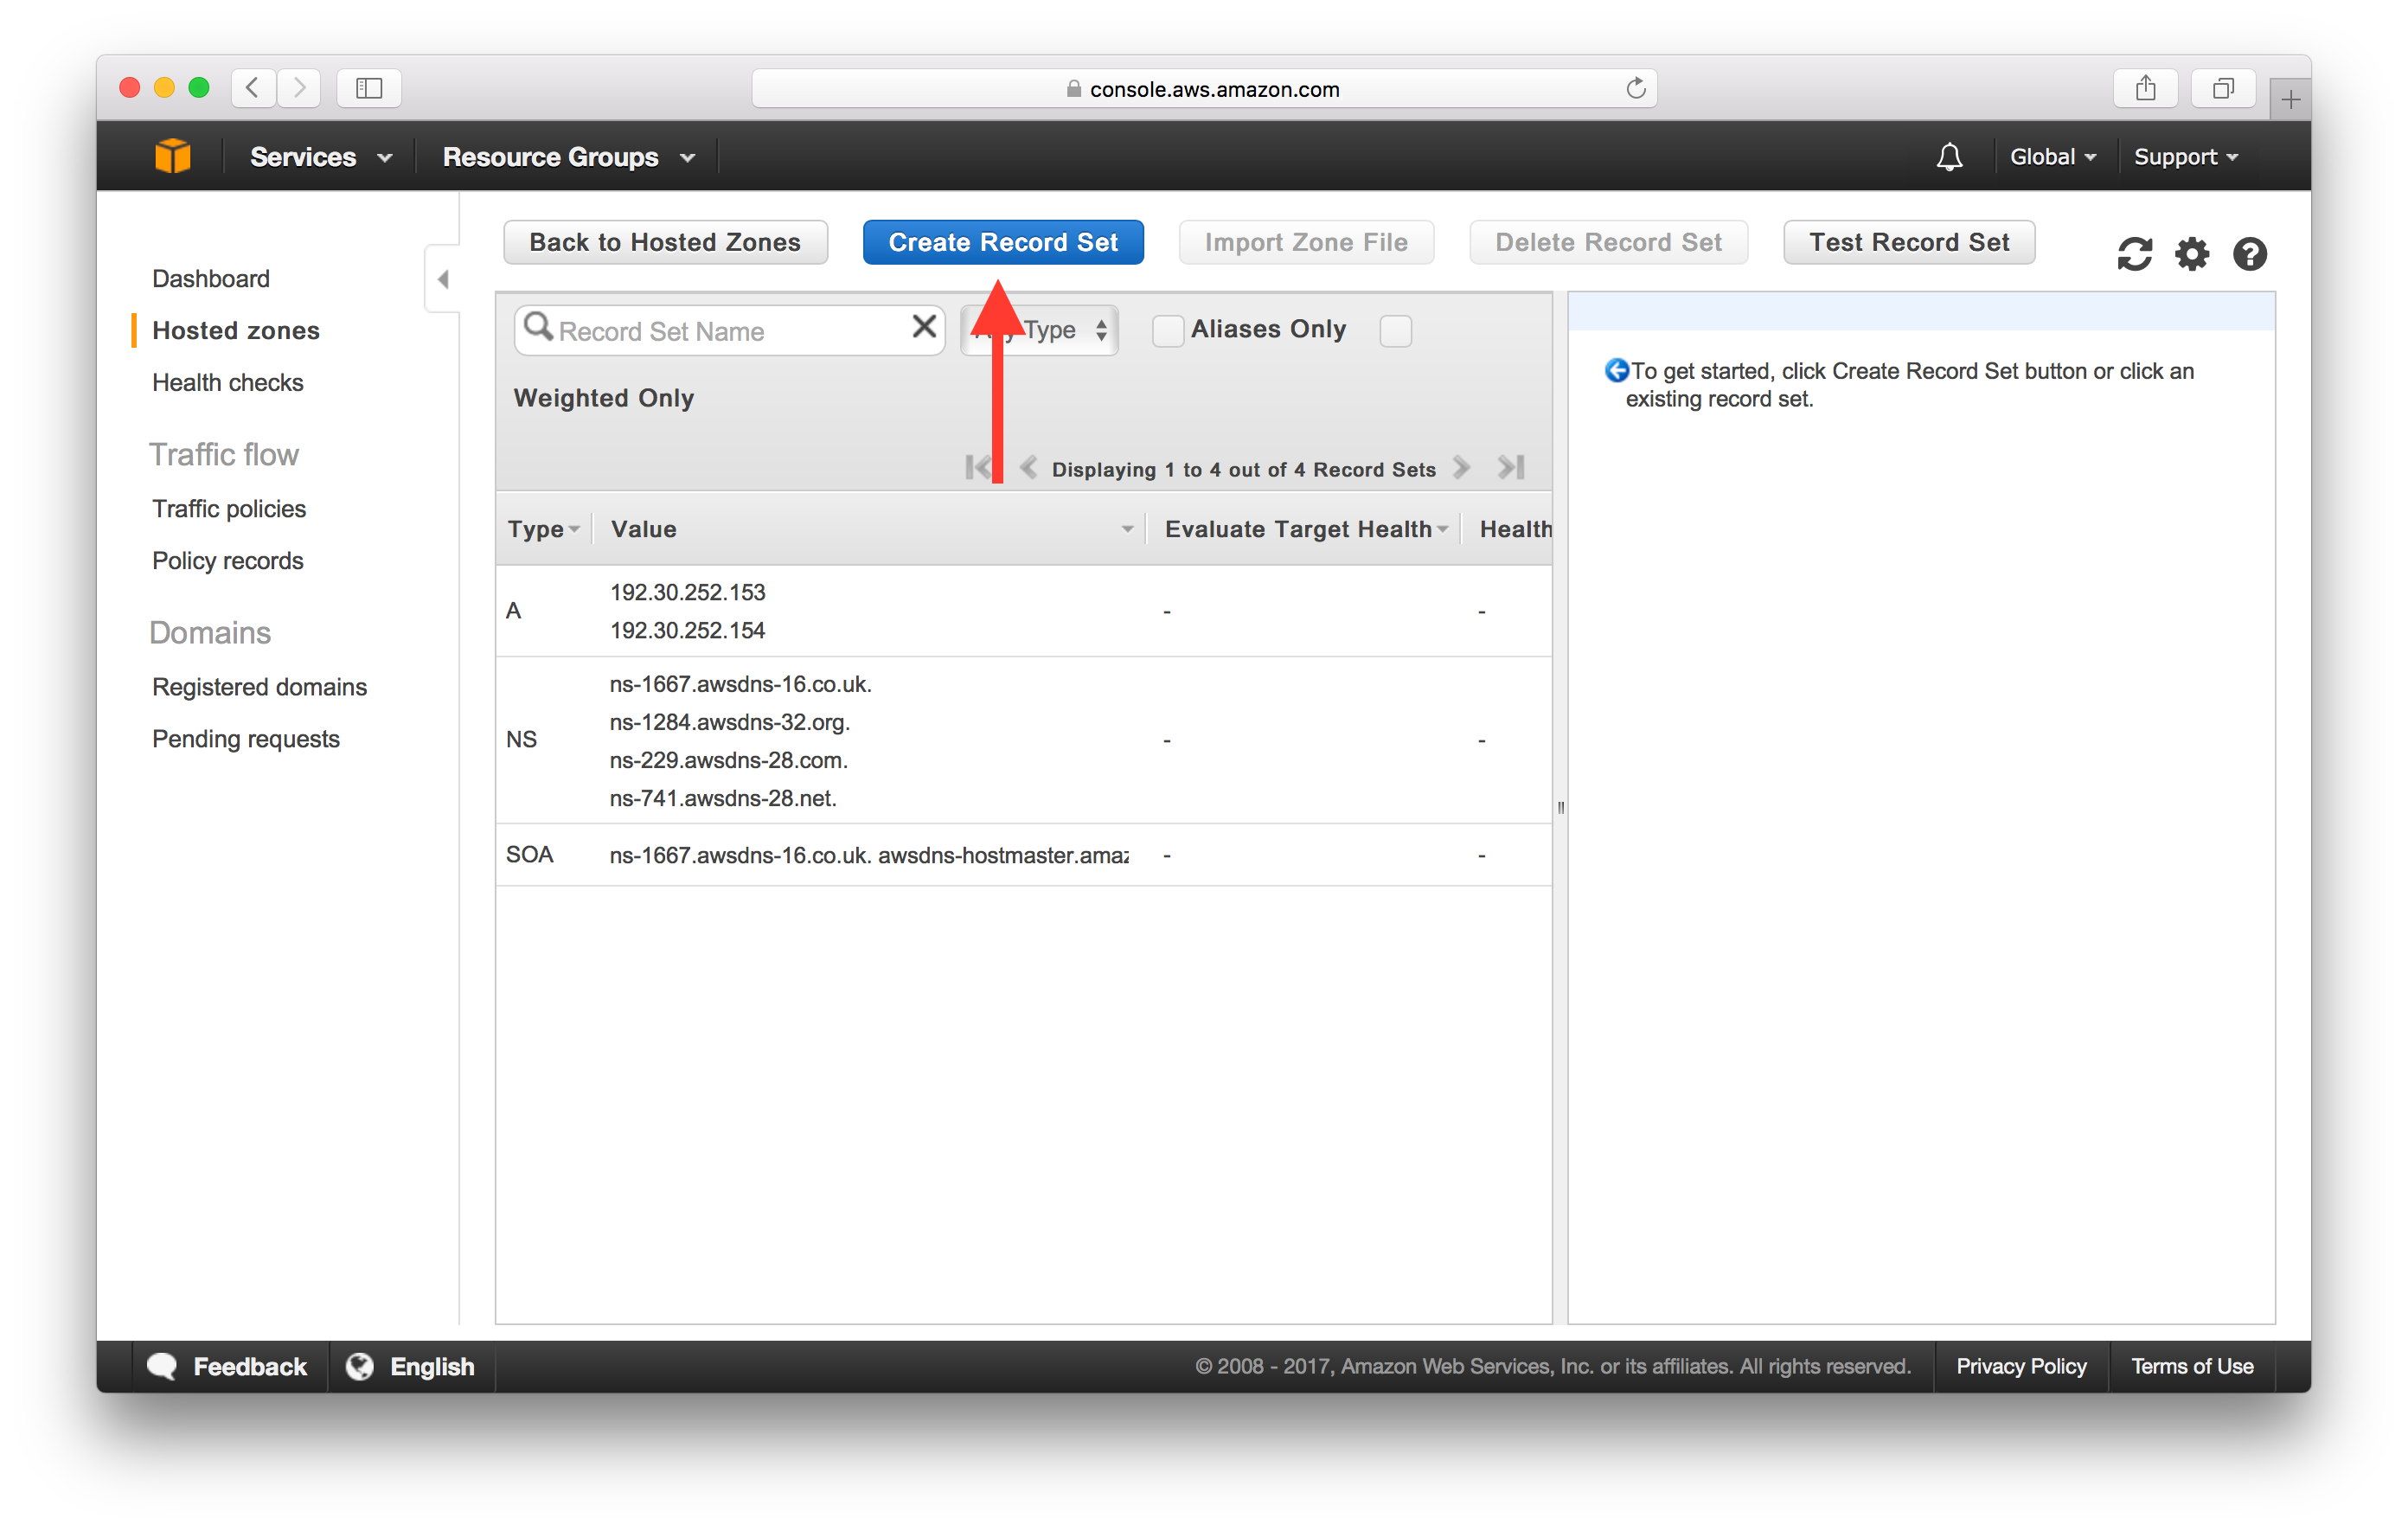
Leave the Name field empty since we are going to point our bare domain (without the www.)) to our CloudFront Distribution.
And select Alias as Yes since we are going to simply point this to our CloudFront domain.
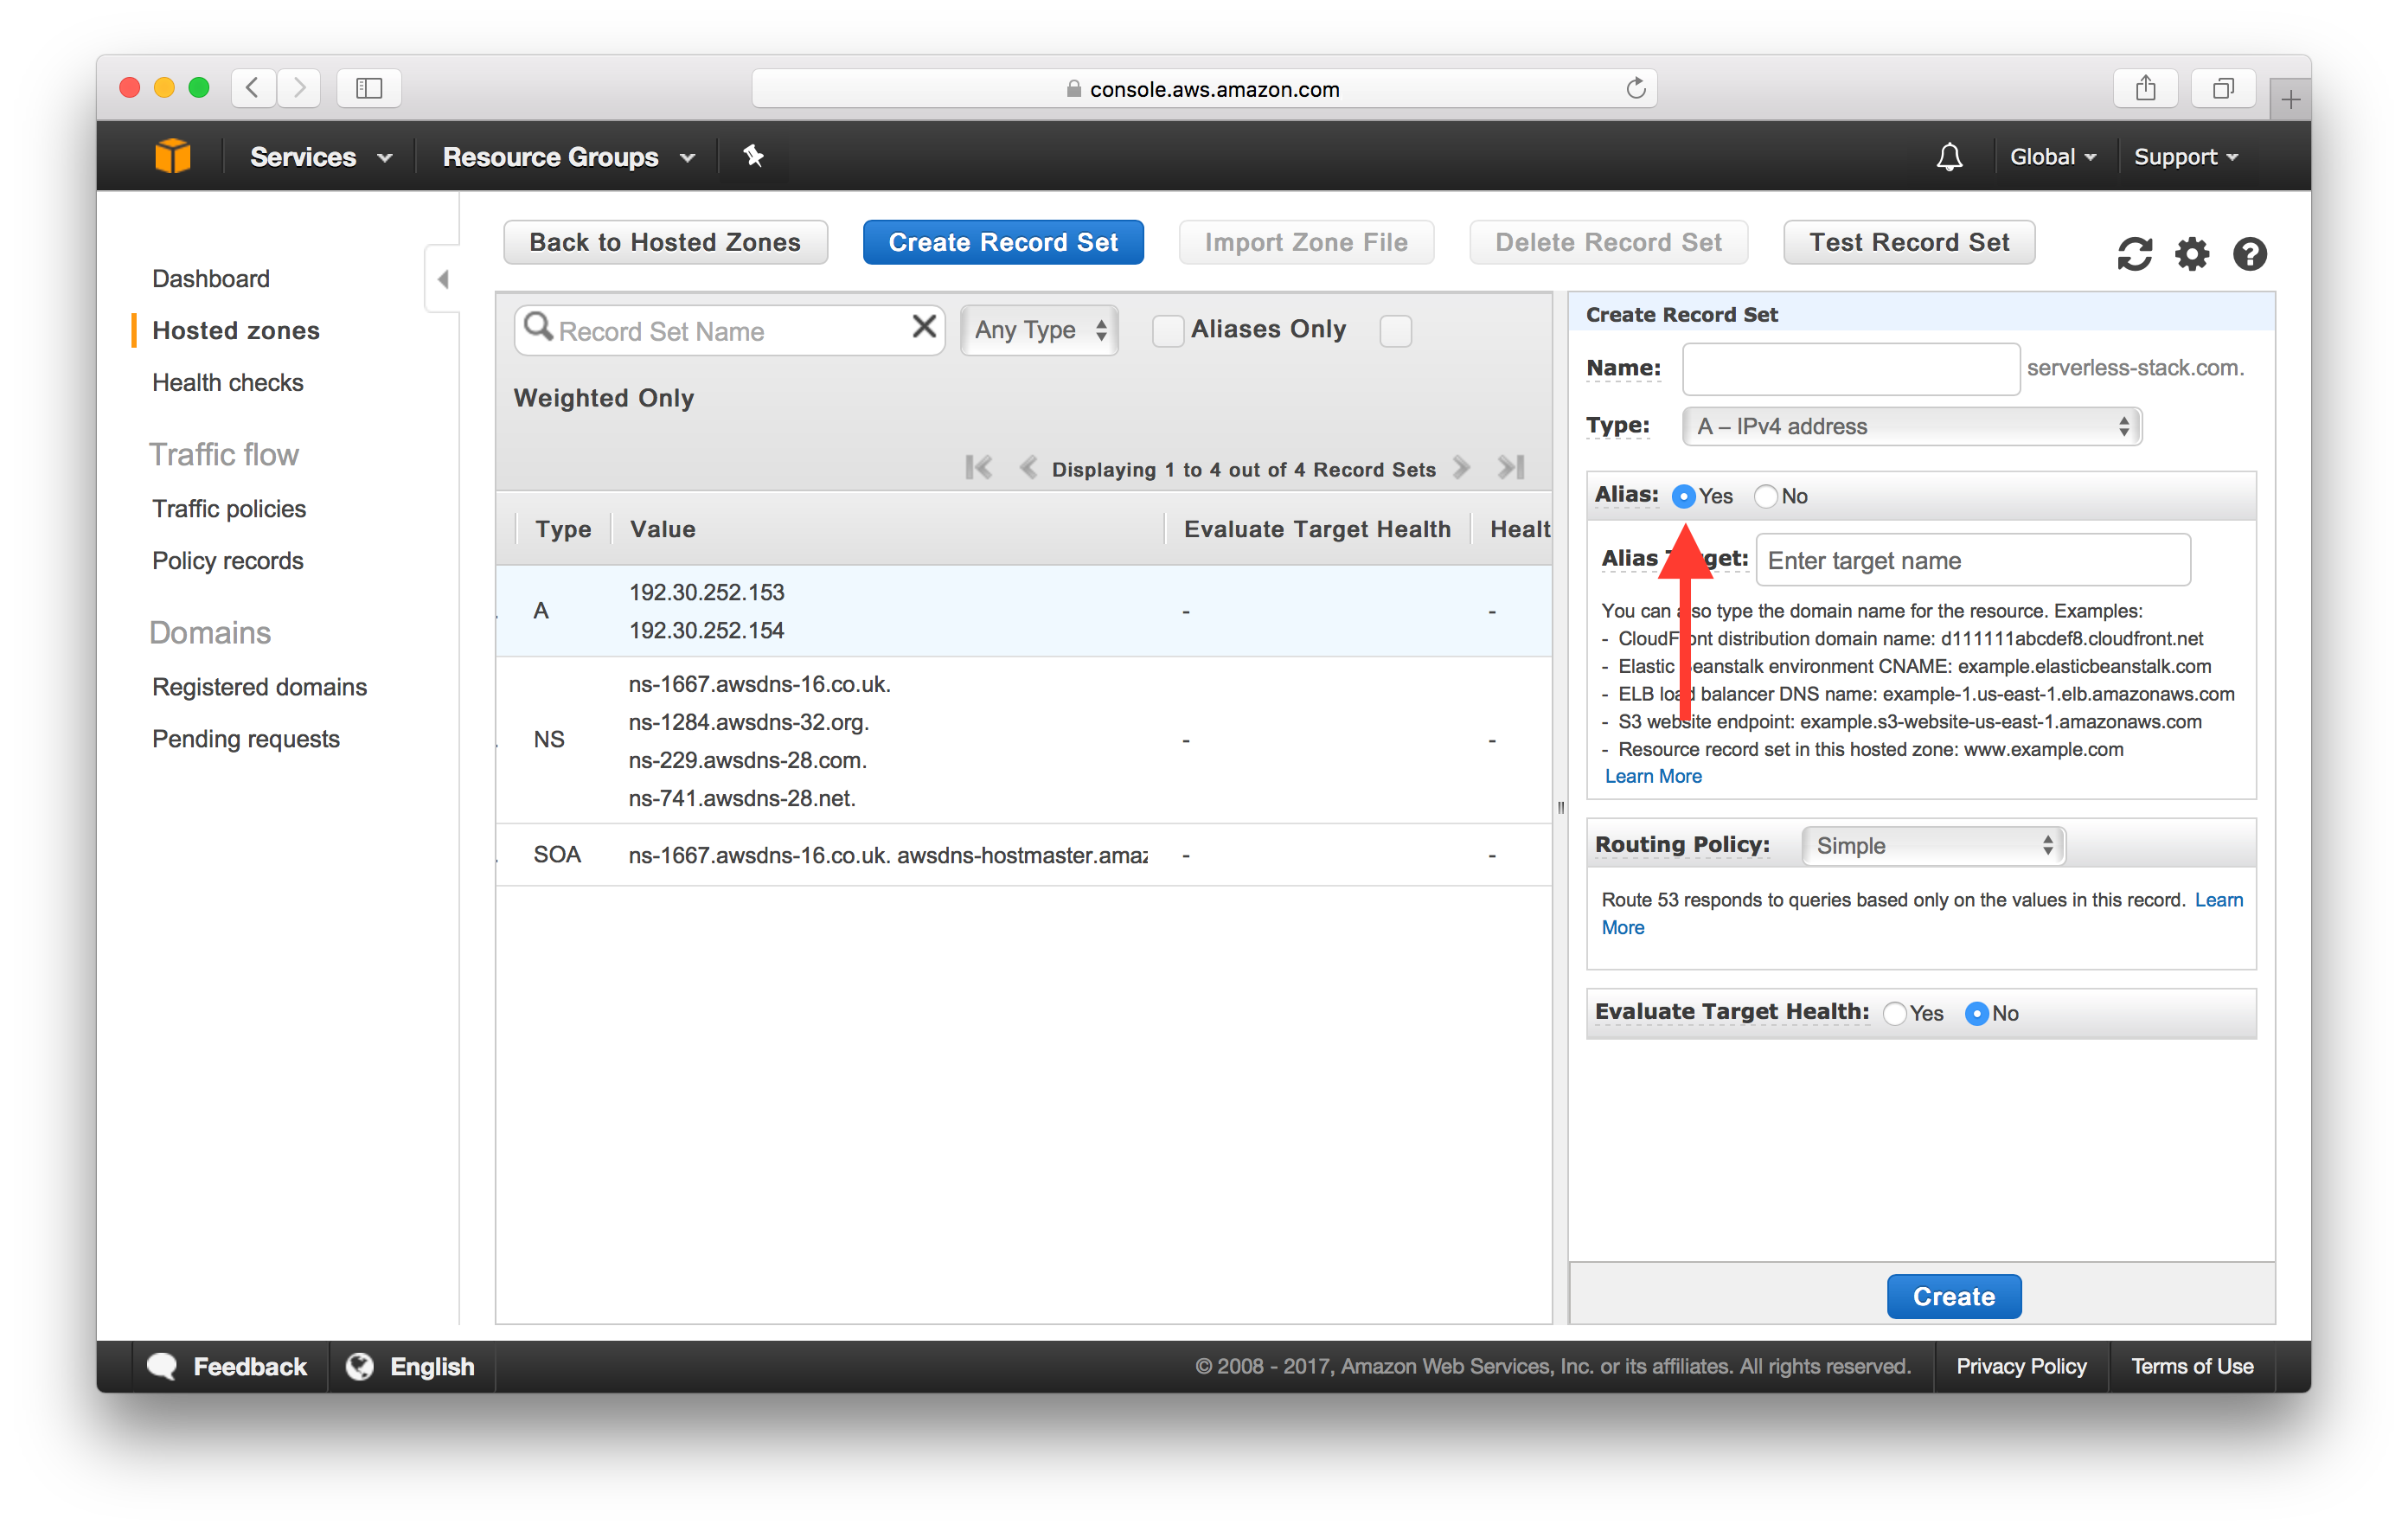
In the Alias Target dropdown, select your CloudFront Distribution.

Finally, hit Create to add your new record set.
Now if you have domain name purchased from Go daddy then update nameserver on go daddy or if domain purchased from ROute 53 only then just add that name in public hostname which has already been done
If the domain is from Go daddy
First things first. In case you do not own a domain yet, you should buy one. Check this blog to learn how to do it.
1. Godaddy DNS Management
Okay, so once we already have the Godaddy domain, we will log into our account and access to manage our domain. On GoDaddy products we will be able to see the domains we own, additional products and recommendations.
In this step, we are going to click to the “DNS” button to access the DNS Management console from Godaddy. Since the account is new, or still on Godaddy DNS, we will be able to see different sections.
-
Records
-
Name Servers
-
Additional Functionalities
-
Forwardings
Okay, that’s a lot of information/records and something we don’t want to look at here…
The DNS Management is in charge of routing all your domains traffic to the specified server or available service, depending on your configuration.
What we actually want to take a look at is to the Server Names block. We will see that there are 2 nameservers specified in the current Godaddy DNS block.
Usually, Godaddy Name servers are:
-
NS#.domaincontrol.com
-
NS#.domaincontrol.com
Like these:
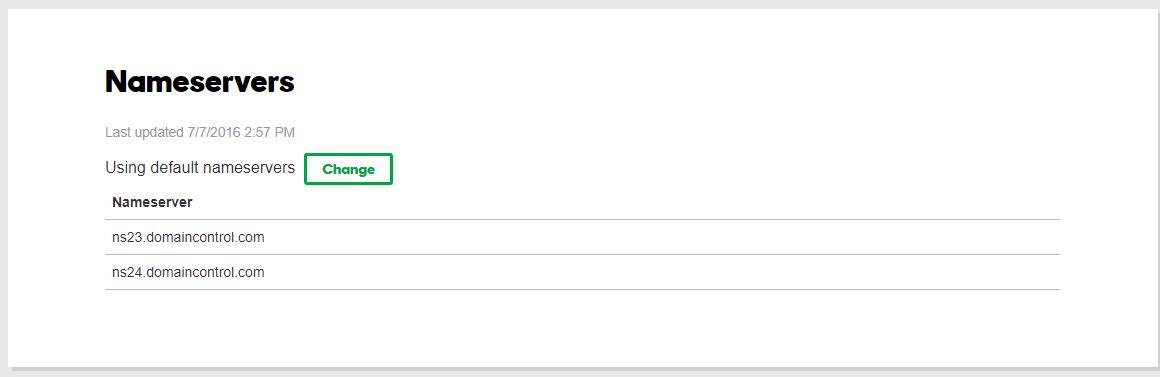
These are the ones to be changed once we have created our hosted zone in AWS. Right now we are going to leave it as it is, and go to AWS to create our Route 53 hosted zone.
6. Change the DNS
After copying over all our records, we will need to change the Nameservers for the ones that Amazon provided.

After pointing our new Name Servers to the Route53 hosted zone, we won’t be able to see the DNS Records such as IPs, CNAME or MX Records in Godaddy. Instead, we will now require going to Route53 to view our setup.
7. Review Propagation
After changing our DNS, even before changing them we can see where in the world it is propagated and where it is missing.
If you test the “NS” and search your domain, it will tell you the main zones where it is resolving to.
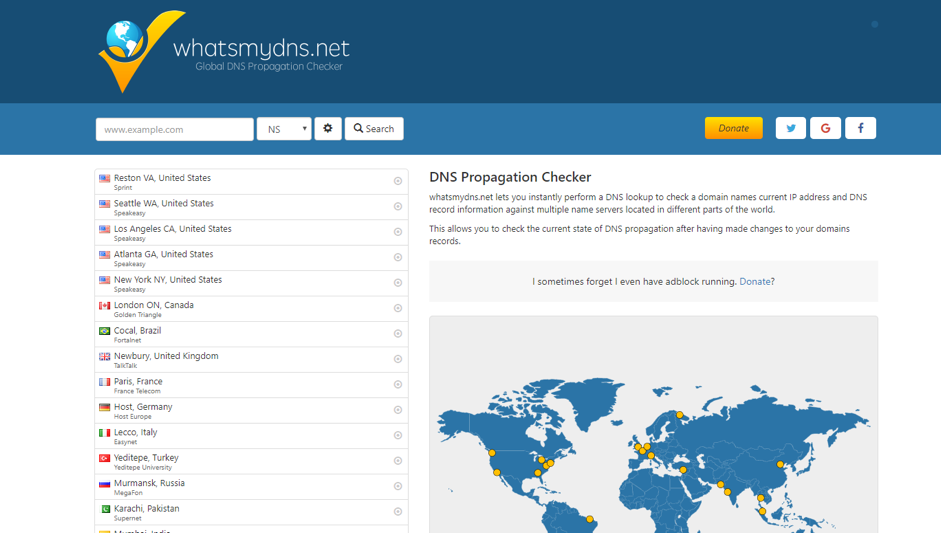
And that’s it. After you have migrated your Name Servers, it is only a matter of time to see the changes. Now you have transferred your DNS and domain from Godaddy to AWS successfully
Comments