
In this Blog, we will set up the Node js development project with Typescript First Let’s understand why we need Typescript for Node JS application and then we will do the setup of node js application with typescript. Code available here
What is Typescript & Why you should use it ..
Typescript is a superset of Javascript, which is designed to develop large Javascript applications. Being a superset of Javascript, existing Javascript programs are also valid Typescript programs, meaning you don’t have to worry about converting the whole existing Javascript code into Typescript at once. Instead, if you wish to migrate your existing Javascript code to Typescript, you can do that gradually.
Typescript is a superset of Javascript
There are some major benefits of using Typescript, which includes, support for Classes and Modules, Type-checking, ES6 features support, Class library API definition, support for Javascript packaging, and a lot more.
Why should one use it?
Here are few features of Typescript which make its usage worth, and are a reason why a javascript developer should consider using the Typescript.
Using new features of ECMAScript:
TypeScript supports new ECMAScript standards and transpiles them to (older) ECMAScript targets of your choice (current targets are 3, 5 and 6 [a.k.a. 2015]). This means you can use features of ES2015 and beyond, like modules, lambda functions, classes, the spread operator, de-structuring, today. It also adds type support of course, which is not part of any ECMAScript standard and may likely never be due to the interpreted nature instead of compiled nature of JavaScript. There are some other tools available to do this job as well. Like BabelJS. Typescript does this out of the box.
Static typing:
JavaScript is dynamically typed. This means JavaScript does not know what type a variable is until it is actually instantiated at run-time. TypeScript adds type support to JavaScript. Bugs that are caused by false assumptions of some variables being of a certain type can be completely eradicated if you play your cards right; how strict you type your code or if you type your code at all is up to you. TypeScript provides static typing through type annotations to enable type checking at compile time.
Type Inference:
TypeScript makes typing a bit easier and a lot less explicit by the use of type inference. For example: var x = "hello" in TypeScript is the same as var x : string = "hello". The type is simply inferred from its use. Even it you don’t explicitly type the types, they are still there to save you from doing something which otherwise would result in a run-time error.
Better IDE support
The development experience with TypeScript is a great improvement over JavaScript. There is a wide range of IDEs that have excellent support for TypeScript, like Visual Studio & VS code, Atom, Sublime, and IntelliJ/WebStorm. These IDEs are well informed in real-time by the TypeScript compiler on its rich type information. This gives a couple of major advantages. For example, with TypeScript, you can safely do refactoring like renames across your entire codebase.
Strict Null Checking
Errors like cannot read property 'x' of undefined are common in javascript programming. By using Typescript, you already avoid most of these kinds of errors, since one cannot use a variable that is not known to the TypeScript compiler. But its still possible though to mistakenly utilize a variable that is set to undefined. By using --strictNullChecks flag in TypeScript compiler you can eliminate these kinds of errors altogether.
Interoperability and many more
TypeScript is closely related to JavaScript so it has great interoperability capabilities, but some extra work is required to work with JavaScript libraries in TypeScript.
Lets setup application
Let’s install all required dependencies Installing TypeScript
What if I told you installing TypeScript is as easy as installing any module from npm? We’ll you’d have to believe me, because it is. Running one command in your terminal will get you the TypeScript compiler up and running on your machine. Let’s jump in.
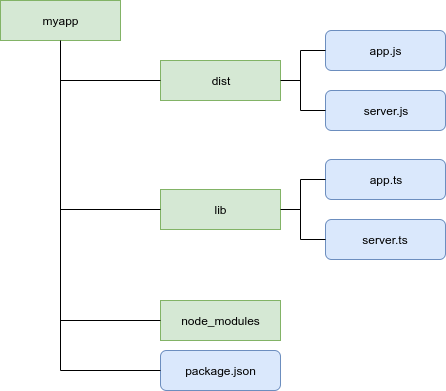
You can go ahead and open up a terminal window and create a directory where you want to type some code. I’ll name mine myapp. Initialize npm so you get a package.json file. Then, installing TypeScript is as easy as just running one command.
$ npm init -y
$ npm install -g typescript
This will give your terminal global access to the TypeScript compiler, simply with using tsc command.
Here’s a simple example. Open up a code editor of your choice and create a simple file. But, give it an extension of .ts. I’ll name my file app.ts.
// app.ts

let x: number = 10;
let y: number = 20;
console.log(x + y);
Now just run tsc with the filename.ts
$ tsc app.tsRunning the command will create an app.js file in the same directory. Opening it up we can see it’s basic ES5 JavaScript.
// app.js

var x = 10;
var y = 20;
console.log(x + y);
Installing dependencies
As this would be a proper tutorial without some real code, we need to install some dependencies first. Two of them which make up a large portion of Node apps today are express and body-parser. So what’s Express?
Fast, unopinionated, minimalist web framework for Node.js — Official Website
Let’s get crackin’, shall we? Installing the required dependencies is easy, just one command to run.
$ npm install --save express @types/express body-parserWe’re installing express, the express data types for TypeScript, and of course body-parser. This can seem strange. Some @types showing up all of sudden. Not to worry. These types are what make TypeScript special. They’re part of DefinitelyTyped, the repository for high-quality TypeScript type definitions. If you need some special types you just install them. That’s just awesome. This lets the TypeScript compiler know what the special values in Express mean giving it the possibility to do pre-compile error checking correctly.
That was a rather short installation process. Let’s jump to the code.
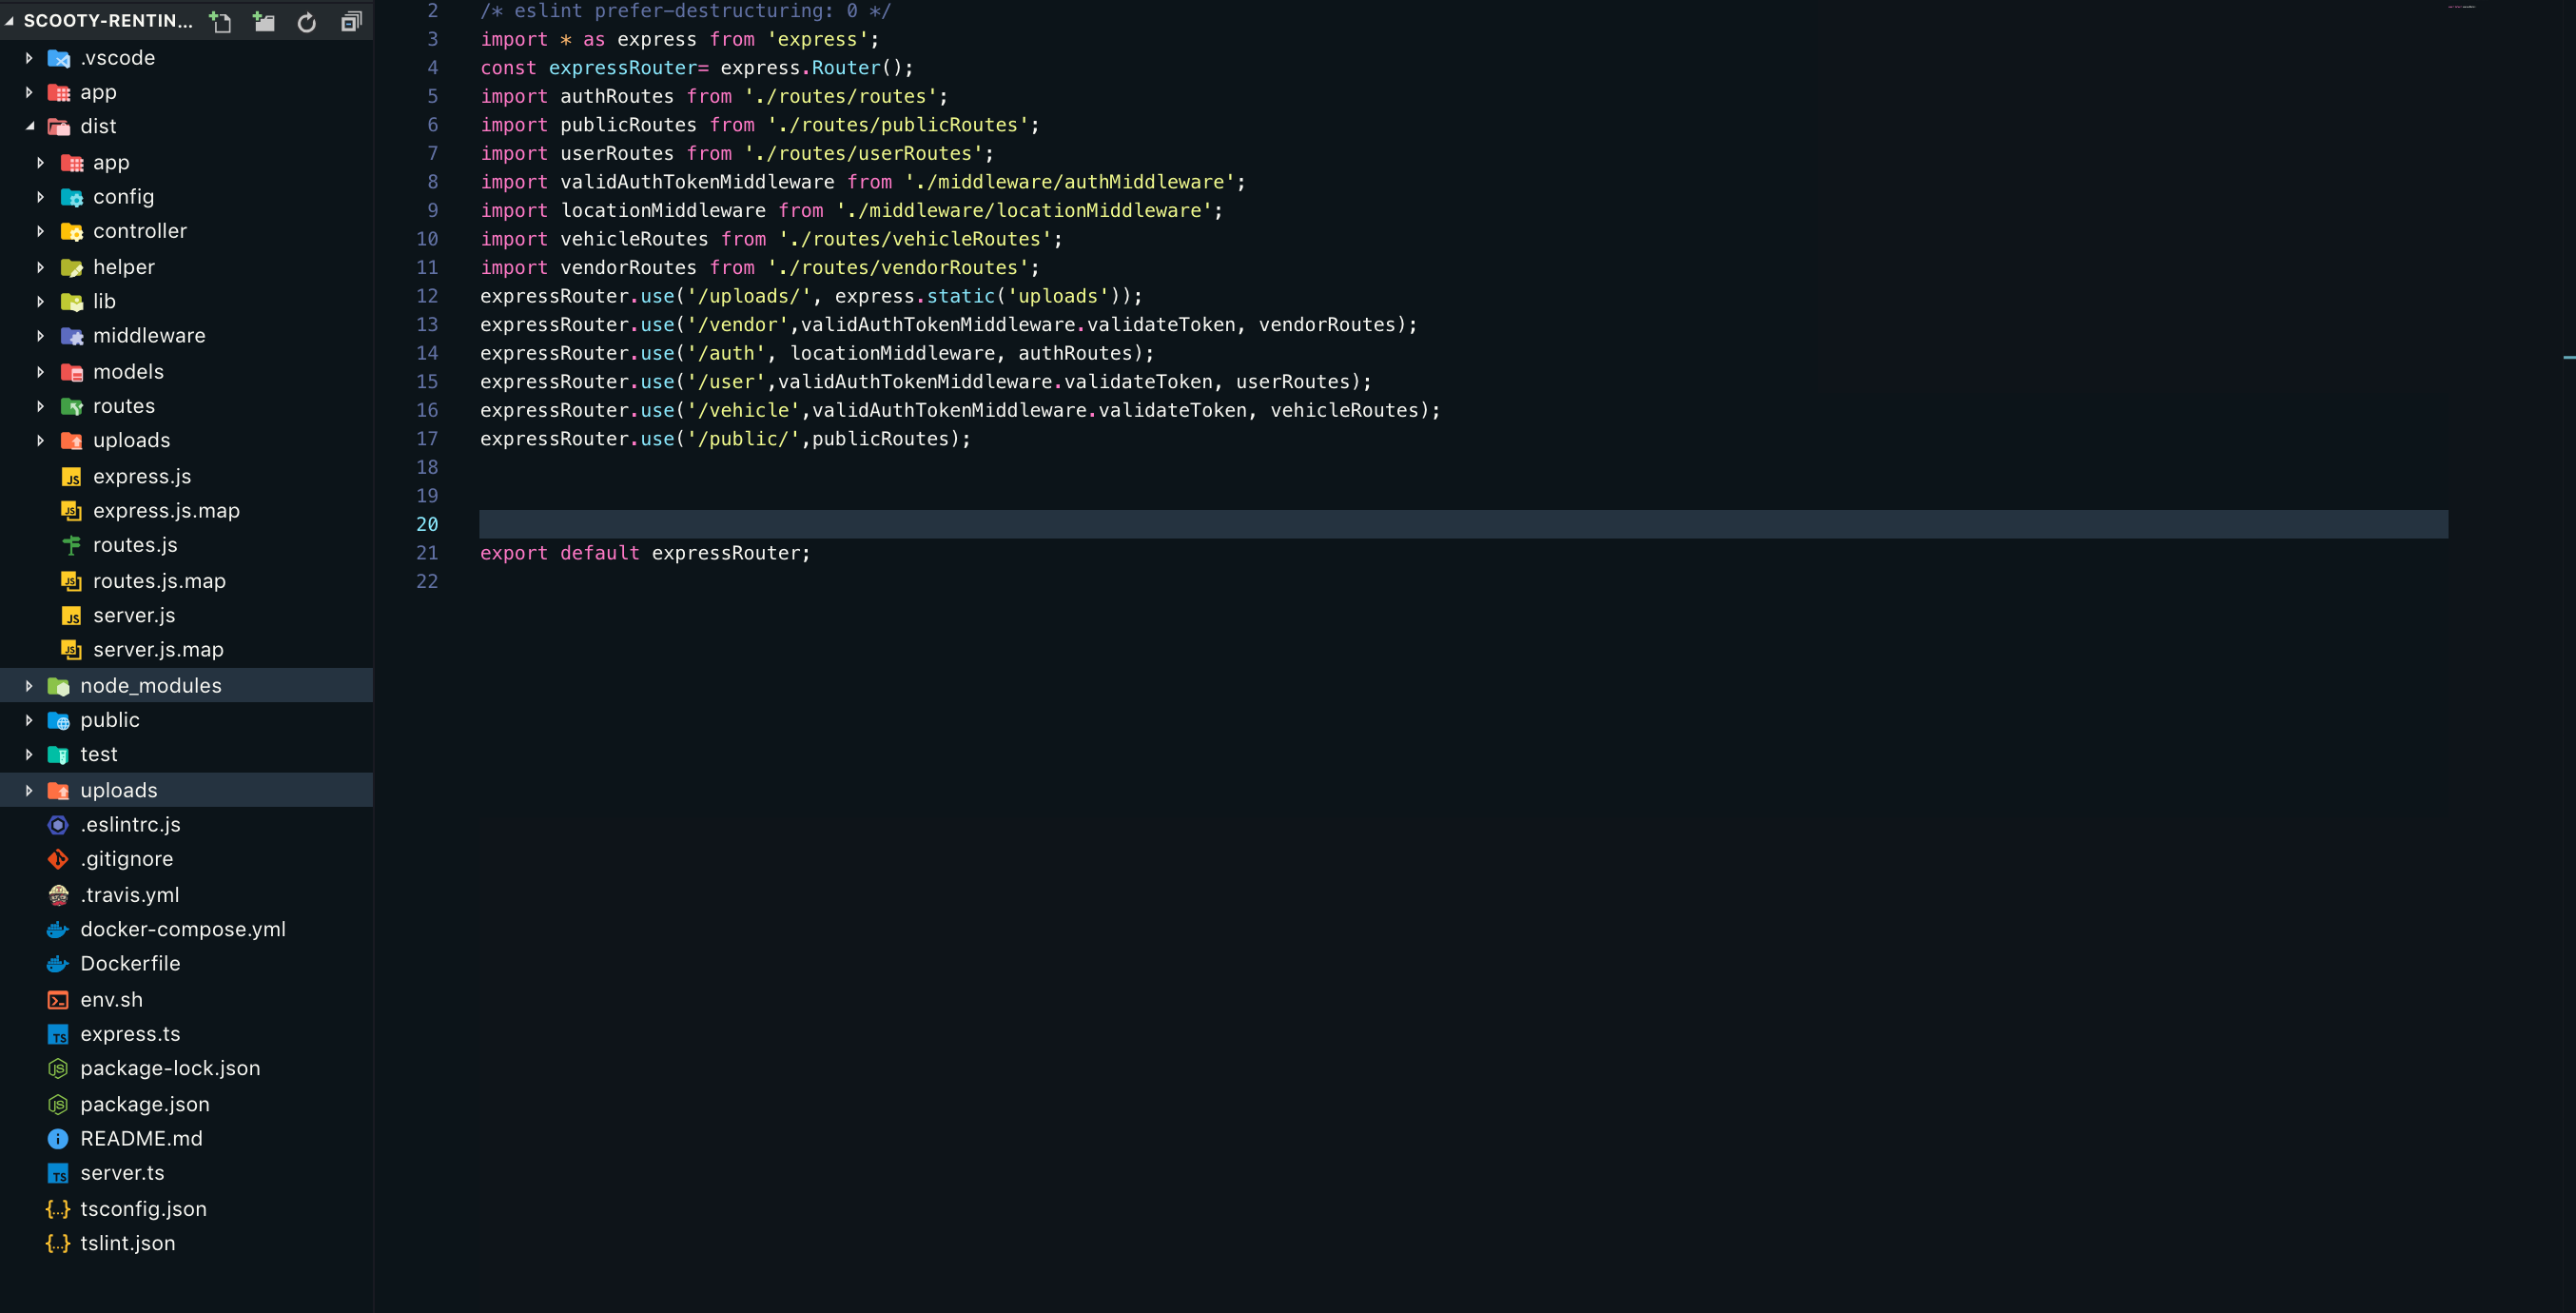
The application itself will be rather simple, we’ll create a simple server, add two routes, configure it properly and spin it up on a port of our choice. The main thing we need to understand is the folder structure.
1. Making it work
 dependencies
Configure express app with Node JS HTTP server, here we will do import as we do in ES6 module import and export as we are writing code in typescript
The code we write in ES5 Vs ES6
// ES5 way
const express = require('express');
module.exports = app


// ES6 way
import * as http from 'http';
export default app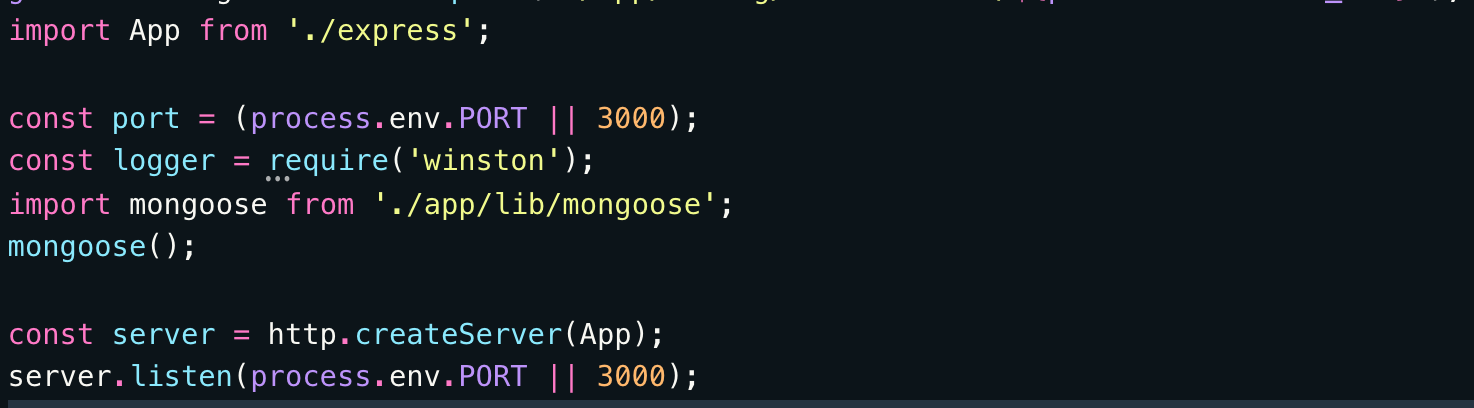
The app can be started like this using ES6 and typescript here we will create all files with.ts file extension
import * as express from "express";
import * as bodyParser from "body-parser";
import { Request, Response } from "express";

class App {
  constructor() {
    this.app = express();
    this.config();
    this.routes();
  }
  public app: express.Application;
  private config(): void {
    this.app.use(bodyParser.json());
    this.app.use(bodyParser.urlencoded({ extended: false }));
  }
  private routes(): void {
    const router = express.Router();
    router.get('/', (req: Request, res: Response) => {
      res.status(200).send({
        message: 'Hello World!'
      })
    });
    this.app.use('/', router)
  }

}

export default new App().app;
Setting up Compilation
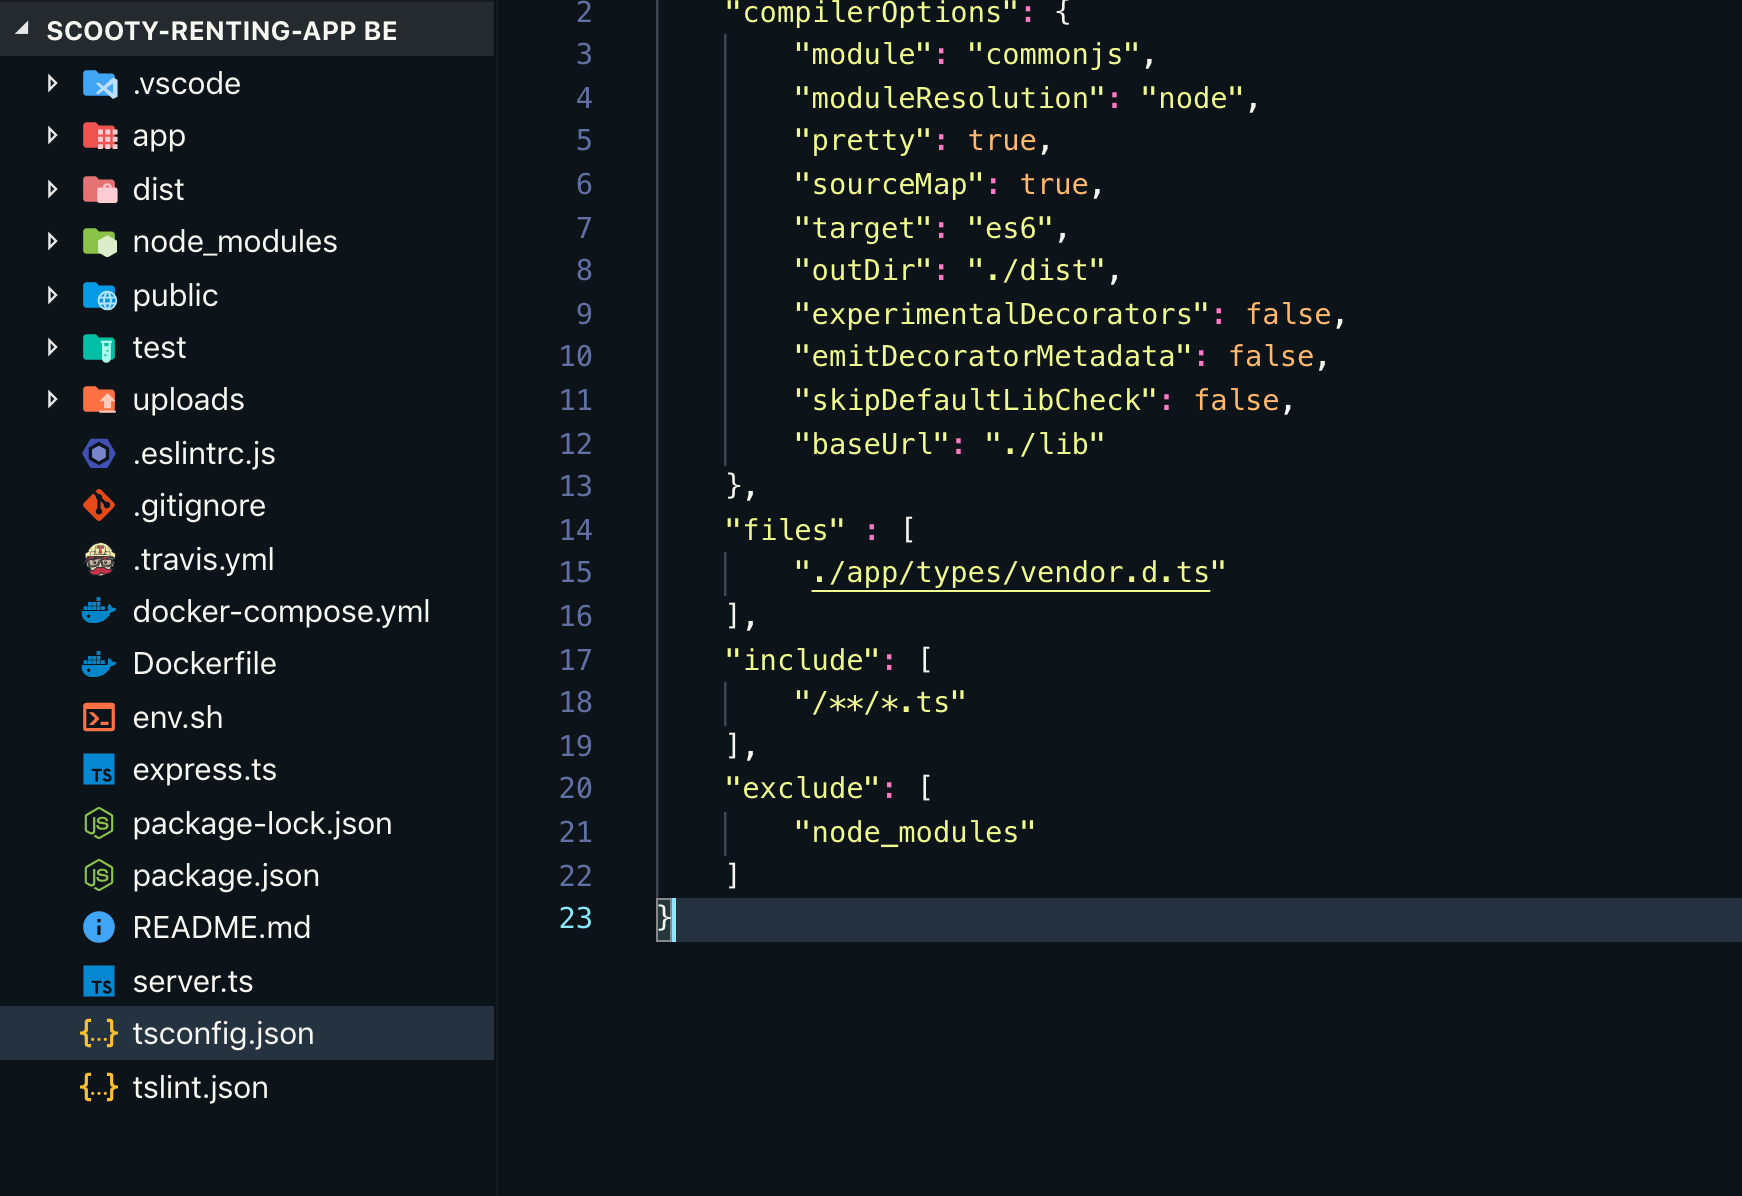
With the tsconfig.json file, we tell TypeScript what we want to compile and how, as well as where to place the compiled files. There are so many things you can configure, but we’ll focus on the most important things such as the ECMAScript version we want to compile to, which module system to expect and of course the location of the files.
{
    "compilerOptions": {
        "module": "commonjs",
        "moduleResolution": "node",
        "pretty": true,
        "sourceMap": true,
        "target": "es6",
        "outDir": "./dist",
        "experimentalDecorators": false,
        "emitDecoratorMetadata": false,
        "skipDefaultLibCheck": false,
        "baseUrl": "./lib"
    },
    "files" : [
        "./app/types/vendor.d.ts"
    ],
    "include": [
        "//*.ts"
    ],
    "exclude": [
        "node_modules"
    ]
}
The outDir is set to ./dist, meaning it will create the dist directory and place the compiled files there. We’re also specifying the include to add all .tsfiles located in the lib directory. Now when you run the tsc command, it will read this file and compile everything just as you want. Let’s try it.
$ tscRunning this you’ll see the new dist directory get created along with the app.js and server.js file. Check it out. The .js files are now basic JavaScript files, written in ES6. To make it easier to run, let’s add some scripts in the package.json.
{
"name": "bla-bla-scooty",
"version": "0.0.0",
"private": true,
"scripts": {
"start-dev": ". ./env.sh && cd dist && nodemon server.js",
"start": "cd dist && nodemon server.js",
"test": ". ./env.sh && NODE_ENV=test && mocha ",
"build": "tsc --watch",
"dev": ". ./env.sh && ts-node server.ts",
"start-tsc": ". ./env.sh && nodemon ./dist/server.js",
"buildAndstart": ". ./env.sh && npm run build && npm run start"
},
"dependencies": {
"@types/express": "^4.11.1",
"assert": "^1.4.1",
"axios": "^0.18.0",
"bcrypt-nodejs": "0.0.3",
"bluebird": "^3.5.3",
"body-parser": "^1.18.3",
"cookie-parser": "^1.4.3",
"cors": "^2.8.5",
"dotenv": "^6.1.0",
"email-templates": "^2.7.1",
"express": "^4.16.4",
},
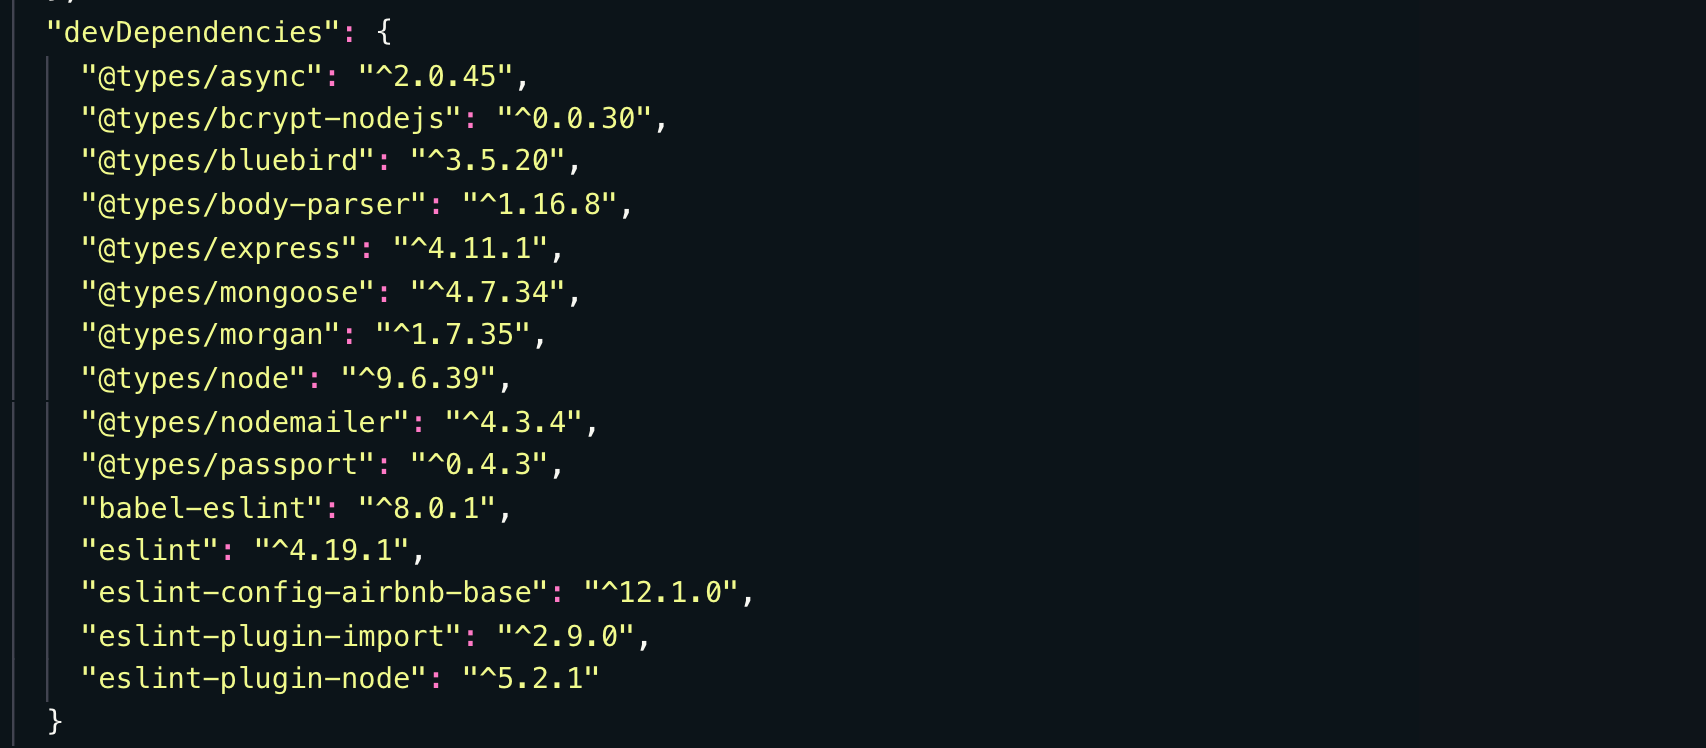
"devDependencies": {
"@types/async": "^2.0.45",
"@types/bcrypt-nodejs": "^0.0.30",
"@types/bluebird": "^3.5.20",
"@types/body-parser": "^1.16.8",
"@types/express": "^4.11.1",
"@types/mongoose": "^4.7.34",
"@types/morgan": "^1.7.35",
"@types/node": "^9.6.39",
"@types/nodemailer": "^4.3.4",
"@types/passport": "^0.4.3",
"babel-eslint": "^8.0.1",
"eslint": "^4.19.1",
"eslint-config-airbnb-base": "^12.1.0",
"eslint-plugin-import": "^2.9.0",
"eslint-plugin-node": "^5.2.1"
}
}When you run npm run buildandStart in the terminal, you will spin up the app with the tsc module, first it will compile code and create code in dist folder where we can run this as plain javascript server, tsc — watch will build code and will watch files for changes then we can run nodemon serer.js in dost folder to start application.
Comments