
Build and Test Simple CRUD Operations using Nestjs
We are going to develop a REST API project with CRUD operations in Typescript using PostgreSQL, TypeORM and Docker.
What is NestJS?
Before we begin, we need to know what [NestJS](https://nestjs.com) is. Nest (NestJS) is a framework for building efficient, scalable Node.js server-side apps in JavaScript and Typescript. Either way, under the hood Nest uses [Express](https://expressjs.com) by default, or we can configure [Fastify](https://fastify.dev/).
Nest has a special modular architecture than other JavaScript frameworks. It was inspired by Angular. For example, everything related to working with users will be grouped into one module for users. This way, as our project grows, it will be easier to maintain, scale, support and test. This is a very big plus for NestJS.
The NestJS architecture contains three main concepts:
- Controllers — responsible for handling incoming requests and returning responses to the client
- Providers — a fundamental concept in Nest where controllers delegate more complex tasks to them. Many of Nest’s base classes can be thought of as providers — services, repositories, factories, helpers, etc.
- Modules — provide metadata that Nest uses to organize the structure of the app
Setting Up the Project
First, we’ll create a new Nest project where we’ll create, get, update, and delete students using the REST API. We can create a new project with two options:
Let’s create our project using the NestJS CLI. If you are not familiar, it is a command-line interface tool that helps you initialize, develop, and maintain your Nest apps. If you don’t have NestJS CLI, you can install it using the following command:
npm i -g @nestjs/cli
Now it is ready and installed globally so we can use it anywhere. Let’s create a new Nest project through the following line of code:
nest new nest-academy-rest-api
Great, we’ve successfully created our Nest app.
If we go to the src/ folder, there will be several main files:
app.controller.ts— a basic controller with a single routeapp.controller.spec.ts— the unit tests for the controllerapp.module.ts— the root module of the appapp.service.ts— a basic service with a single methodmain.ts— the entry file of the app
The main.ts file includes an async function that will bootstrap our app:
import { NestFactory } from '@nestjs/core';

import { AppModule } from './app.module';

async function bootstrap() {
  const app = await NestFactory.create(AppModule); // create Nest app
  await app.listen(3000); // listen on port 3000
}

bootstrap(); // run the app
Above, we created an instance of the Nest app and run it on port 3000 using the static creation method of NestFactory.
One last thing before we start coding, let’s check if everything works by running the app using the following command:
npm start
It should show Hello World text if we open localhost:3000 in a browser.
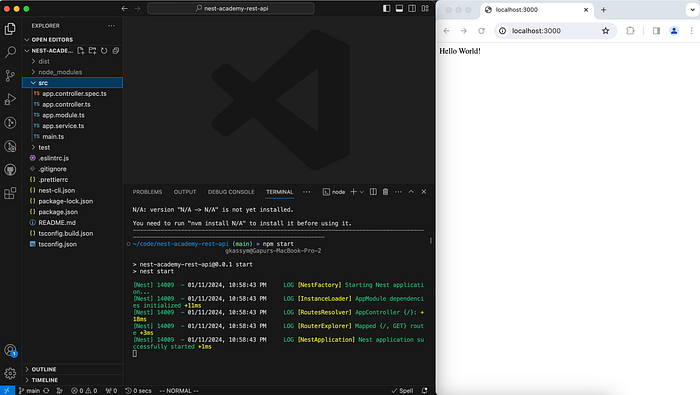
Nest project
Generating a New Module
As we already mentioned, NestJS architecture is based on modules. Hence, we need to create a new module class, controller, service and entity for a student using the Nest CLI. We can create each of them separately. Luckily, the Nest CLI provides the ability to generate everything associated with a single module with a single command. Let’s generate with the following command:
nest g resource students
Awesome, everything was generated seamlessly:
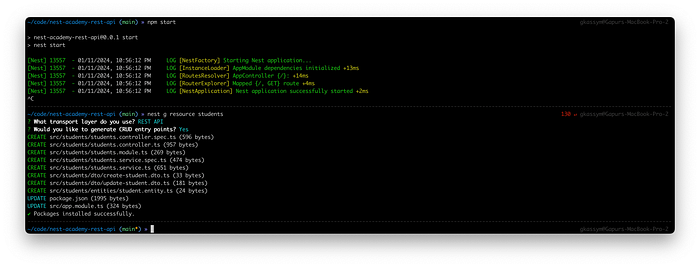
Generate a student module
Student Entity
Before we begin, we need to install the necessary packages:
npm i pg typeorm @nestjs/typeorm @nestjs/config
- pg: Postgres driver for NodeJS
- typeorm: ORM for NodeJS
- @nestjs/typeorm: NestJS module for TypeORM
- @nestjs/config: NestJS module for configuration
We created a Student entity class. Entity is a class annotated with [@Entity](http://twitter.com/Entity)() that maps to a database table (or collection when using MongoDB). Let’s update student.entity.ts by adding the following code:
import { Entity, PrimaryGeneratedColumn, Column } from 'typeorm';

// it tells TypeORM that this is an entity
@Entity()
export class Student {
  // a primary column which value will be automatically generated
  // with an auto-increment value
  @PrimaryGeneratedColumn()
  id: number;

  @Column()
  firstName: string; // firstName column with type varchar

  @Column()
  lastName: string;

  @Column()
  email: string;

  @Column()
  address: string;
}
Above we have created a student table with five columns using the [@Column](http://twitter.com/Column)() decorator. Our id column is defined using the @PrimaryGeneratedColumn decorator to indicate that it is a primary column with an auto-increment value.
Student Data Transfer Object
We generated the CreateStudentDto and UpdateStudentDto DTO classes. DTO (Data Transfer Object) is a design pattern commonly used in software development to transfer data between different parts of an app. We’re going to use some validation on our data. To do this we need to install the necessary packages:
npm i --save class-validator class-transformer
Once it’s done, let’s update create-student.dto.ts file by adding the following code:
import { IsString, IsNotEmpty } from 'class-validator';

export class CreateStudentDto {
  @IsString() // it should be a string
  @IsNotEmpty() // it shouldn't be empty
  firstName: string;

  @IsString() // it should be a string
  @IsNotEmpty() // it shouldn't be empty
  lastName: string;

  @IsString() // it should be a string
  @IsNotEmpty() // it shouldn't be empty
  email: string;

  @IsString() // it should be a string
  address: string;
}
To apply the validation, we should set it in the main.ts file globally for the entire application:
async function bootstrap() {
  const app = await NestFactory.create(AppModule);
  app.useGlobalPipes(new ValidationPipe()); // use the validation
  await app.listen(3000);
}
Student Service
TypeORM supports the repository design pattern, so each entity has its own repository and allows creation, updating, deleting, loading, etc. with any entity. Let’s edit our students.service.ts file to include the following lines of code:
import { Injectable } from '@nestjs/common';
import { InjectRepository } from '@nestjs/typeorm';
import { Repository } from 'typeorm';

import { CreateStudentDto } from './dto/create-student.dto';
import { UpdateStudentDto } from './dto/update-student.dto';
import { Student } from './entities/student.entity';

// It tells NestJS that it is a service and an injectable
@Injectable()
export class StudentsService {
  // Inject student repository
  constructor(    @InjectRepository(Student) private studentRepository: Repository<Student>,  ) {}

  // create a new student
  create(createStudentDto: CreateStudentDto) {
    const student = new Student();
    student.firstName = createStudentDto.firstName;
    student.lastName = createStudentDto.lastName;
    student.email = createStudentDto.email;
    student.address = createStudentDto.address;
    return this.studentRepository.save(student);
  }

  // fetch all students
  findAll() {
    return this.studentRepository.find();
  }

  // get student by id
  findOne(id: number) {
    return this.studentRepository.findOneBy({ id });
  }

  // update student data by id
  async update(id: number, updateStudentDto: UpdateStudentDto) {
    const studentById = await this.studentRepository.findOneBy({ id });
    studentById.firstName = updateStudentDto.firstName;
    studentById.lastName = updateStudentDto.lastName;
    studentById.email = updateStudentDto.email;
    studentById.address = updateStudentDto.address;
    return this.studentRepository.save(studentById);
  }

  // detete student by id
  remove(id: number) {
    return this.studentRepository.delete(id);
  }
}
Above, we created a StudentService provider and injected a Student entity repository using constructor and InjectRepository decorator.
Student Controller
Now, our students.controller.ts:
import {
  Controller,
  Get,
  Post,
  Body,
  Patch,
  Param,
  Delete,
  NotFoundException,
  ParseIntPipe,
} from '@nestjs/common';

import { StudentsService } from './students.service';
import { CreateStudentDto } from './dto/create-student.dto';
import { UpdateStudentDto } from './dto/update-student.dto';

@Controller('students')
export class StudentsController {
  // inject studentsService provider
  constructor(private readonly studentsService: StudentsService) {}

  // create a new student
  @Post()
  create(@Body() createStudentDto: CreateStudentDto) {
    return this.studentsService.create(createStudentDto);
  }

  // get all students
  @Get()
  findAll() {
    return this.studentsService.findAll();
  }

  // get student by id param
  // we used ParseIntPipe to convert id to numeric type
  @Get(':id')
  findOne(@Param('id', ParseIntPipe) id: number) {
    const student = this.studentsService.findOne(id);

    if (!student) {
      throw new NotFoundException('Student does not exist!');
    }

    return student;
  }

  // update student by id
  // we used ParseIntPipe to convert id to numeric type
  @Patch(':id')
  update(    @Param('id', ParseIntPipe) id: number,
    @Body() updateStudentDto: UpdateStudentDto,  ) {
    return this.studentsService.update(id, updateStudentDto);
  }

  // delete student by id
  // we used ParseIntPipe to convert id to numeric type
  @Delete(':id')
  remove(@Param('id', ParseIntPipe) id: number) {
    return this.studentsService.remove(id);
  }
}
We used the [@Controller](http://twitter.com/Controller)(‘students’) decorator to tell NestJS that this is a controller and that the route is students. We also injected the StudentService provider through the constructor.
Student Module
Now, we need to update students.module.ts:
import { Module } from '@nestjs/common';
import { TypeOrmModule } from '@nestjs/typeorm';

import { StudentsService } from './students.service';
import { StudentsController } from './students.controller';
import { Student } from './entities/student.entity';

// it tells NestJS that this is a module
@Module({
  imports: [TypeOrmModule.forFeature([Student])],
  controllers: [StudentsController],
  providers: [StudentsService],
})
export class StudentsModule {}
Here we import StudentController, StudentService and use the TypeOrmModule.forFeature() method to determine which repositories are registered in the current scope.
Update the Main Module
Last but not least, we will import the TypeOrmModule into the root AppModule with environment variables to connect to the database. Let’s update the app.module.ts module file.
import { Module } from '@nestjs/common';
import { TypeOrmModule } from '@nestjs/typeorm';
import { ConfigModule } from '@nestjs/config';

import { AppController } from './app.controller';
import { AppService } from './app.service';
import { StudentsModule } from './students/students.module';

@Module({
  imports: [
    ConfigModule.forRoot(),
    StudentsModule,
    TypeOrmModule.forRoot({
      type: process.env.DB_TYPE as any,
      host: process.env.PG_HOST,
      port: parseInt(process.env.PG_PORT),
      username: process.env.PG_USER,
      password: process.env.PG_PASSWORD,
      database: process.env.PG_DB,
      entities: [__dirname + '/**/*.entity{.ts,.js}'],
      synchronize: true,
    }),
  ],
  controllers: [AppController],
  providers: [AppService],
})
export class AppModule {}
Dockerize the Project
If you’re not familiar with Docker, it’s a containerization platform that makes it easy to deploy and manage apps.
To containerize our NestJS app, we first create three docker files:
touch Dockerfile .dockerignore docker-compose.yml
We will use the .dockerignore file to tell Docker which files and directories to ignore when building the image.
node_modules
dist
.git
.eslintrc.js
docker-compose.yml
LICENSE
*.md
Next we will update Dockerfile:
FROM node:18
WORKDIR /app
COPY package*.json ./
RUN npm install
COPY . .
RUN npm run build
EXPOSE 3000
CMD ["npm", "run", "start:prod"]
It installs the necessary dependencies, copies the application code into the container, builds and runs.
Finally, we will edit the docker-compose.yml file to run the NestJS app with PostgreSQL using the following lines of code:
version: '3.9'
services:
  nest_academy_app:
    container_name: nest-academy-app
    image: gkassym/nest-academy-app:1.0.0
    build: .
    ports:
      - '3000:3000'
    environment:
      - DB_TYPE=postgres
      - PG_USER=postgres
      - PG_PASSWORD=postgres
      - PG_DB=postgres
      - PG_PORT=5432
      - PG_HOST=database
    depends_on:
      - database
  database:
    container_name: database
    image: postgres
    environment:
      POSTGRES_USER: postgres
      POSTGRES_PASSWORD: postgres
      POSTGRES_DB: postgres
    ports:
      - '5432:5432'
    volumes:
      - pgdata:/var/lib/postgresql/data
volumes:
  pgdata: {}
Run the Project
We will use the docker compose command to build an image of the Nest app.
docker compose build
Now we can run:
docker compose up
Congratulations, everything works.
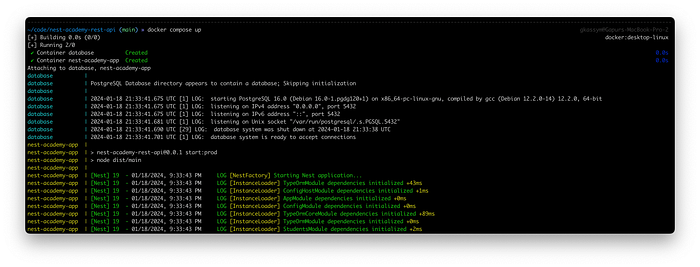
Run the app
Comments