
Lets talk about actual development of Lambda as a micro-service
We will talk about two different approached here
- Plain simple APIs REST APIs exposed through api gateway with lambda as plain function
- Building a whole apis in a node JS service and deploy that service as a single lambda
So first approach is not like building a microservice, its just building a simple API using a function first approach is an old school approach, Lets talk about these one by one
Make REST APIs Using AWS Lambda and API Gateway (Old school way)
Get your REST APIs or Web-Sockets up and running within 5 minutes in 4 Steps using AWS Lambda and API Gateway:
AWS Lambda
You can think of AWS Lambda as a service, which will execute your code for you. And you don’t have to worry about server configuration, doing a setup of required runtime to execute it and all that jazz. It support multiple languages.
Amazon API Gateway
In simple term, you can configure your REST API endpoint and it’s HTTP verbose here. There are more things which can be done here, like — setting authorization mechanism for your APIs, rate limiting, etc. In short you are defining (to be precise configuring) your routes here.
Note: Your lambda function cannot be invoked directly, we will expose a REST API resource using API Gateway and set the lambda function as a downstream system for your API.
Step 1: Create your Lambda function
- Open the AWS Lambda console.
- Choose Create a function.
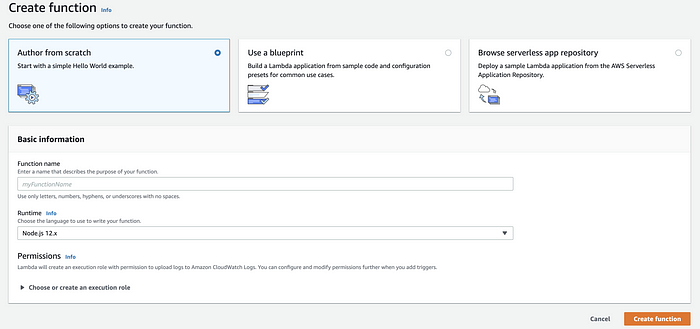
We are authoring from scratch here
- For Function name, enter
**<FUNCTION_NAME>**. - Choose a runtime — Depends on language.
- Click Create function.
- Write your code (which can do many things like, processing the request data, make call to 3P API or some storage service, and more) in the code editor on the next screen and save.
Step 2: Create Amazon API Gateway
- Open Amazon API Gateway
- Click on “Create API” → Choose API type as “REST API” → Enter the required information and click “Create API”.
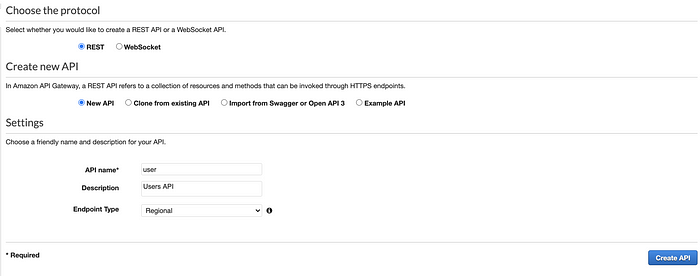
Enter the required information
- From the Actions dropdown, you can Create Method (Endpoint) and Create Resource (HTTP Verbose)
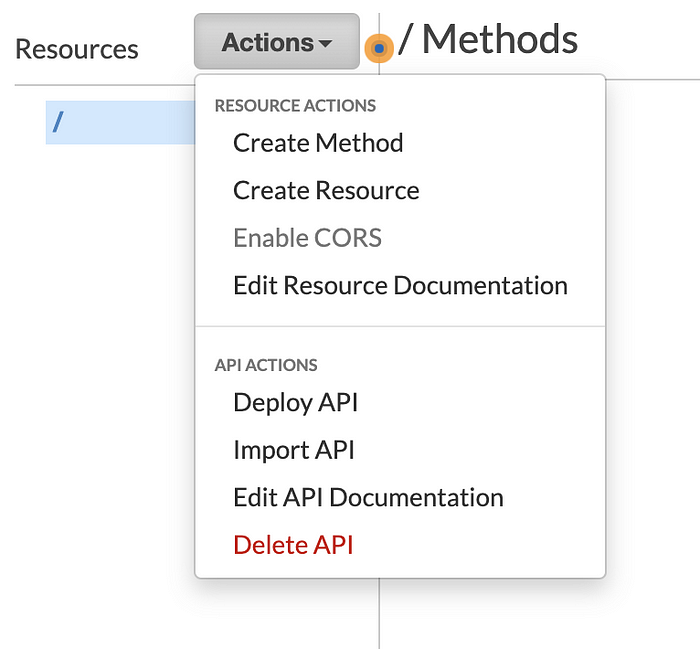
- When you create a method, you will be asked to choose an integration point from where you can select your lambda function created in step 1
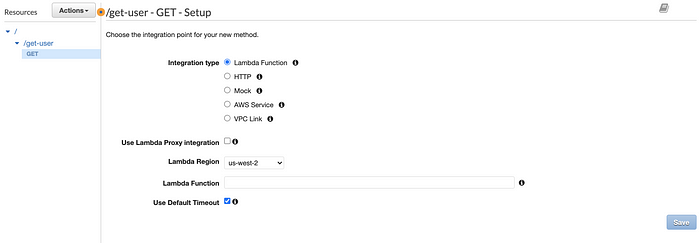
Search and select your Lambda Function
- Now this lambda function is a downstream system of your API. All the request landing on this endpoint will be fulfilled by your lambda function.
- Time to deploy your API.
- From the same Actions dropdown, from where you have created resources / methods. Click on “Deploy API” option there.
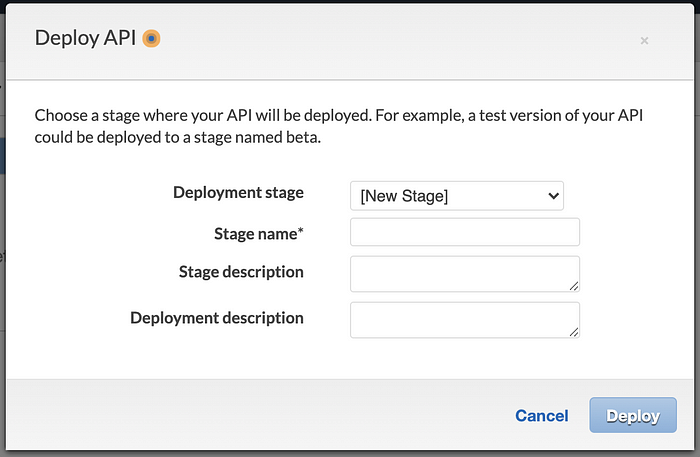
This modal will open up to capture deployment detail.
- Enter the stage name for your deployment, like — PreProd, Test, Prod, etc. Click “Deploy”.
- Note: You have to deploy again to appropriate stage if you make any changes (Like adding or removing resource / method, policy of any method) to the API.
- After this you will see base link to your API. Append your endpoint after this base url and hit it, lambda function will execute and respond you back as programmed. The URL will look like:
https://<AWS_URL>/<STAGE_NAME>/<RESOURCE_NAME>
Hurray! Your API is ready till here. Now let’s work on making it little secure.
Step 3: Setup API keys for accessing API Gateway
Let’s ensure your client (browser, mobile, etc) can only access your APIs with authentication key. We will create such key in this step.
- Go to Amazon API Gateway page, select your API.
- On the left hand side menu, click on the option called “API Keys”. Use it to create an API Key to provide it to the API Client for Authorization purpose.
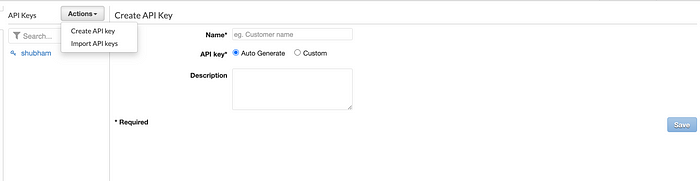
Click on Actions → Create API Key
Step 4: Create usage plan for stage and specify allowed API keys.
- On left hand side menu, Click on “Usage Plan” to create a plan.
- Enter plan name, Throttling criteria, etc and click next.
- Select the API and Stage (on which we have deployed our APIs in Step 2), click next.
- Now it will ask you to add API Key (which we created in Step 3). Request with on these API keys will be allowed to the API and the stage combination you have select with the usage policies (throttling, request per month, etc) we have defined so far.
- Now, We will go back and modify our resource created in Step 2 to enforce and restrict access with the valid API Keys only.
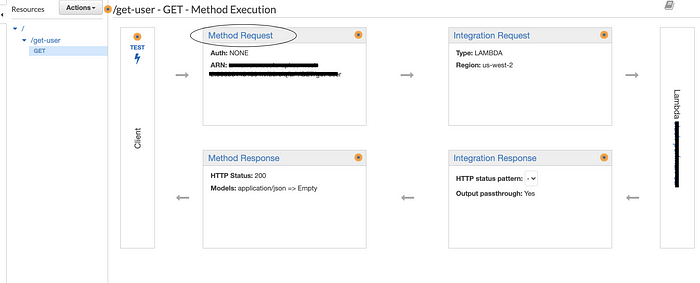
Click on “Method Request”
- Set “API Key Required” value to “true”.
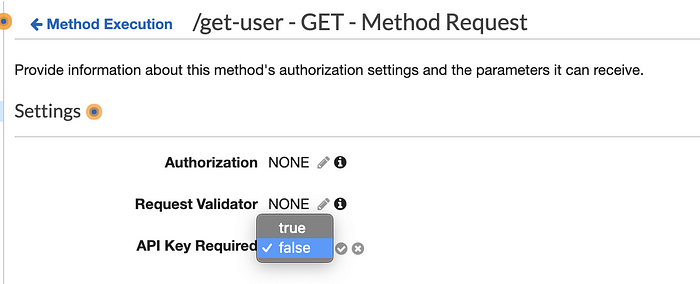
Set it to true and click on a small tick icon next to the dropdown to save it.
And we are done! 🎉
Some additional info:
- Logging: The most important part.
There is an option to configure and capture logs at both the levels— API Gateway and Lambda function. You can make a group in Amazon CloudWatch and capture them there. - You must have seen these option in between while configure this setup with me so far. I trust you! :)
so what we have done so far
- We have successfully created (1) Lambda function, (2) Defined our REST API endpoint in API Gateway, (3) Set the Lambda function as downstream system for your APIs (4) Set stages for deployment and deployed our APIs there (5) Set the Usage Plan (criteria) and Authentication of our APIs.
- In order to access the APIs, a client can only request using the allowed API keys which we have generated and provided to them, and similarly we can revoke its access anytime.
- We have ensured that we are not loading our system (and maybe on, 3P app or some storage system your lambda function is talking to) and have defined throttling as per the same, guarding us from DDoS attack as well.
Above approach is little bit old now, i am not building just a single api i need a whole service as lambda so either If i need multiple APIs then i need to do mapping on gateway and create another lambda and map it to that lambda function
There are framework like serverless designed to give you all setup with all gateway mapping mapped to lambda so our task is easier now
its like you write your yml config and functions for all different operation, this framework will take care of creating and deploying resources on AWS
Building a single lambda as a whole api service
you can choose either express or nestjs and write your whole api service which can run on some port now how can we manage this whole service as a single lambda (a single function as there is no server)
Here comes some latest tooling which makes this possible to run APIs as a function on the invocation aws-serverless-express
Nest JS with serverless Lambda deployment
Github : https://github.com/tkssharma/blogs/tree/master/nest-js-aws-cdk-lamda-deployment
Hi Guys,
In this Blog We are going to talk about serverless deployment of Nest JS APIs I remember when i first wrote my lambda in Node JS and that time i upload my code zip and executed lambda, I was never a big fan of lambda as my approach of developing lambda was not the correct one
what i was doing wrong
- building a single lambda for single REST APIs and map that lambda to api gateway
- managing a lambda which is serving simple one api for my service so if i am shaving 10 end points i was having 10 lambda mapped to api gateway
- Another issues is managing mapping at api gateway for all these REST end points and managing versions
Recently i started doing more serverless and the reason is now i don't need to struggle with all above problems
- I can build whole microservice as a single lambda
- i don't need to worry about api gateway mapping as we have single proxy to node js server
- we are using using AWS CDK so its easy to deploy on AWS (other options are also good like serverless but i like AWS CDK )
So now as my previous problem are over we can use nestjs microservice to deploy on AWS
Build a simple Nest JS service
Install the CLI globally using the npm install -g command (see the Note above for details about global installs).
$ npm install -g @nestjs/cliBasic workflow# Once installed, you can invoke CLI commands directly from your OS command line through the nest executable. See the available nest commands by entering the following:
$ nest --helpGet help on an individual command using the following construct. Substitute any command, like new, add, etc., where you see generate in the example below to get detailed help on that command:
$ nest generate --helpTo create, build and run a new basic Nest project in development mode, go to the folder that should be the parent of your new project, and run the following commands:
$ nest new my-nest-project
$ cd my-nest-project
$ npm run start:dev
In your browser, open http://localhost:3000 to see the new application running. The app will automatically recompile and reload when you change any of the source files.
Setup AWS account
If you do not have it already, signup for an AWS account.
Once an account is active, create a user with the AWS IAM service and get its access key and secret access key. When that information is available create a hidden folder called ‘.aws’ in your working directory with a file name ‘credentials’ and paste the below content. Save the file once done.
[default]
aws_access_key_id = YOUR_ACCESS_KEY
aws_secret_access_key = YOUR_SECRET_ACCESS_KEY
# In VS Code terminal of a Mac machine, the commands would be:
mkdir .aws
cd .aws
touch credentials
open .
We will use AWS CDK to deploy lambda
With this configuration, Serverless will create the Lambda function main that will serve all the routes and methods of the API. so its like one service with different apis and one single Lambda
- The next step is to install a few dependencies:
aws-serverless-express : This library enables you to utilize AWS Lambda and Amazon API Gateway to respond to web and API requests using your existing Node.js
aws-lambda: AWS Lambda lets you run code without provisioning or managing servers.
serverless-plugin-typescript: Serverless plugin for Typescript support that works out of the box without the need to install any other compiler or plugins.
serverless-plugin-optimize: Plugin to transpile and minify your code
serverless-offline plugin: Plugin to be able to test your app offline.
npm install --save aws-serverless-express
npm install --save aws-lambda
npm install --save-dev serverless-plugin-typescript
npm install --save-dev serverless-plugin-optimize
npm install --save-dev serverless-offline plugin
Nest JS application is a simple Hello world app, you can add more REST APIs and can plan to deploy this to AWS using CDK
now we need to modify nestjs service Code as we don't need http server it will be just a function
import { NestFactory } from "@nestjs/core";
import { ExpressAdapter } from "@nestjs/platform-express";
import { INestApplication } from "@nestjs/common";
import { AppModule } from "./app.module";
import { Express } from "express";

export async function createApp(
  expressApp: Express
): Promise<INestApplication> {
  const app = await NestFactory.create(
    AppModule,
    new ExpressAdapter(expressApp)
  );

  return app;
}

// async function bootstrap() {
//   const app = await NestFactory.create(AppModule);
//   await app.listen(3000);
// }
// bootstrap();
we have commented server lines here
// async function bootstrap() {
//   const app = await NestFactory.create(AppModule);
//   await app.listen(3000);
// }
// bootstrap();
We can create lambda.ts file and get app instance frok main.ts
import { Server } from "http";
import { Context } from "aws-lambda";
import { createServer, proxy, Response } from "aws-serverless-express";
import * as express from "express";
import { createApp } from "./src/main";

let cachedServer: Server;

async function bootstrap(): Promise<Server> {
  const expressApp = express();

  const app = await createApp(expressApp);
  await app.init();

  return createServer(expressApp);
}

export async function handler(event: any, context: Context): Promise<Response> {
  if (!cachedServer) {
    const server = await bootstrap();
    cachedServer = server;
  }

  return proxy(cachedServer, event, context, "PROMISE").promise;
}
Important part here is how we are adding lambda handler function and what handler function will do
export async function handler(event: any, context: Context): Promise<Response> {
  if (!cachedServer) {
    const server = await bootstrap();
    cachedServer = server;
  }

  return proxy(cachedServer, event, context, "PROMISE").promise;
}
Serverless need an entry point to compile the NestJS app to a lambda function. This entry point will be a handler object exported in the file lambda.ts. Create the lambda.ts file in the src folder of your application as shown below.
Remaining all code will be same
import { Module } from '@nestjs/common';
import { AppController } from './app.controller';
import { AppService } from './app.service';

@Module({
  imports: [],
  controllers: [AppController],
  providers: [AppService],
})
export class AppModule {}
Deploying Lambda to AWS using CDK
Now we just to deploy this lambda to AWS after setting up CDK AWS CDK code configuration can live is same code base, We have bin and lib folder

we have created lambda Stack with construct
// import { resolve } from "path";

import * as cdk from "@aws-cdk/core";
import * as lambda from "@aws-cdk/aws-lambda";
import * as gateway from "@aws-cdk/aws-apigateway";

export class CdkNestStack extends cdk.Stack {
  constructor(scope: cdk.App, id: string, props?: cdk.StackProps) {
    super(scope, id, props);

    const lambdaLayer = new lambda.LayerVersion(this, "BackendLayer", {
      code: lambda.Code.fromAsset("lambda/api/node_modules"),
      compatibleRuntimes: [
        lambda.Runtime.NODEJS_12_X,
        lambda.Runtime.NODEJS_10_X,
      ],
    });

    const backendLambda = new lambda.Function(this, "BackendHandler", {
      runtime: lambda.Runtime.NODEJS_12_X,
      code: lambda.Code.fromAsset("lambda/api/dist"),
      handler: "index.handler",
      layers: [lambdaLayer],
      environment: {
        NODE_PATH: "$NODE_PATH:/opt",
      },
    });
    new gateway.LambdaRestApi(this, "BackendEndpoint", {
      handler: backendLambda,
    });
  }
}
Lets import our stack and create a stack for lambda
#!/usr/bin/env node
import * as cdk from '@aws-cdk/core';
import { CdkNestStack } from '../lib/cdk-nest-stack';

const app = new cdk.App();
new CdkNestStack(app, 'CdkNestStack');
Now we can trigger basic CDK commands
cdk init
cdk synth
cdk bootstrap
cdk deploy
cdk destroy
cdk bootstrap : we must run this command before deploy, this is one time command to initialize platform before deployment cdk deploy with provide user friendly interface and will expose all resources its creating aws destroy - it will destroy resources created
Comments