
User Authentication and Authorization with AWS Cognito
AWS Cognito provides an authentication service for applications. It is serverless. You don’t need to manage any database or servers to handle user data and authentication flows. Cognito can be leveraged to handle those tasks.
Imagine a web application needs to access AWS resources using AWS SDK with authenticated users. This blog will provide a walkthrough on how to achieve that.
A straightforward and a simple way of doing this would be to include a secret key of a AWS user to enable access to AWS resources. But this is less secure and it’s not possible to restrict access to certain users. That’s where user authentication comes in to play either with AWS Cognito or with external authentication providers.
To allow AWS resource access to users with authentication providers in Cognito, “Identity Pools” are used. Identity pools can provide AWS Access via multiple external authentication providers such as Facebook, Amazon, Google, OpenID connect providers and SAML Identity providers. This is called federated authentication.
In order to successfully authenticate a user, AWS Cognito needs an Identity pool and a token received from an external authentication provider or from AWS Cognito authentication provider itself.
Using an external provider is less of a hassle because the provider handles the user sign up, sign in and password management for us. One of my blogs which you can find from this Link, explains how to use Google authentication provider with AWS Identity Pools.
AWS Cognito provides the ability for us to configure our own identity (Authentication) provider. Which means the control of the user sign up, sign in, password management and many more user management features are in our hands.
This post will provide a detailed walk-through on how to configure an Identity pool with an Identity provider and create a simple static html web app for user sign up and sign in process. After authentication, the app will list the objects of a specified S3 bucket to show the authorized access the logged in user has received.
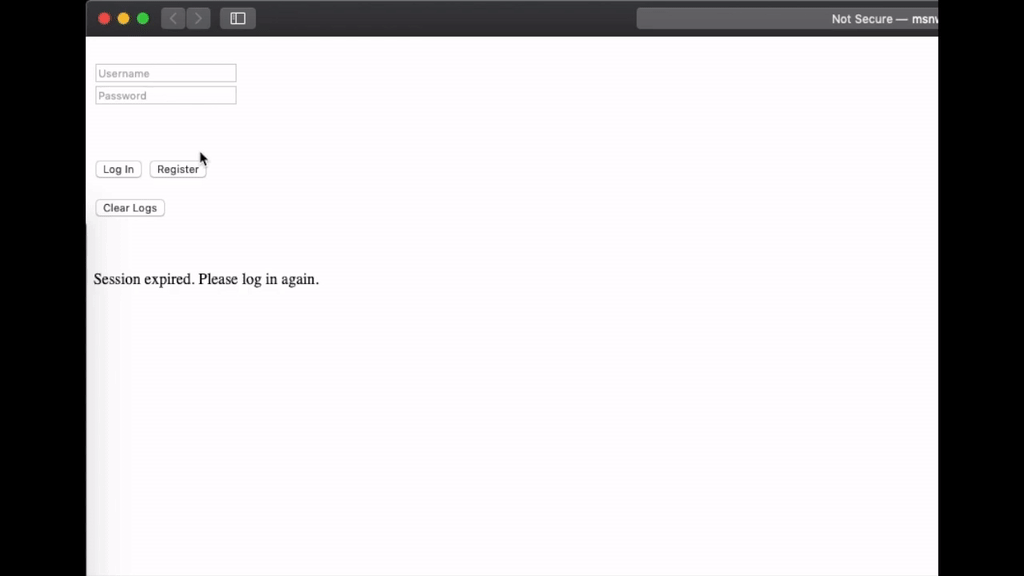
Below is a GIF demonstrating the demo web app that will be built in this blog. It consists of user registration, user verification, user login and an authenticated query request to an S3 bucket. All using our own AWS Cognito authentication provider. No 3rd party involved. Everything is in our control.
Prerequisites
You need to have an AWS account and some basic knowledge working with AWS services. Following AWS services will be utilized throughout this guide.
- AWS Cognito Service
- Simple Storage Service
- Identity Access Management Service
You will learn
- How to configure an AWS Cognito authentication provider according to your needs.
- How to host a static web app in an AWS S3 bucket.
- How to register, verify and login a user using AWS Cognito Javascript SDK.
- How to use AWS Cognito Identity JavaScript SDK to get temporary access credentials.
- How to use AWS S3 JavaScript SDK to query S3 bucket items using temporary access credentials.
Let’s get started.
High Level Architecture
Let’s have a look at the components, services involved and their job to get an idea on how this works. Below is the high level architecture.
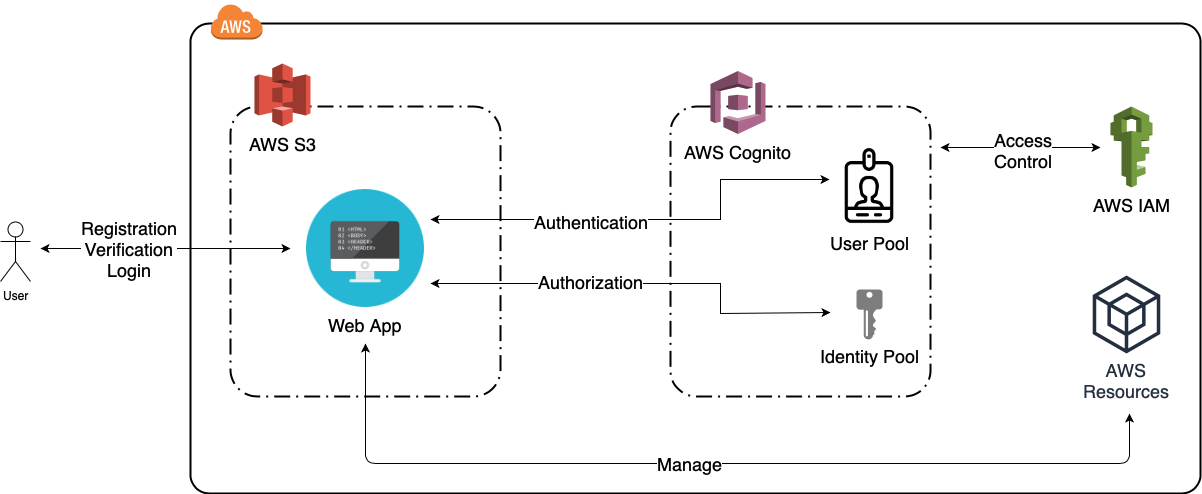
Main steps of this process are as follows in order,
- User Registration
User enters email, username and password and registers with the User Pool. - User Verification
AWS Cognito User Pool will send verification code by email or sms and the user enters the code to get verified with the User Pool. - User Login
User enters username and password and logs in with Cognito User Pool in which case a token will be provided by Cognito upon successful login. - Get Temporary Credentials
Cognito Identity Pool will provide temporary credentials to AWS resources using the token that was recieved on successful login. - User Authorization
Cognito will authorize the user with necessary permissions with IAM role. - AWS Resource Management
Authorized user will now have the ability to manage AWS resources according to the permissions given by AWS IAM.
1. Configuring a User Pool
User pool provides features to control user sign up, sign in and user management with more advanced features. Follow the steps below to create a user pool.
1. Go to AWS Cognito service and click “Manage User Pools”.
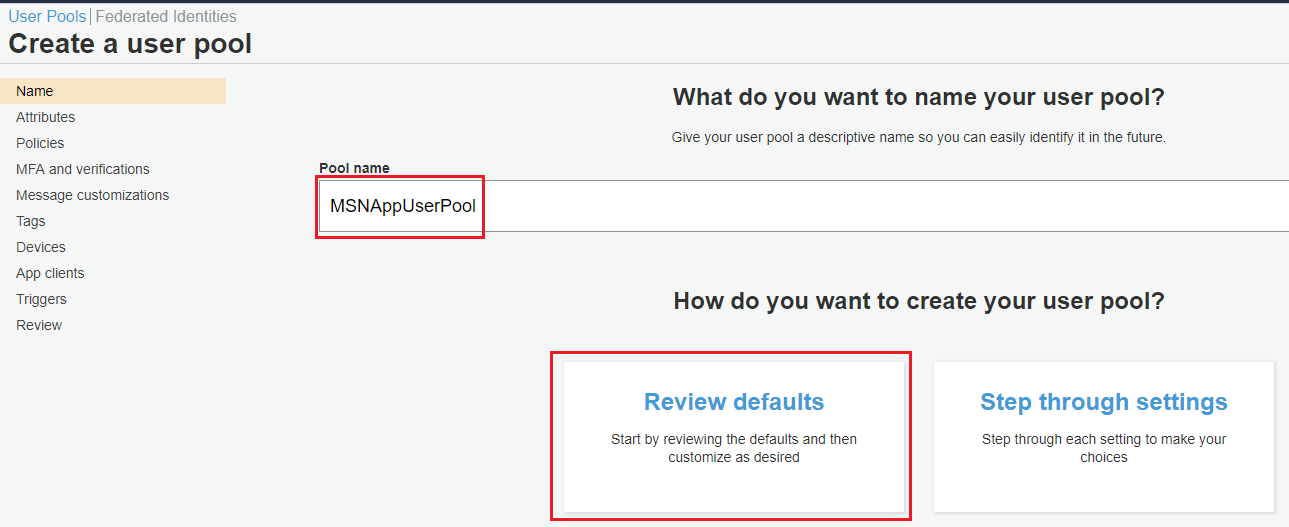
2. Click “Create a user pool” and give a “Pool name” and click “Review defaults” as below.
3. The next page will display the default settings. It is possible to customize features such as user attributes, password policies, verification by email or phone and Multi-factor authentication settings. To keep things simple, this guide will keep the default settings. Click “Create pool”.
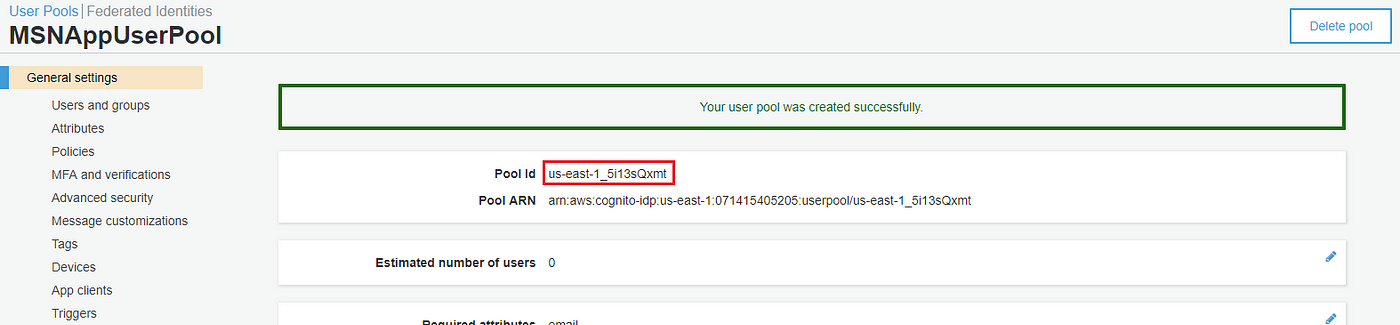
4. Copy the generated “Pool Id” from “General settings” section as below.
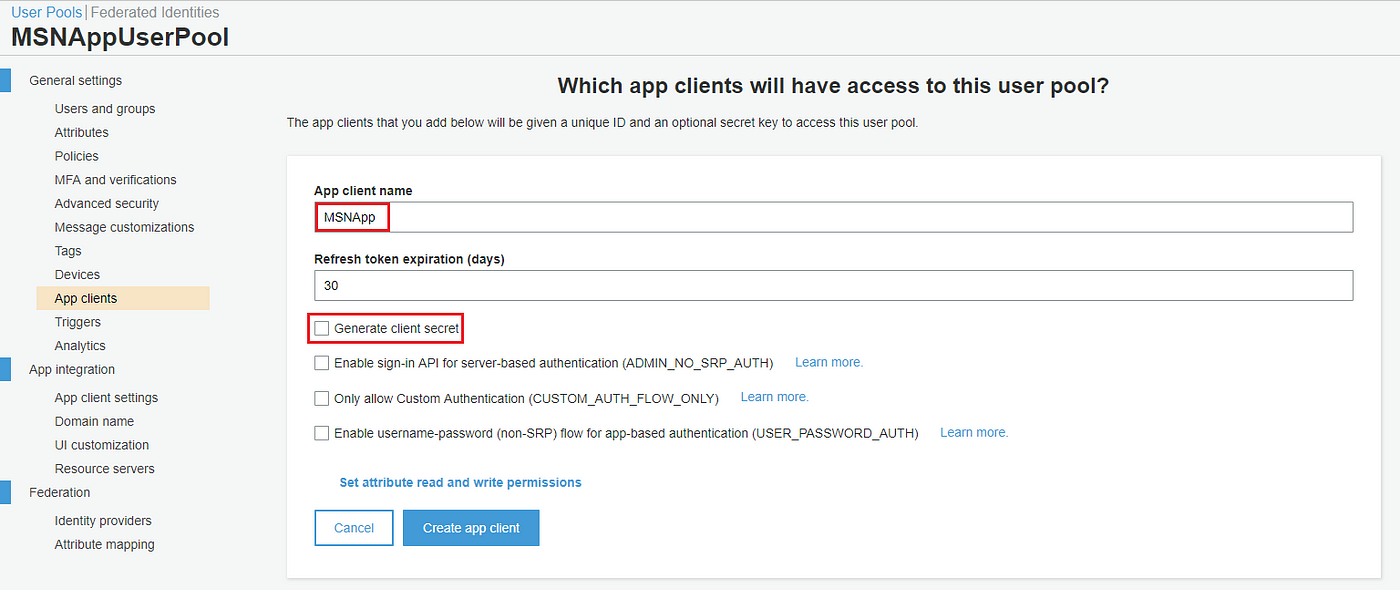
5. Go to “App Clients” section and click “Add an app client”.
6. Give an “App client name” and uncheck “Generate client secret” as below. The reason for this is because, to quote from AWS document “When creating the App, the generate client secret box must be unchecked because the JavaScript SDK doesn’t support apps that have a client secret.” — AWS Document. Probably for security reasons. We don’t want to keep app secrets on the client side do we.
Click “Create app client”.
7. Copy the generated “App client id” from “App clients” section as below.

2. Configure an Identity Pool.
Identity pool gives AWS resource access after it verifies the token provided to it, is a valid token generated by a registered authentication provider. In this case the authentication provider that will be registered with the Identity pool will be the AWS Cognito authentication provider that was created in step “1”.
2.1. Create an Identity Pool
1. Go to AWS Cognito service and click “Manage Identity Pools”.
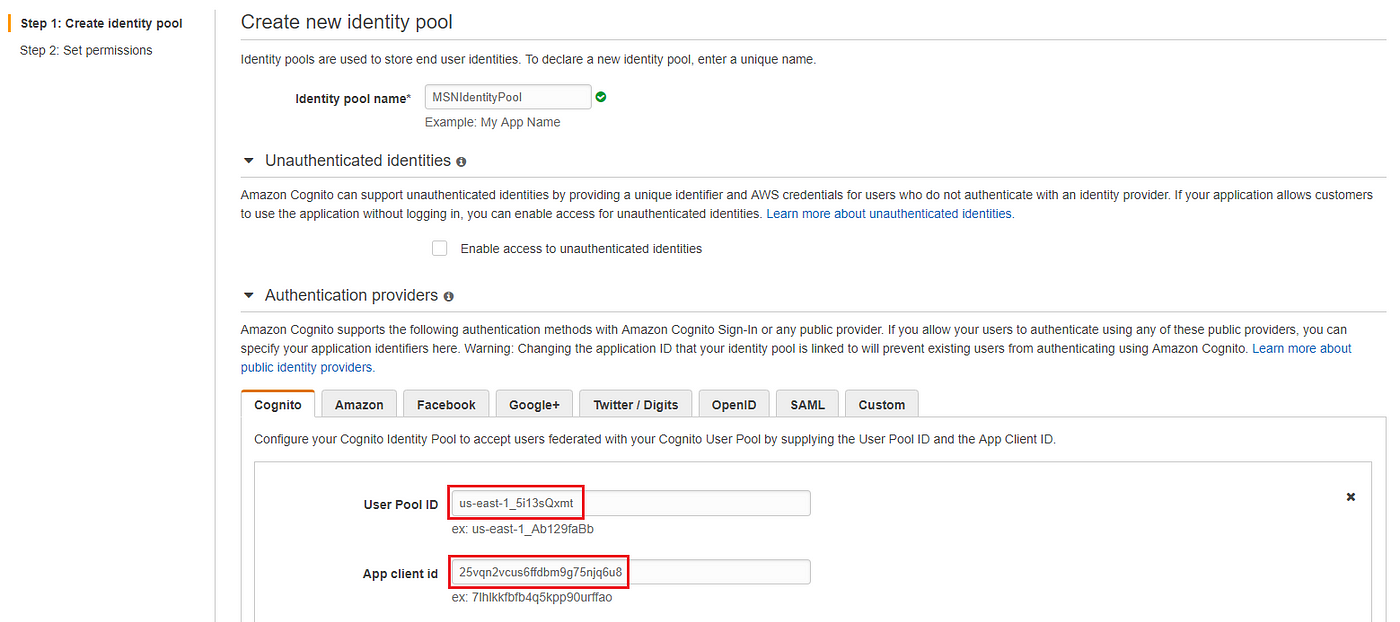
2. Enter “Identity pool name”, expand the “Authentication providers” section and select “Cognito” tab. This is where the Cognito authentication provider will be registered with the Identity pool.
3. For the field “User Pool ID” paste the “Pool id” copied from step “1.4” and for the field “App client id” paste the “App client id” copied from step “1.7” as below and click “Create Pool”.
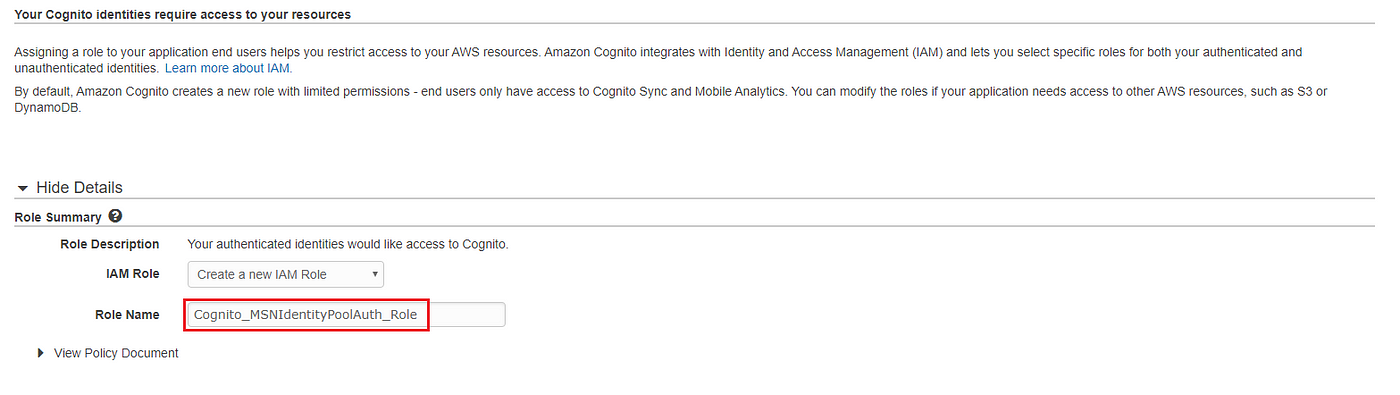
4. In the next “Your Cognito identities require access to your resources” page, take note of the IAM Roles that will be created for authenticated and unauthenticated users as displayed below.
Necessary IAM Role Policy will need to be given to these roles. In this example, the authenticated user role which is “Cognito_MSNIdentityPoolAuth_Role” will be given full AWS S3 access. This will be done in the next step. Click “Allow” to finish creating Identity Pool.
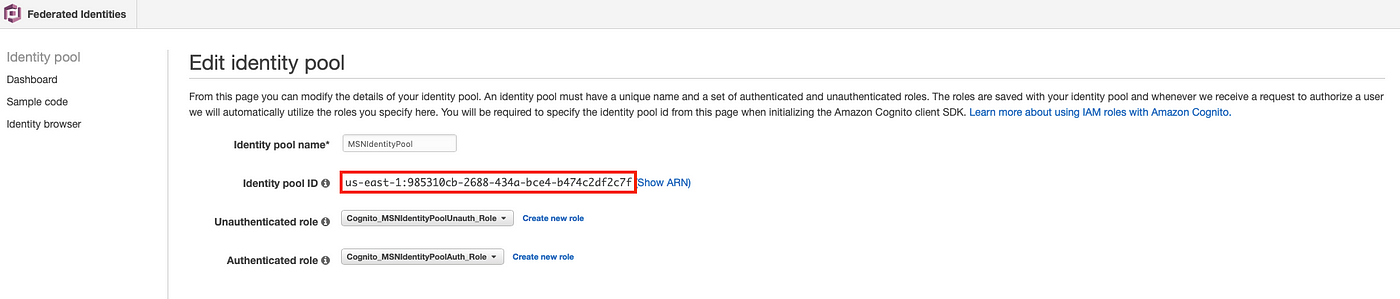
5. After creation go to the created Identity pool dashboard and click “Edit Identity Pool” and copy the “Identity pool ID” as displayed below.
2.2. Allow AWS Resource Access to Identity Pool Role
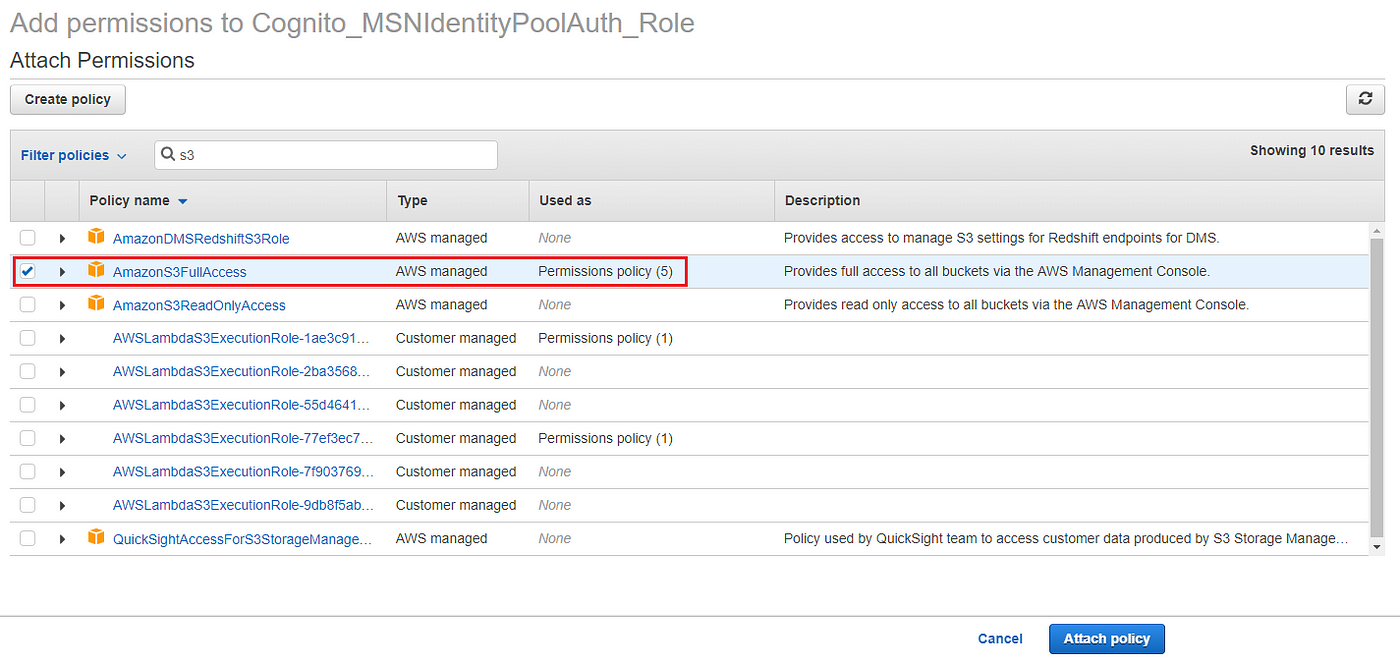
1. Go to AWS IAM Service -> Roles and find the role that was noted in step “2.1.4” and click “Attach policies”.
2. Search and add “AmazonS3FullAccess” as below and click “Attach policy”. Now any authenticated user that will assume this role will have access to work with AWS S3.
3. Creating an S3 Bucket for Web Hosting
<!DOCTYPE html>
<html lang="en">
<head>
    <title>MSN AWS App</title>
</head>
<body>
    <script src="./script/jquery.min.js"></script>
    <script src="./script/aws-sdk-2.487.0.min.js"></script>
    <script src="./script/aws-cognito-sdk.min.js"></script>
    <script src="./script/amazon-cognito-identity.min.js"></script>

    <style>
    .loader {
        border: 16px solid #f3f3f3; /* Light grey */
        border-top: 16px solid #3498db; /* Blue */
        border-radius: 50%;
        width: 20px;
        height: 20px;
        animation: spin 2s linear infinite;
    }

    @keyframes spin {
        0% { transform: rotate(0deg); }
        100% { transform: rotate(360deg); }
    }
    </style>

    <input id="emailInput" type="text" placeholder="Email" style="display:none"/></br>
    <input id="userNameInput" type="text" placeholder="Username"/></br>
    <input id="passwordInput" type="password" placeholder="Password"/></br>
    <input id="confirmPasswordInput" type="password" placeholder="Confirm Password" style="display:none"/></br>
    <input id="verificationCodeInput" type="text" placeholder="Verification Code" style="display:none"/></br>
    <input id="bucketNameInput" type="text" placeholder="S3 Bucket Name" style="display:none"/></br>
    <input id="logInButton" type="Button" value="Log In" onclick="logIn()">
    <input id="registerButton" type="button" value="Register" onclick="register()">
    <input id="logOutButton" type="Button" value="Log Out" onclick="logOut()" style="display:none">
    <input id="verifyCodeButton" type="button" value="Verify" onclick="verifyCode()" style="display:none">
    <input id="listS3ObjectsButton" type="button" value="List S3 Objects" onclick="listS3Objects()" style="display:none"></br></br>
    <input id="clearLogsButton" type="button" value="Clear Logs" onclick="clearLogs()">
    </br></br>
    <div id="loader" class="loader" style="display:none"></div>
    </br></br>
    <div id="log" style="width: 500px; height: 300px; overflow-y: scroll;"></div>


    <script>

        //=============== AWS IDs ===============
        var userPoolId = '<User Pool ID>';
        var clientId = '<App Client ID>';
        var region = '<Region>';
        var identityPoolId = '<Identity Pool ID>';
        //=============== AWS IDs ===============

        var cognitoUser;
        var idToken;
        var userPool;

        var poolData = {
            UserPoolId : userPoolId,
            ClientId : clientId
        };

        getCurrentLoggedInSession();

        function switchToVerificationCodeView(){
            $("#emailInput").hide();
            $("#userNameInput").hide();
            $("#passwordInput").hide();
            $("#confirmPasswordInput").hide();
            $("#logInButton").hide();
            $("#registerButton").hide();
            $("#bucketNameInput").hide();
            $("#verificationCodeInput").show();
            $("#verifyCodeButton").show();
            $("#listS3ObjectsButton").hide();
            $("#logOutButton").hide();
        }

        function switchToRegisterView(){
            $("#emailInput").show();
            $("#userNameInput").show();
            $("#passwordInput").show();
            $("#confirmPasswordInput").show();
            $("#logInButton").hide();
            $("#registerButton").show();
            $("#verificationCodeInput").hide();
            $("#verifyCodeButton").hide();
            $("#listS3ObjectsButton").hide();
            $("#bucketNameInput").hide();
            $("#logOutButton").hide();
        }

        function switchToLogInView(){
            $("#userNameInput").val('');
            $("#passwordInput").val('');
            $("#emailInput").hide();
            $("#userNameInput").show();
            $("#passwordInput").show();
            $("#confirmPasswordInput").hide();
            $("#logInButton").show();
            $("#registerButton").show();
            $("#verificationCodeInput").hide();
            $("#verifyCodeButton").hide();
            $("#listS3ObjectsButton").hide();
            $("#bucketNameInput").hide();
            $("#logOutButton").hide();
        }

        function switchToLoggedInView(){
            $("#emailInput").hide();
            $("#userNameInput").hide();
            $("#passwordInput").hide();
            $("#confirmPasswordInput").hide();
            $("#logInButton").hide();
            $("#registerButton").hide();
            $("#verificationCodeInput").hide();
            $("#verifyCodeButton").hide();
            $("#listS3ObjectsButton").show();
            $("#bucketNameInput").show();
            $("#logOutButton").show();
        }

        function clearLogs(){
            $('#log').empty();
        }

        /*
        Starting point for user logout flow
        */
        function logOut(){
            if (cognitoUser != null) {

                $("#loader").show();
                cognitoUser.signOut();
                switchToLogInView();
                logMessage('Logged out!');
                $("#loader").hide();
            }
        }

        /*
        Starting point for user login flow with input validation
        */
        function logIn(){

            if(!$('#userNameInput').val() || !$('#passwordInput').val()){
                logMessage('Please enter Username and Password!');
            }else{
                var authenticationData = {
                    Username : $('#userNameInput').val(),
                    Password : $("#passwordInput").val(),
                };
                var authenticationDetails = new AmazonCognitoIdentity.AuthenticationDetails(authenticationData);

                var userData = {
                    Username : $('#userNameInput').val(),
                    Pool : userPool
                };
                cognitoUser = new AmazonCognitoIdentity.CognitoUser(userData);

                $("#loader").show();
                cognitoUser.authenticateUser(authenticationDetails, {
                    onSuccess: function (result) {
                        logMessage('Logged in!');
                        switchToLoggedInView();

                        idToken = result.getIdToken().getJwtToken();
                        getCognitoIdentityCredentials();
                    },

                    onFailure: function(err) {
                        logMessage(err.message);
                        $("#loader").hide();
                    },

                });
            }
        }

        /*
        Starting point for user registration flow with input validation
        */
        function register(){
            switchToRegisterView();

            if( !$('#emailInput').val() || !$('#userNameInput').val()  || !$('#passwordInput').val() || !$('#confirmPasswordInput').val() ) {
                    logMessage('Please fill all the fields!');
            }else{
                if($('#passwordInput').val() == $('#confirmPasswordInput').val()){
                    registerUser($('#emailInput').val(), $('#userNameInput').val(), $('#passwordInput').val());
                }else{
                    logMessage('Confirm password failed!');
                }

            }
        }

        /*
        Starting point for user verification using AWS Cognito with input validation
        */
        function verifyCode(){
            if( !$('#verificationCodeInput').val() ) {
                logMessage('Please enter verification field!');
            }else{
                $("#loader").show();
                cognitoUser.confirmRegistration($('#verificationCodeInput').val(), true, function(err, result) {
                    if (err) {
                        logMessage(err.message);
                    }else{
                        logMessage('Successfully verified code!');
                        switchToLogInView();
                    }

                    $("#loader").hide();
                });
            }
        }

        /*
        User registration using AWS Cognito
        */
        function registerUser(email, username, password){
            var attributeList = [];

            var dataEmail = {
                Name : 'email',
                Value : email
            };

            var attributeEmail = new AmazonCognitoIdentity.CognitoUserAttribute(dataEmail);

            attributeList.push(attributeEmail);

            $("#loader").show();
            userPool.signUp(username, password, attributeList, null, function(err, result){
                if (err) {
                    logMessage(err.message);
                }else{
                    cognitoUser = result.user;
                    logMessage('Registration Successful!');
                    logMessage('Username is: ' + cognitoUser.getUsername());
                    logMessage('Please enter the verification code sent to your Email.');
                    switchToVerificationCodeView();
                }
                $("#loader").hide();
            });
        }

        /*
        Starting point for AWS List S3 Objects flow with input validation
        */
        function listS3Objects(){
            if(!$('#bucketNameInput').val()){
                logMessage('Please enter the name of the S3 Bucket!');
            }else{
                $("#loader").show();
                getAWSS3BucketObjects();
            }

        }

        /*
        This method will get temporary credentials for AWS using the IdentityPoolId and the Id Token recieved from AWS Cognito authentication provider.
        */
        function getCognitoIdentityCredentials(){
            AWS.config.region = region;

            var loginMap = {};
            loginMap['cognito-idp.' + region + '.amazonaws.com/' + userPoolId] = idToken;

            AWS.config.credentials = new AWS.CognitoIdentityCredentials({
                IdentityPoolId: identityPoolId,
                Logins: loginMap
            });

            AWS.config.credentials.clearCachedId();

            AWS.config.credentials.get(function(err) {
                if (err){
                    logMessage(err.message);
                }
                else {
                    logMessage('AWS Access Key: '+ AWS.config.credentials.accessKeyId);
                    logMessage('AWS Secret Key: '+ AWS.config.credentials.secretAccessKey);
                    logMessage('AWS Session Token: '+ AWS.config.credentials.sessionToken);
                }

                $("#loader").hide();
            });
        }

        /*
        This method will use AWS S3 SDK to get a list of S3 bucket object.
        Before using this method, AWS Credentials must be set in AWS config.
        */
        function getAWSS3BucketObjects(){
            var s3 = new AWS.S3();

            var params = {
                Bucket: $("#bucketNameInput").val()
            };

            s3.listObjects(params, function(err, data) {
                if (err) logMessage(err.message);
                else{
                    logMessage('');
                    logMessage('====== S3 Bucket Objects ======');
                    data.Contents.forEach(element => {
                        logMessage(element.Key);
                    });
                    logMessage('');
                }

                $("#loader").hide();
            });
        }

        /*
        If user has logged in before, get the previous session so user doesn't need to log in again.
        */
        function getCurrentLoggedInSession(){

            $("#loader").show();
            userPool = new AmazonCognitoIdentity.CognitoUserPool(poolData);
            cognitoUser = userPool.getCurrentUser();

            if(cognitoUser != null){
                cognitoUser.getSession(function(err, session) {
                    if (err) {
                        logMessage(err.message);
                    }else{
                        logMessage('Session found! Logged in.');
                        switchToLoggedInView();
                        idToken = session.getIdToken().getJwtToken();
                        getCognitoIdentityCredentials();
                    }
                    $("#loader").hide();
                });
            }else{
                logMessage('Session expired. Please log in again.');
                $("#loader").hide();
            }

        }

        /*
        This is a logging method that will be used throught the application
        */
        function logMessage(message){
            $('#log').append(message + '</br>');
        }
    </script>

</body>
</html>- Go to AWS S3 page and click “Create bucket”.
- Enter a “Bucket name” and click “Next”.
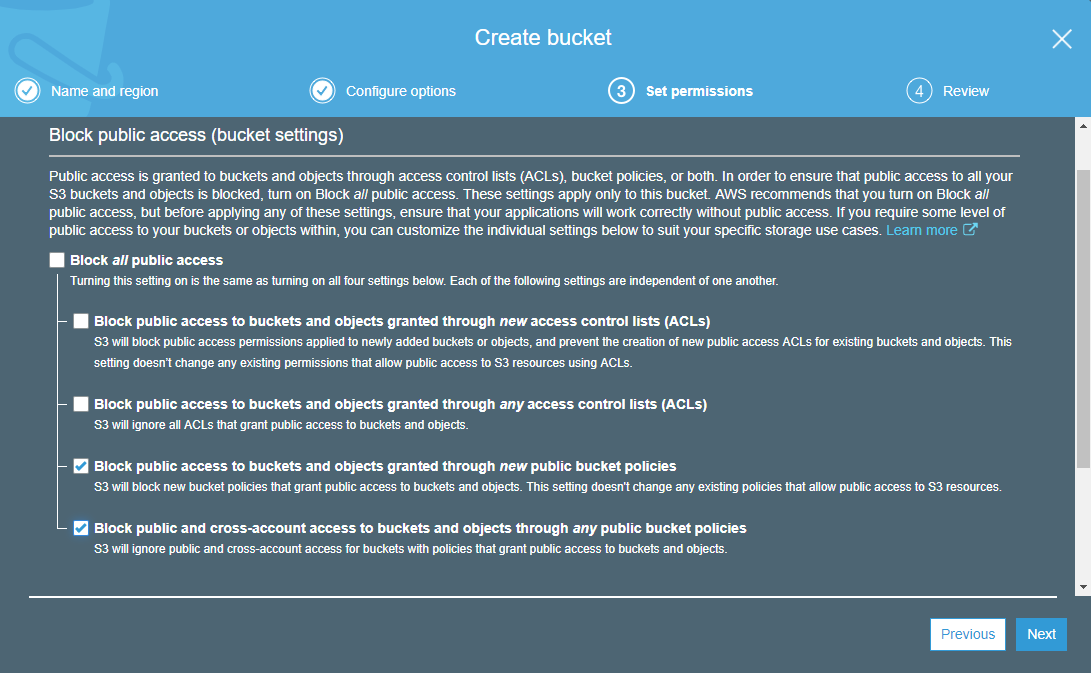
- In “Set permissions” section, set the permissions as below.
4. Click on the created bucket and go to bucket properties.
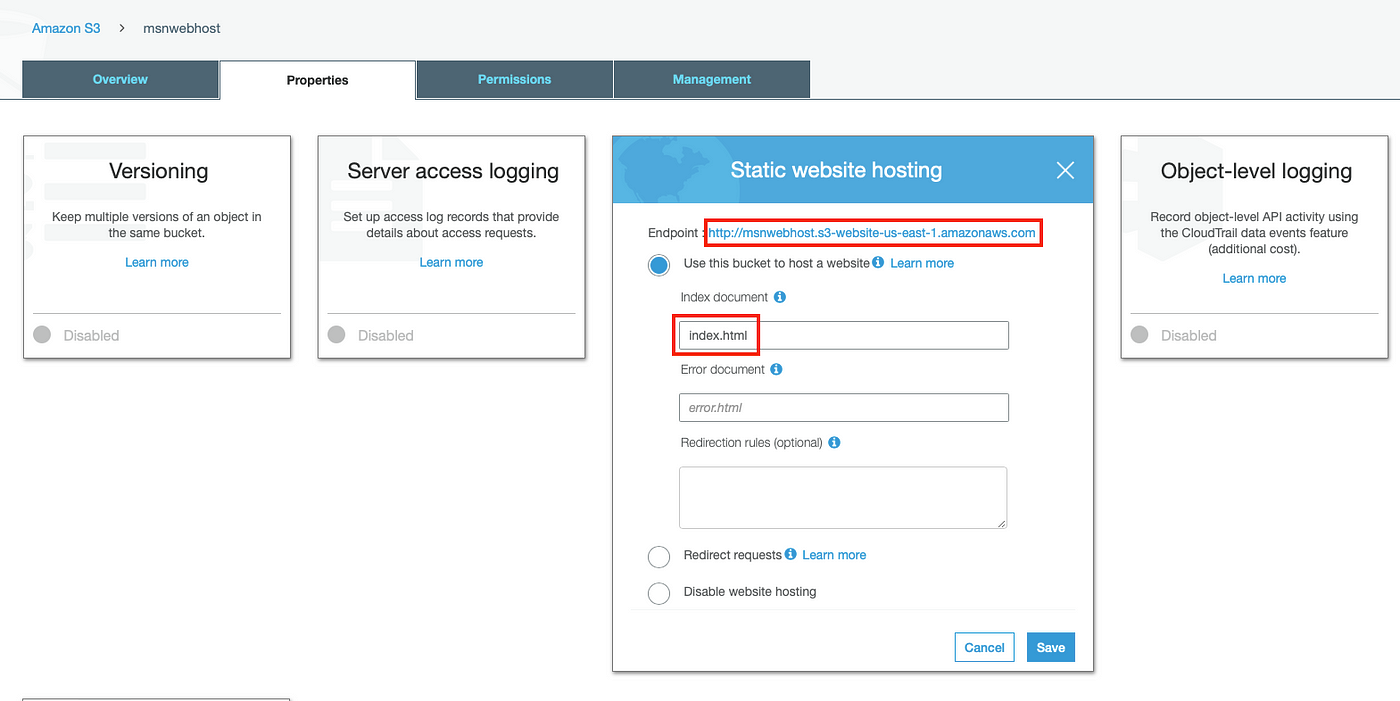
5. Enable the “Static website hosting” and configure as below. Enter “Index document” as “index.html”. Copy the “Endpoint” URL as the web app that will be hosted is accessed using this endpoint later.
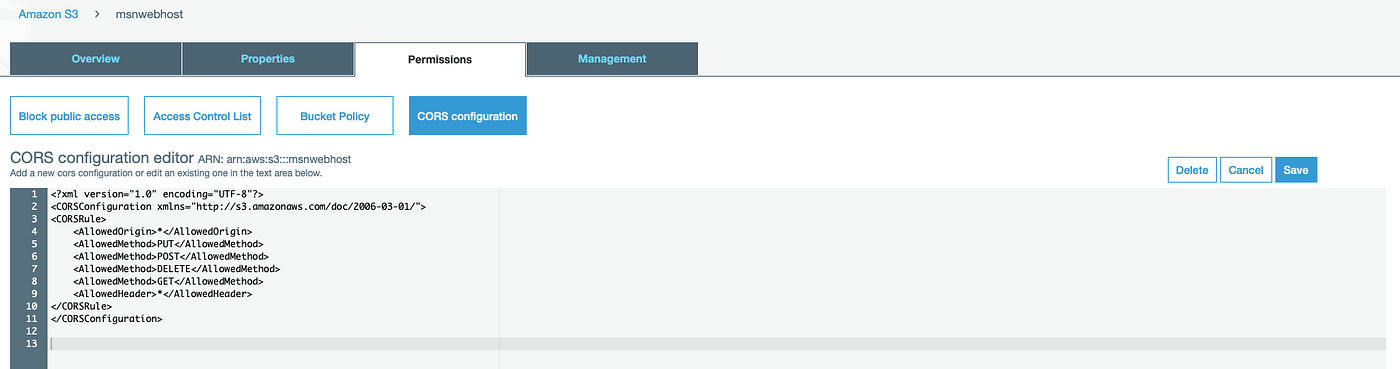
6. Click on “Permissions” tab and go to “CORS configuration” and paste the below JSON and click “Save”. This will allow cross origin access.
Edited: Previously the CORS configuration was XML. Now it’s JSON.
4. Creating and Hosting The Web App
1. Go to this Github Repo and get the code for the sample web app. This is a very simple static html page with AWS Javascript SDK included in “script” folder. Which is displayed below.
Key points in the code are,
Line 168
Gets the ID token after a user is successfully logged in with AWS Cognito authentication provider.
Line 335
Gets the ID token from an already logged in user session. This method is called on the page load.
Line 272
Gets the temporary credentials for AWS services using ID token, Identity Pool ID and User Pool ID and updates the AWS credentials.
2. Open “index.html” and replace following place holder values and save.
<User Pool ID> with the value copied in step “1.4”.
<App Client ID> with the value copied in step “1.7”.
<Region> with the region code of the region that you have created your services. You can get region codes from here.
<Identity Pool ID> with the value copied in step “2.1.5”.
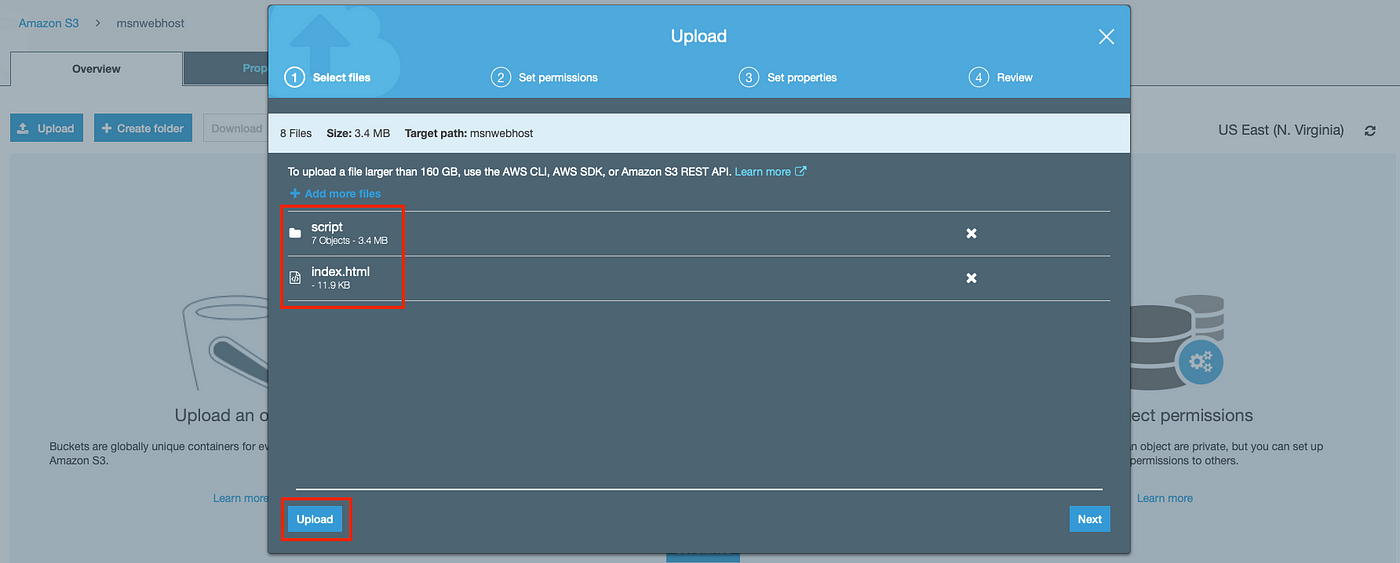
3. Go the S3 bucket that was created in step “3” and drag the “index.html” as well as “script” directory as below and click “Upload”.
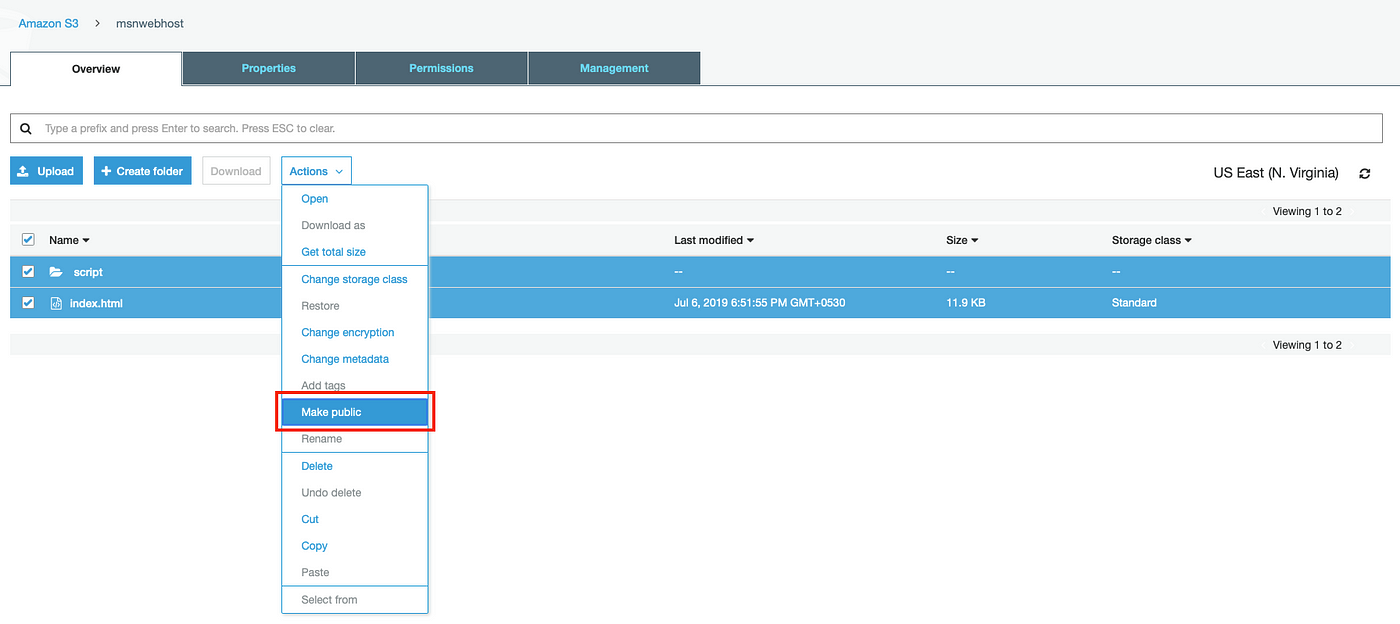
4. In order to allow public access, Select all the files, click on “Actions” and select “Make public” as below.
5. Go to the endpoint that was copied in step “3.5” and you will be presented with the login page. Go ahead and try out create, verify and login of a user and as for the S3 bucket name give the bucket name that was created in step “3” and it will successfully display the files that was uploaded. By default verification code will be sent to your email.
Please refer to the demo GIF below.
Congrats! Now you now how to utilize AWS Cognito into your app and unleash the full power of it!
Reference
Amazon Cognito identity pools provide temporary AWS credentials for users who are guests
Comments