
NestJS, TypeORM and PostgreSQL — full example development and project setup working with database…
Working with stateful data and databases is hard, especially when your project grows overtime. To have a good development and project setup right from the beginning is essential for the success of your development project. In this Post I want to show you how I have set up most of the projects and try to highlight some thoughts behind the setup.
In this example we’ll work on a simple NodeJS API that is powered by a PostgreSQL database for data storage and setup some tooling around it to make dev’s life easier.
This is the setup:
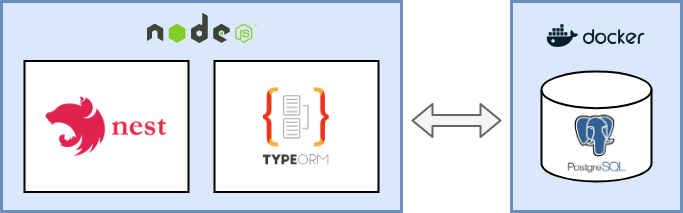 the setup - NestJS & typeORM connected to a PostgreSQL DB in a docker container
To build the API in NodeJS we will use NestJS. It’s a pretty flexible framework and is built on ExpressJS principals and lets you craft out NodeJS services in no time as it comes with a lot of goodies (like full typescript support, dependency injection, module management and a lot more) backed in.
Checkout there website for more info: http://nestjs.com
Project and tooling
To kick off things even faster NestJS comes with a nice CLI tool that handles the boilerplate for us. For me the generated NestJS project from the CLI is a perfect starter.
I have used the NestJS CLI a couple of times now and I know and understand all the code it generates. It does not generate stuff I don’t need or understand. Why is this fact important? Because on the long run you will have to support and maintain all the things in the project.
Generated black *magic code will *give us a hard time building on top when we try to adjust or extend it without knowing what it actually does. That’s why I always prefer starting super small and then adding the things I need over time and learning instead of using an overblown starter project that has a lot of stuff I don’t need, or I don’t understand.
Getting the project ready — the boilerplate
Okay cool, Let’s get started by generating our project with these few lines:
npm i -g @nestjs/cli
nest new project-name
more on the NestJS and it’s CLI here
Your project will look something like this:
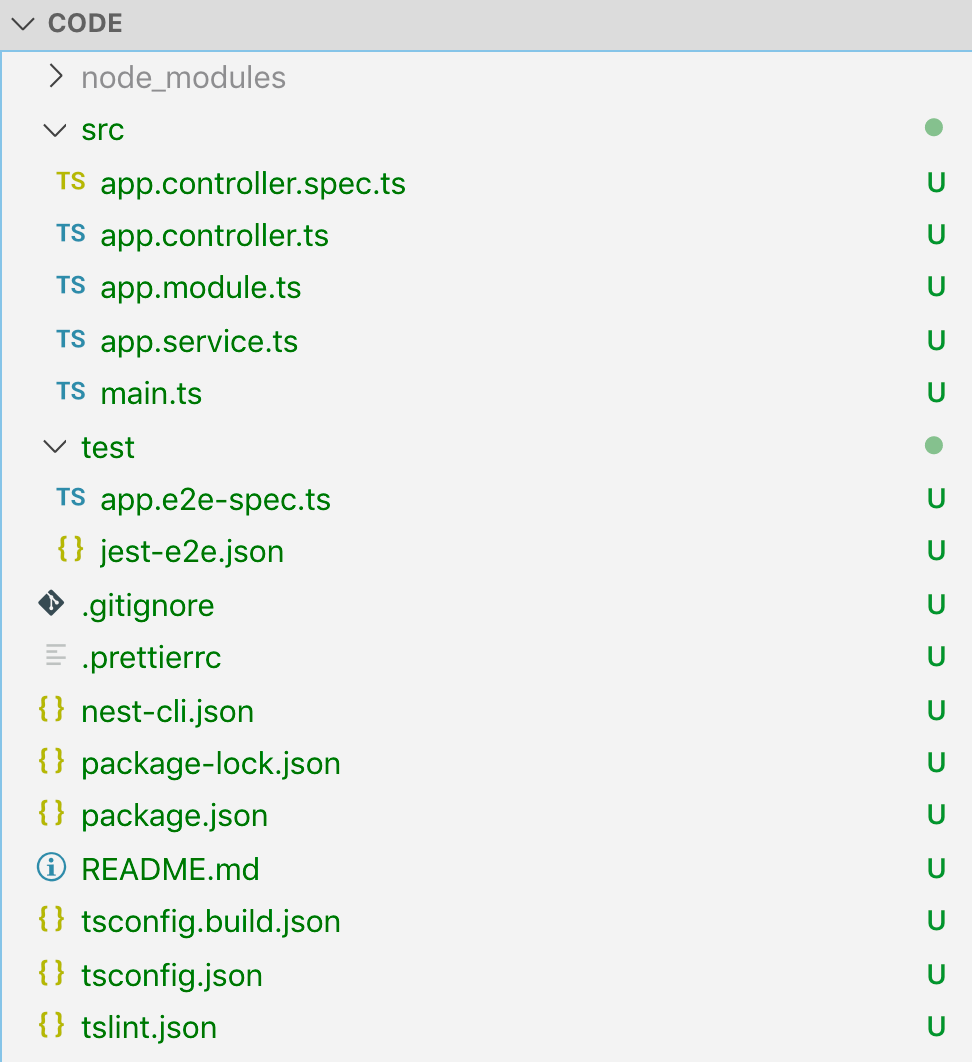 project files
Lets give it a test run to see if all works so far with:
npm run start:devSo now we have our project baselines setup, let’s add some data persistence layer.
We’ll use *TypeORM* to manage our database schema. What is nice about TypeORM is, that it allows you to model your data entities in type save code (Typescript) and then is able to apply / sync these models into the table structure in your database. (By the way, this not only works with PostgreSQL databases, but also other databases, find more info on which databases are supported in the TypeORM docs)
Setting up a local PostgreSQL database instance — with docker automation!
To work locally with data persistence, we now would need a database server and a database to connect to. One way would be to set up a PostgreSQL database server on your local machine, what I’m not a big fan of. Why? This would tie the project to my machine a lot. Meaning if you work on a project with a team or you simply switch machines you would have to do this on every machine again or writing somehow a setup guide etc. (when you have different operating systems — on these machines, things get even more icky).
So how do we overcome this? We automate!
We use pre-build PostgreSQL docker image and run the database sever as a docker process. Like this we can script a whole setup with a couple lines of shell code to get our server instance running and prepare an empty database ready to connect to. This is great because it’s reproducible and the setup code can be managed in source control together with the rest of the project code, what makes the “getting started” for other dev’s in your team super straightforward.
Here is how this script would look like:
#!/bin/bash
set -e

SERVER="my_database_server";
PW="mysecretpassword";
DB="my_database";

echo "echo stop & remove old docker [$SERVER] and starting new fresh instance of [$SERVER]"
(docker kill $SERVER || :) && \
  (docker rm $SERVER || :) && \
  docker run --name $SERVER -e POSTGRES_PASSWORD=$PW \
  -e PGPASSWORD=$PW \
  -p 5432:5432 \
  -d postgres

# wait for pg to start
echo "sleep wait for pg-server [$SERVER] to start";
SLEEP 3;

# create the db
echo "CREATE DATABASE $DB ENCODING 'UTF-8';" | docker exec -i $SERVER psql -U postgres
echo "\l" | docker exec -i $SERVER psql -U postgres
Lets add that command to our package.json run-scripts so we can easy execute it.
"start:dev:db": "./src/scripts/start-db.sh"Sweet, now we have a command we can run and it would setup the database server and a plain database to start with.
To make the process more robust, we will always use the same name for the docker container ($SERVER var in the script) — like this we can add an additional check — if the container is running already kill and remove it to ensure a clean state.
Connecting NestJS to your database
Like for everything, there is already an NPM module that helps you to hook the NestJS project to your database. Let’s add TypeORM support to our project by using the pre-build NestJS-to-TypeORM module.
You can add the needed modules like this:
npm install --save @nestjs/typeorm typeorm pgMore info can be found in the NestJS docs.
Configuration management
Now it’s time to glue things together.
The way we can tell TypeORM in NestJS to which database server to connect to, is by using the TypeOrmModule. It has a forRoot method we can pass the config in.
But here is the challenge. We know that the config will be different on local development and on the production environment. So, this process somehow has to be generic so it can provide different configs for these cases.
To make this work nicely we can write the following config service.
The idea of this config class is to run before our API Server main.ts starts. It can read the configuration from environment variables being able to provide the values then at runtime in a read only manner.
To make this flexible for dev and prod we will use the dotenv module.
npm install --save dotenvWith this module we can have a “.env” file in our project root on local development to prepare the config values and on production we can just read the values from the environment variables on our production server. This is a pretty flexible approach and also allows you to share the config with other dev’s in your team easily with one file.
Note: I would highly recommend to git ignore this file though, as you might end up putting actual secrets in this file and you for sure don’t want to leak these out of your project or commit them by accident.
This is how your .env file could look like:
POSTGRES_HOST=127.0.0.1
POSTGRES_PORT=5432
POSTGRES_USER=postgres
POSTGRES_PASSWORD=mysecretpassword
POSTGRES_DATABASE=my_database
PORT=3000
MODE=DEV
RUN_MIGRATIONS=true
So, our ConfigService would run as a singleton service, loading the config values on start and providing them to other modules. We will include an error-early pattern in the service. Meaning it will throw meaning full errors if it is asked for values it is not able to provide. This makes your setup more robust as you will detect configuration errors at build/boot time, not at runtime lifecycle. Like this you will be able to detect this early when you deploy / start your server, not when a consumer uses your api.
This is how your ConfigService could look like and how we add it to the NestJS app module:
// app.module.ts

import { Module } from '@nestjs/common';
import { TypeOrmModule } from '@nestjs/typeorm';
import { AppController } from './app.controller';
import { AppService } from './app.service';
import { configService } from './config/config.service';

@Module({
  imports: [
    TypeOrmModule.forRoot(configService.getTypeOrmConfig())
  ],
  controllers: [AppController],
  providers: [AppService],
})
export class AppModule { }
config service
// src/config/config.service.ts
import { TypeOrmModuleOptions } from '@nestjs/typeorm';

require('dotenv').config();

class ConfigService {

  constructor(private env: { [k: string]: string | undefined }) { }

  private getValue(key: string, throwOnMissing = true): string {
    const value = this.env[key];
    if (!value && throwOnMissing) {
      throw new Error(`config error - missing env.${key}`);
    }

    return value;
  }

  public ensureValues(keys: string[]) {
    keys.forEach(k => this.getValue(k, true));
    return this;
  }

  public getPort() {
    return this.getValue('PORT', true);
  }

  public isProduction() {
    const mode = this.getValue('MODE', false);
    return mode != 'DEV';
  }

  public getTypeOrmConfig(): TypeOrmModuleOptions {
    return {
      type: 'postgres',

      host: this.getValue('POSTGRES_HOST'),
      port: parseInt(this.getValue('POSTGRES_PORT')),
      username: this.getValue('POSTGRES_USER'),
      password: this.getValue('POSTGRES_PASSWORD'),
      database: this.getValue('POSTGRES_DATABASE'),

      entities: ['**/*.entity{.ts,.js}'],

      migrationsTableName: 'migration',

      migrations: ['src/migration/*.ts'],

      cli: {
        migrationsDir: 'src/migration',
      },

      ssl: this.isProduction(),
    };
  }

}

const configService = new ConfigService(process.env)
  .ensureValues([
    'POSTGRES_HOST',
    'POSTGRES_PORT',
    'POSTGRES_USER',
    'POSTGRES_PASSWORD',
    'POSTGRES_DATABASE'
  ]);

export { configService };
Note: This singleton pattern for the configService does not make it easy testable. In the official NestJS docs (here) you can find a way how to make this configService better testable with NestJS. However, the approach there heavily relies on the dependency injection strategy NestJS is build on, what ties it strongly to the framework lifecycle— meaning running it without NestJS from CLI is kinda icky, but this for me is essential to reuse it outside the NestJS app lifecycle you — will see later why - that’s why I choose this approach. I’m sure you will be also able to mix both in a nice way with some extra code.
So, we are nearly ready to give it a first spinn, but because we actually want to work in typescript in development, we will use nodemon with dedicated a* nodemon.json *to run our development server with the ts-node module hooking up the typescript compiler — so let’s install nodemon and ts-node
npm i --save-dev nodemon ts-nodethen add a nodemon.json file with debug and ts-node support in root
{
 "watch": ["src"],
 "ext": "ts",
 "ignore": ["src/**/*.spec.ts"],
 "exec": "node --inspect=127.0.0.1:9223 -r ts-node/register -- src/main.ts",
 "env": {}
}
finally we change the start:dev script in the package.json to:
"start:dev": "nodemon --config nodemon.json",Like this we can do *npm run start:dev *to start our API-server, that on start it should pick up the .env-values from the ConfigService what then will connect typeORM to our database and it’s not bound to my machine — sweet!
Define and load data model entities.
TypeORM supports auto loading of data model entities. You can simply place all of them in one folder and load them with a pattern in your configuration — we put ours in model/

Another nice feature from TypeORM is that these entity models support inheritance.
What is awesome if you for example have certain data fields you want every of your entities to have.
For example: an auto generated uuid id-field and/or a createDateTime-, lastChangedDateTime-fields. Note: that these base classes should be abstract.
So, defining your data model entities in TypeORM would look something like this:
// base.entity.ts
import { PrimaryGeneratedColumn, Column, UpdateDateColumn, CreateDateColumn } from 'typeorm';

export abstract class BaseEntity {
    @PrimaryGeneratedColumn('uuid')
    id: string;

    @Column({ type: 'boolean', default: true })
    isActive: boolean;

    @Column({ type: 'boolean', default: false })
    isArchived: boolean;

    @CreateDateColumn({ type: 'timestamptz', default: () => 'CURRENT_TIMESTAMP' })
    createDateTime: Date;

    @Column({ type: 'varchar', length: 300 })
    createdBy: string;

    @UpdateDateColumn({ type: 'timestamptz', default: () => 'CURRENT_TIMESTAMP' })
    lastChangedDateTime: Date;

    @Column({ type: 'varchar', length: 300 })
    lastChangedBy: string;

    @Column({ type: 'varchar', length: 300, nullable: true })
    internalComment: string | null;
}
import { Entity, Column } from 'typeorm';
import { BaseEntity } from './base.entity';
@Entity({ name: 'item' })
export class Item extends BaseEntity {
@Column({ type: 'varchar', length: 300 })
name: string;
@Column({ type: 'varchar', length: 300 })
description: string;
}Find more supported data annotations in the typeORM docs.
Party time — Let’s start our API and see if it works.
npm run start:dev:db
npm run start:dev
… cool — that seems to work, but actually our database does not reflect our data model jet.
Apply the database-schema, generate and run database-migrations
As mentioned earlier, TypeORM is able to synchronize your data model into tables in your database.
This synchronisation of the model is nice, but also dangerous.
Why? In early development it’s great — you don’t have all your data entities figured out jet. So, you change the class in code, and all just works out nicely on the database. Basically, you don’t have to think about the state your database is in that much — typeORM just does the magic for you.
But here comes the tricky part. Once you have actual data in your database you do not want to lose on every entity change — it gets a bit more complicated. This sync magic works in a way, that it would to apply the necessary changes to your database tables by drop and recreating them. Meaning you lose the data inside the table. What of course in production you should avoid but also in development can lead to unexpected side effects.
That’s why I prefer to work with database migrations in code straight from the beginning.
This will also help you and your team to trace and understand changes to the data set better and forces you to think about this more actively. What helps you to avoid breaking changes and data loss in production szenarios.
So let’s handle this — lucky TypeORM comes with a solution and CLI commands for this, which handle the task of generating the SQL commands for you. You can then easy validate and test these, without any black magic in the background.
Here is how to set that typeORM CLI up nicely.
1. setup for the typeORM CLI
we have already added all necessary config with our ConfigService,
but the typeORM CLI works with an ormconfig.json where it expects the correct config to be in. Also, we would like to run the CLI separately from the actual API server. Let’s add a quick helper script to write the config json file and add it to our .gitignore-list, as we will generate it before using the CLI.
import { configService } from '../config/config.service';
import fs = require('fs');

fs.writeFileSync('ormconfig.json',
 JSON.stringify(configService.getTypeOrmConfig(), null, 2)
);
and let’s add a npm script task to run it as well as commands for typeorm:migration:generate and typeorm:migration:run.
like this the ormconfig will be generated before running the typeORM CLI commands.
"pretypeorm": "(rm ormconfig.json || :) && ts-node -r tsconfig-paths/register src/scripts/write-type-orm-config.ts",

"typeorm": "ts-node -r tsconfig-paths/register ./node_modules/typeorm/cli.js",

"typeorm:migration:generate": "npm run typeorm -- migration:generate -n",

"typeorm:migration:run": "npm run typeorm -- migration:run"
2. Creating a migration
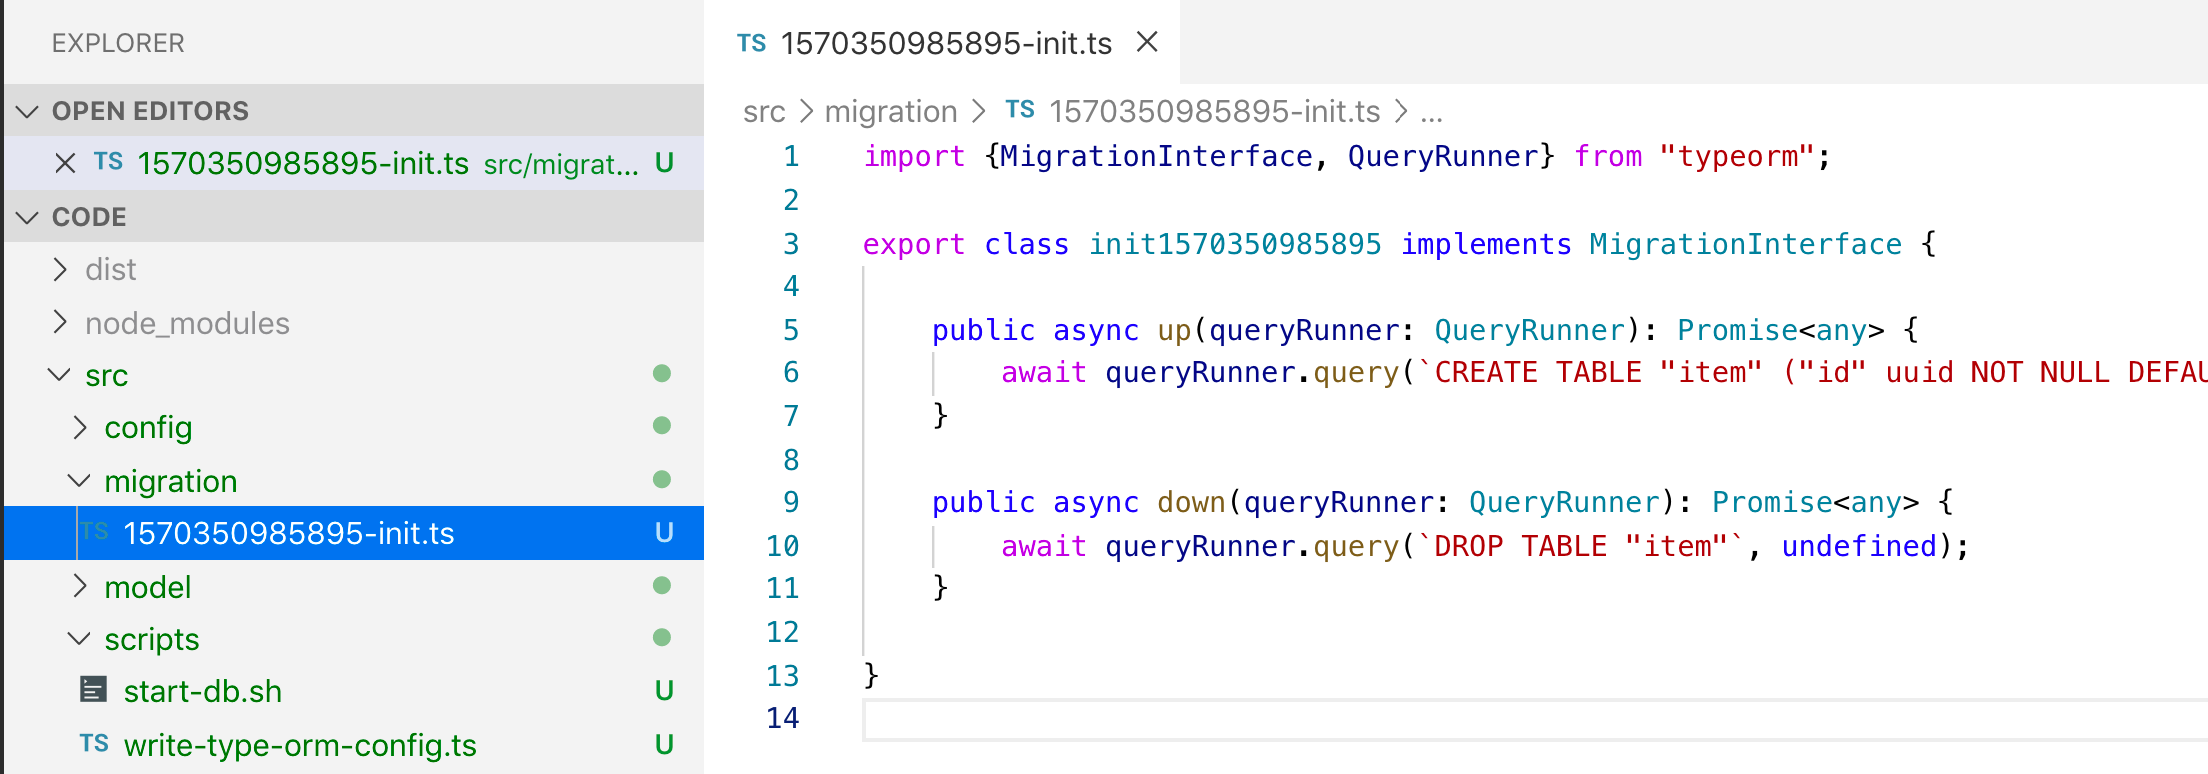
now we can run this command to create a init migration:
npm run typeorm:migration:generate -- my_initthis will connect the typeORM to your database and generate a database migration script my_init
Note: You should commit these migration scripts to your source control and treat these files read only — they work in order on top of each other.
If you want to change something the idea is to add another migration on top using the cli command.
3. Run a migration
npm run typeorm:migration:runapplies then all migrations to your database that have not been applied jet. (or does nothing if all is up to date already)
So now we have all the tooling we need to create and run migrations without running the API server project, what is nice because it gives us a lot of flexibility when developing because we can re-run, re-create & add them whenever we like.
On production or stage environments however you actually often want to auto run your migration scrips before starting your API server after/on deploy.
To do so, you can simply add a start.sh script.
Where you can also add an env-variable RUN_MIGRATIONS=<0|1>to control if the migration should be auto run or not.
#!/bin/bash

set -e
set -x

if [ "$RUN_MIGRATIONS" ]; then
  echo "RUNNING MIGRATIONS";
  npm run typeorm:migration:run
fi

echo "START SERVER";
npm run start:prod
Debugging and database tooling
Cool our API and setup to the DB works — but does our database actually reflect our data model?
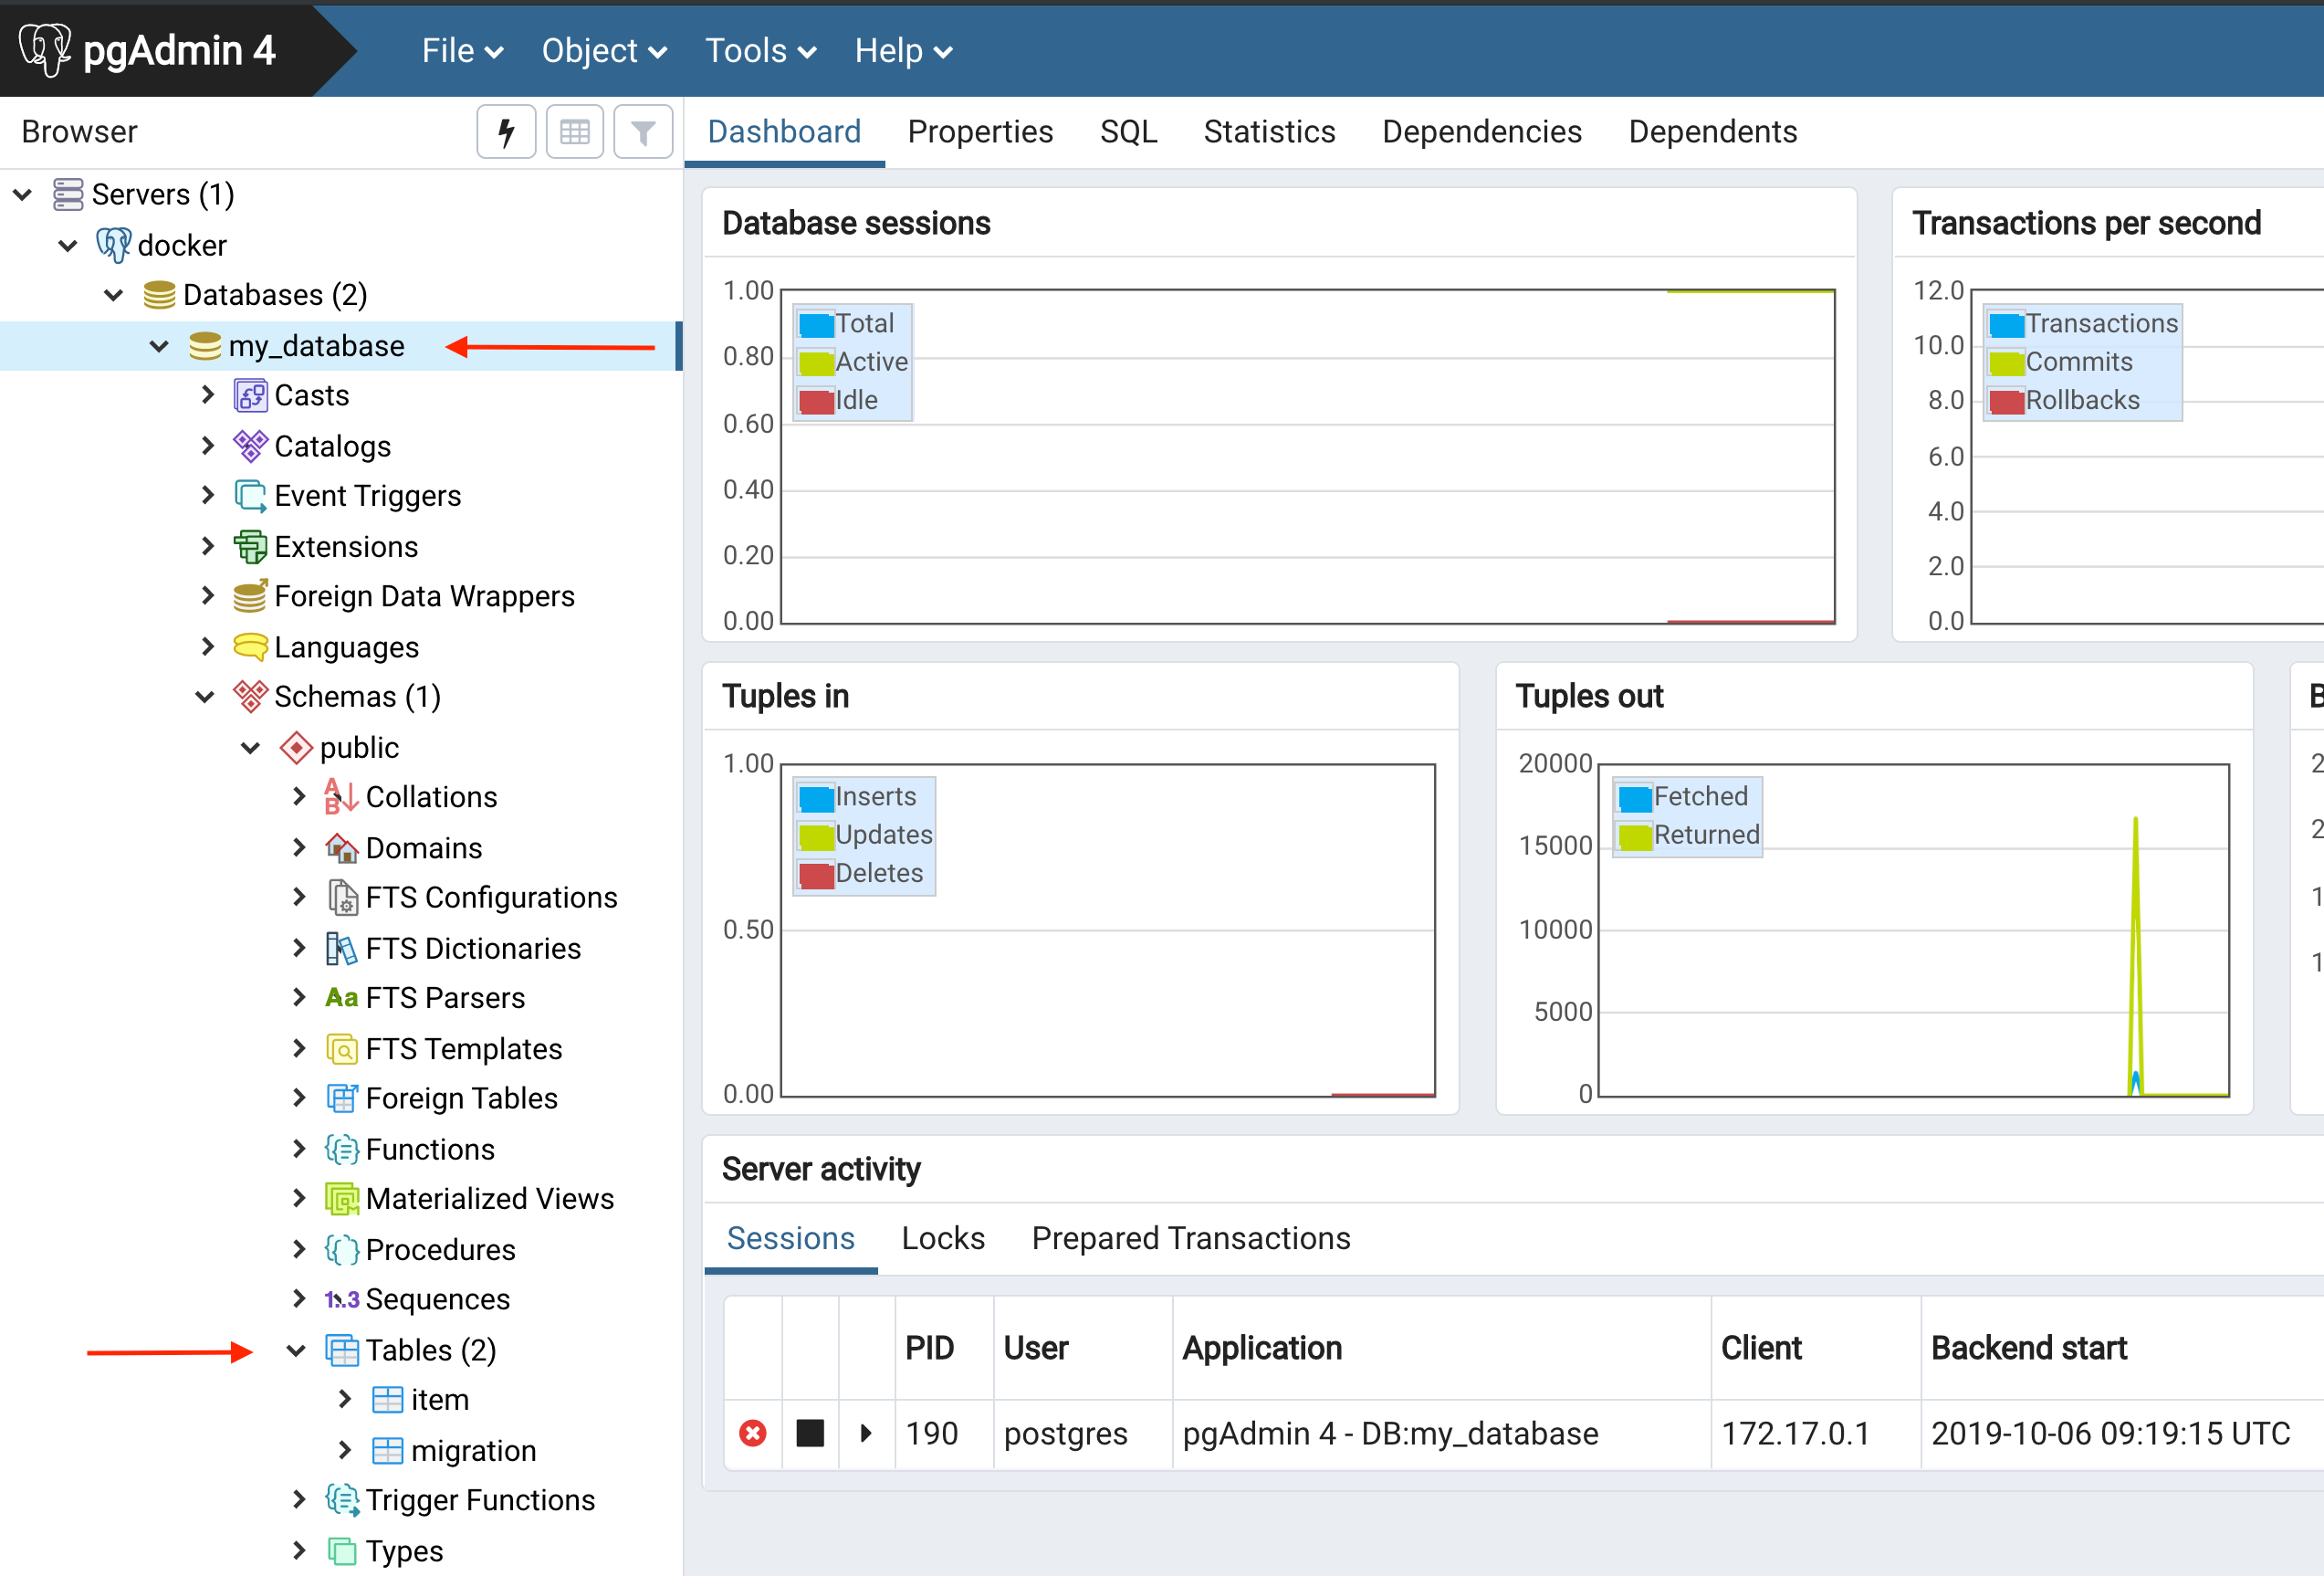
We can check this by running some cli script queries against the DB or using a UI database management tool for quick debugging.
When working with PostgreSQL database, I use pgAdmin.
It’s a pretty powerful tool with a nice UI to see what’s going on. However, I would recommend you the following workflow:
Avoid „manual changes” on your database using tools, rather apply code changes in your project (model, migrations & scripting) to reflect this in the database. Why? Because this is reproducible, and you have fewer chances running into „well it works on my machine but does not on another one“ (or production).
Go for database state as code.
 pgAdmin
We can now see that our tables got created in the database.
- our item table we defined in our project
- a migration table, in this table typeORM keeps track which migration was executed on this database already. (Note: you should treat this table read only also otherwise the typeORM CLI gets confused)
Adding some business logic
Let’s add some business logic now. Just for demo I’ll add a simple endpoint that will return the data in the table.
For this we will add an item controller and an item service we will use the NestJS CLI for this.
nest -- generate controller item
nest -- generate service item
this will generate some boilerplate for us, and then we add:
import { Injectable } from '@nestjs/common';
import { InjectRepository } from '@nestjs/typeorm';
import { Item } from '../model/item.entity';
import { Repository } from 'typeorm';

@Injectable()
export class ItemService {
  constructor(@InjectRepository(Item) private readonly repo: Repository<Item>) { }

  public async getAll() {
    return await this.repo.find();
  }
}
and
// item.controller.ts

import { Controller, Get } from '@nestjs/common';
import { ItemService } from './item.service';

@Controller('item')
export class ItemController {
  constructor(private serv: ItemService) { }

  @Get()
  public async getAll() {
    return await this.serv.getAll();
  }
}
and we hook things together in a ItemModulethat then is imported in the AppModule.
// item.module.ts

import { Module } from '@nestjs/common';
import { TypeOrmModule } from '@nestjs/typeorm';
import { ItemService } from './item.service';
import { ItemController } from './item.controller';
import { Item } from '../model/item.entity';

@Module({
  imports: [TypeOrmModule.forFeature([Item])],
  providers: [ItemService],
  controllers: [ItemController],
  exports: []
})
export class ItemModule { }
after starting the API a curl should give us:
curl localhost:3000/item | jq

[] # << indicating no items in the DB - cool :)
Don’t expose your entities — adding DTO’s and responses
The idea is to not expose one 2 one your actual data model on persistence though your API to your consumers.
It’s tempting to shortcut this in your initial project setup as the benefit of doing this is not directly visible straight from the beginning. Sure — I must agree that this sometimes feels like boilerplate when you wrap each data entity with a data transfer object where you have to serialise and deserialise.
But somehow in every project I have worked on introducing this approach from the beginning has paid off. Regardless if I have build a REST, view-model resource, OData or graphQL driven APIs — Separation is always a good thing.
I would always recommend this setup. So, you have a clear distinction between your internal data model (API to Database) and your **external model **(API-consumer to API). This will help you decouple things and make maintenance easier in the long run.
Some more wins:
- separation to apply domain driven design principles
- performance, optimise queries much easier
- evolution, versioning — different responses with the same persistence
- testability — mocking things
… and a lot more
So for this we will add a ItemDTO response class that will be filled by the item entity from the database. This is how a simple service and response DTO could look like.
Note: you will have to install the @nestjs/swagger, class-validator and class-transformer for this.
// item.dto.ts
import { ApiModelProperty } from '@nestjs/swagger';
import { IsString, IsUUID, } from 'class-validator';
import { Item } from '../model/item.entity';
import { User } from '../user.decorator';

export class ItemDTO implements Readonly<ItemDTO> {
  @ApiModelProperty({ required: true })
  @IsUUID()
  id: string;


  @ApiModelProperty({ required: true })
  @IsString()
  name: string;

  @ApiModelProperty({ required: true })
  @IsString()
  description: string;

  public static from(dto: Partial<ItemDTO>) {
    const it = new ItemDTO();
    it.id = dto.id;
    it.name = dto.name;
    it.description = dto.description;
    return it;
  }

  public static fromEntity(entity: Item) {
    return this.from({
      id: entity.id,
      name: entity.name,
      description: entity.description
    });
  }

  public toEntity(user: User = null) {
    const it = new Item();
    it.id = this.id;
    it.name = this.name;
    it.description = this.description;
    it.createDateTime = new Date();
    it.createdBy = user ? user.id : null;
    it.lastChangedBy = user ? user.id : null;
    return it;
  }
}
now we can simply use the DTO like this:
  // item.controller.ts
  @Get()
  public async getAll(): Promise<ItemDTO[]> {
    return await this.serv.getAll()
  }

  @Post()
  public async post(@User() user: User, @Body() dto: ItemDTO): Promise<ItemDTO> {
    return this.serv.create(dto, user);
  }

  // item.service.ts
  public async getAll(): Promise<ItemDTO[]> {
    return await this.repo.find()
      .then(items => items.map(e => ItemDTO.fromEntity(e)));
  }

  public async create(dto: ItemDTO, user: User): Promise<ItemDTO> {
    return this.repo.save(dto.toEntity(user))
      .then(e => ItemDTO.fromEntity(e));
  }
Setting up OpenAPI (Swagger)
The DTO approach also enable you to generate an API documentation (openAPI aka swagger docs) from them. For this simply install:
npm install --save @nestjs/swagger swagger-ui-expressand add these few lines in the main.ts
// main.ts
async function bootstrap() {
  const app = await NestFactory.create(AppModule);

  if (!configService.isProduction()) {

    const document = SwaggerModule.createDocument(app, new DocumentBuilder()
      .setTitle('Item API')
      .setDescription('My Item API')
      .build());

    SwaggerModule.setup('docs', app, document);

  }
  await app.listen(3000);
}
and tada:
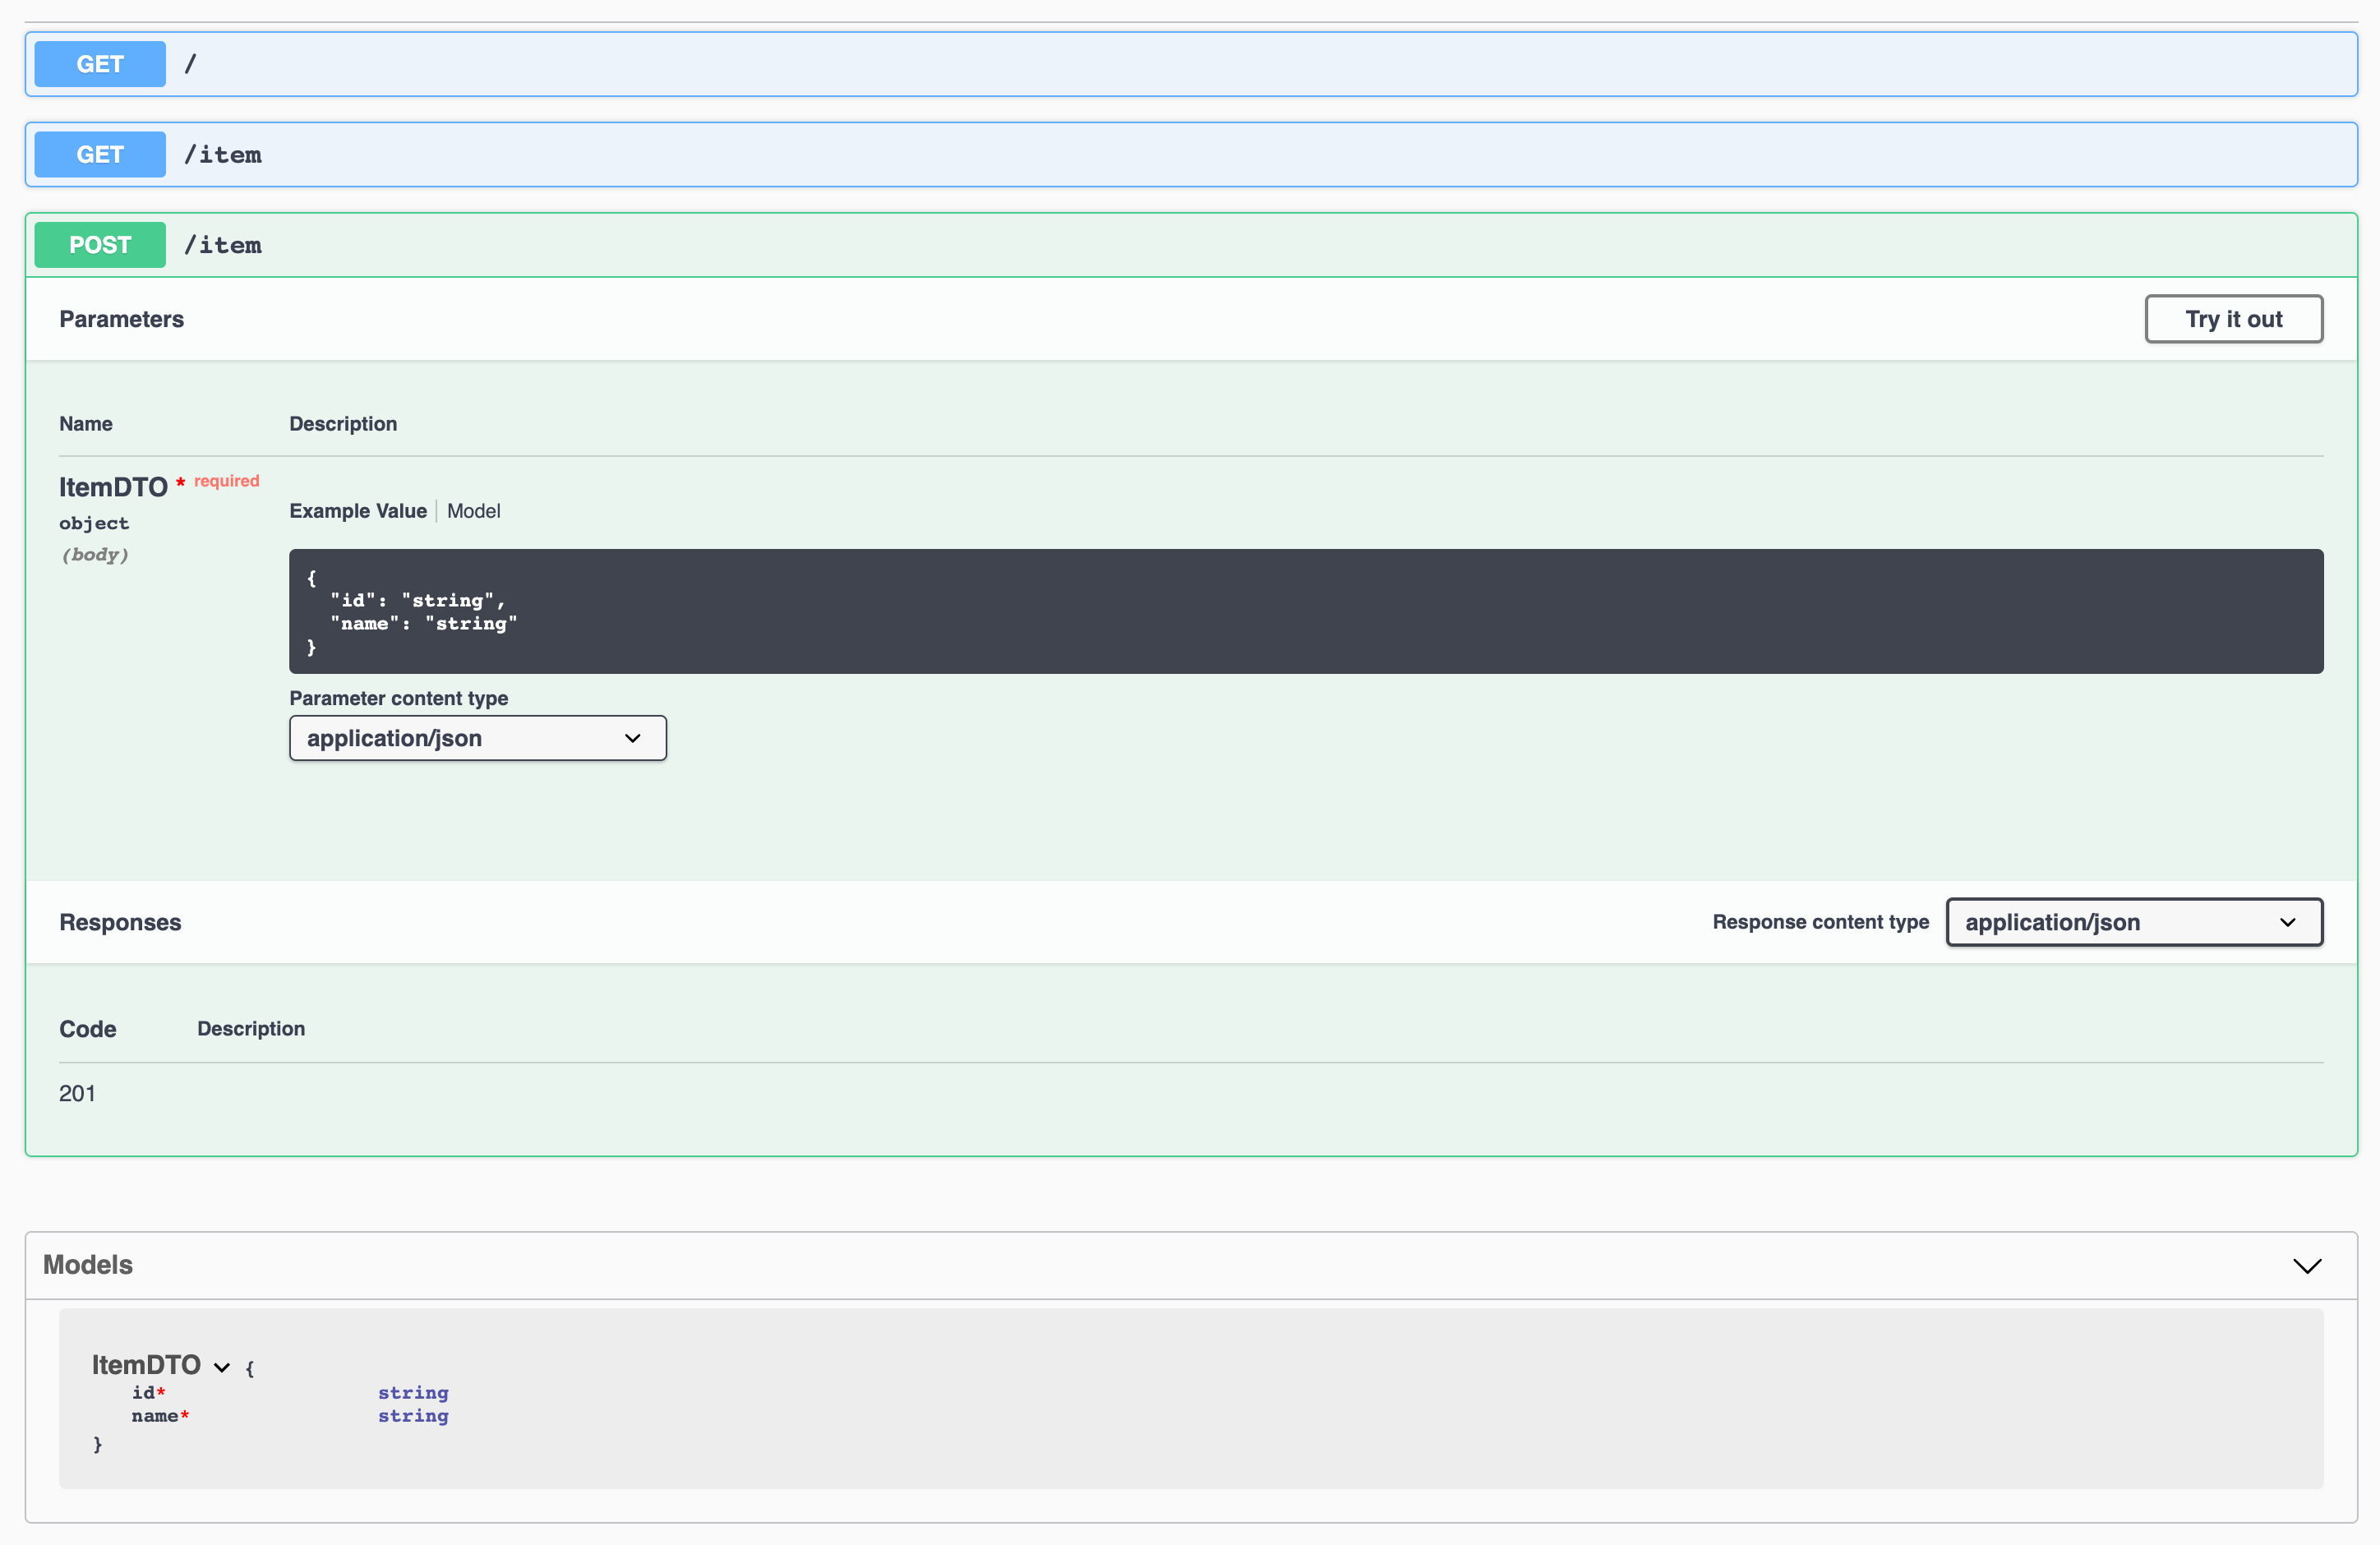 painless swagger API docs
see more info on that topic here
Defining seed data.
We have nearly everything we need to scale our project with fancy business logic now. What will really boost your and your team’s productivity when working on the project is a data seed script.
This is a script that will setup your database with test or dummy data. Remember we added a script that automatically create a database server and an empty database ready to use. Now we add a script that will generate „meaningful dummy data“ in that database. This helps with development (as everybody works locally on the same dataset, but also with running integration tests against a test system as you know what the state of your persistence should be in).
We write the script in a way that it uses our already defined model (and if you like also the service layers etc). Because of the inversion of control, the dependency injection in class constructors we can create instances of our repositories and services from our project manually without starting the NestJS API Server just providing the database connection to them in a TypeScript file.
This is pretty neat — as this kind of dry run tests your code, as well as you are able to run the seed process in stand-alone before you launch the actual server. So, your seed script logic does not bleed into your actual business logic code but it takes advantage from it. I usually write my seed scripts in a very generic way, so they always work standalone in a single run, not depending on anything else just randomizing values and a “seed-id”. This is nice, because then you can run the script over and over again producing more data without screwing up on each run.
Idea: The seed-id would also help you to write a cleanup script where you could select delete by a seed-id for example.
To establish the database connection in our script we will just reuse the configService we have written and run it using the ts-node module.
This is how a seed script could look like:
we run it
npm run start:dev:db:seed

# gives us
# done -> seed2302-1
# done -> seed2302-2
# ...wait for script to exit
and after API start we get this data out of our database
curl localhost:3000/item | jq

[
 {
  "id": "393a370b-762b-44fb-9830-9526a1d6a685",
  "name": "seed8239-1",
  "description": "created from seed"
 },
 // ...
]
Some final thoughts
I hope with this I could get you kickstarted when working with NestJS, typeORM and PostgreSQL databases. What about you? Do you have similar or even better tooling / approaches to it? Let me know in the comments below!
Cheers
Comments