
Understanding Node.js & Express.js fundamentals
If you are wondering what Node.js is and what makes it so great, you came to the right place.
I will start out by (1)briefly introducing Node.js, (2) building a ‘hello world’ app, and then (3) explaining the concepts within the app to get a better understanding of Node.js fundamentals.
(4) I will also touch base on what Express is and (5) walk you through building a sample demo express app.
Introduction to Node JS
In simple terms, it’s a JavaScript free and open source cross-platform for server-side programming that allows users to build network applications quickly.
Installing Node.js
If you’re using OS X or Windows, the best way to install Node.js is to use one of the installers from the Node.js download page. If you’re using Linux, you can use the installer, or you can check NodeSource’s binary distributions to see whether or not there’s a more recent version that works with your system.
Test: Run node -v. The version should be higher than v0.10.32.
If you are stuck, check out these docs for guidance.*
Now that we have it installed, let’s get right to it!
Demo “Hello World” Node app
One of the most common uses for node is running your server. Let’s create your first Node.js HTTP server.
Step 1: Go to terminal & create a folder called “Hello World”
mkdir hello-worldStep 2: Go inside the project & create a file in the root called app.js
cd hello-world
touch app.js
##Step 3: Paste this in your app.js file:
const http = require('http');

var server = http.createServer(function (request, response) {
    response.writeHead(200, {"Content-Type": "text/plain"});
    response.end("Hello World\n");
});

server.listen(4000);-
This http variable contains a function called createServer. This is all you need to do to create an http server.
-
Line 2, 3, 4: This function is a callback → We use the response variable that’s passed in to the callback to write the head and pass in the content type and we end that response with hello world. → This function returns an object that we are going to put in to our server variable and this object is going to have another function called “listen” →
-
Line 5: the minute that we call listen that’s when our server is going to start running as we listen to this port. You can choose any port.
-
By default, HTTP uses port80 but ideally you should specify a port.
Step 4: You can then run your server by going to your terminal and typing:
node app.jsStep 5: Now go to your port…
http://localhost:4000/You should see “Hello World”. :)
Congratulations, you now have a server running!
What makes Node.js so great?
- It’s a JavaScript runtime built on Chrome’s V8 JavaScript engine.
- Both Node and the JS that is executed inside of your browser are running on the same engine → It’s an open source engine that takes JS code and compiles it to much faster machine code → this is what makes Node.js so fast!
- Uses an event-driven, non-blocking I/O model that makes it light weight & efficient
- *What is event-driven programming? *Basically, it’s a different way of thinking about your program flow. The flow of your program is defined by the events that are taking place. (see below for more details)
- *What is I/O? *Input/Output
- *Difference between blocking & non-blocking software development *Blocking methods execute synchronously and non-blocking methods execute asynchronously. (see below for more details)
- Node.js’ package ecosystem, npm, is the largest ecosystem if open source libraries in the world (see below for more details)
Let’s dive in to what all this means in more detail. The following are a few concepts that we need to understand:
What is Event Driven Programming?
*Event Driven Programming *is a computer programming paradigm in which control flow of the program is determined by the occurrence of events. These events are monitored by code known as an event listener that, if it detects that its assigned event has occurred, runs an event “handler”, typically a callback function or method. This handler deals with the event by responding to it with program code.
If you look back at the server function, the response only runs once we get a request — that’s event driven programming:
....
var server = http.createServer(function (request, response) {
....
It doesn’t just happen automatically. There is a process that happens and you have to wait for that.
Node Event Loop
So the next question you might be asking is how do we check for a request? How do we know when something is happening? How do we guarantee that in our code?
Answer: Node provides the event loop as part of the language. The minute that you call Node you don’t have to call a start function to start a loop that’s waiting for events. You literally just put in your script and the loop starts the minute that you start Node and it doesn’t end until the last callback is called so what that means is that if you are creating an http server, the end of that callback will just never arrive because you will always be waiting for an http request to come in and as a result your program won’t shut down until you tell it to shut down.
Blocking I/O
Since the Node event loop is run under a single thread calling something like sleep() makes everything halt — you are blocking the event loop.
Things like reading a file can also block an event loop. The event will be blocked until the entire file is read. This might not be optimal. Imagine you have a long file? it would stop all the other requests when that one is being handled.
const fs = require(‘fs’);

var contents = fs.readFileSync('package.json').toString();
console.log(contents);
*When running Node you want to have your application as asynchronous as possible since it is constantly running an event loop. Even things like reading a file can be run asynchronously. The above snippet of code is synchronous. Let’s see how we can improve it to avoid ‘blocking’…
Asynchronous version:
const fs = require(‘fs’);

fs.readFile('package.json', function (err, buf){
    console.log(buf.toString());
});
In the above snippet, I am passing a callback as opposed to having it freeze while it reads the file. The function is a bit different than the synchronous version we had initially. By passing a callback, the minute it reads a chunk of that file it will execute the callback and move on, letting other events run. This solves the ‘blocking’ issue.
GOAL: *In event driven programming your goal is to get the events timing tied as closely to the actual data flow. You want it to pretty much deal with the chunk of data you need.
Callback Style Programming
We have mentioned callbacks a lot — It is important to understand this concept: The event loops result in callback type programming. In simple terms it’s where you end up splitting your program in to smaller & smaller chunks until each chunk is mapped to operation with data.
This kind of program caused ‘callback insanity’ → many nested callbacks. It makes it not as readable and manageable. Most importantly, it makes it harder to debug. So how should we handle it??
Promises style programming!!!
Promises
What is Promises stye programming?
When a function will return a promise object that will return something in the future. It promises that it will do something for you. You can also chain promises together and it really helps simplify your code.
promise.then(function(result) {
  console.log(result); // "Stuff worked!"
}, function(err) {
  console.log(err); // Error: "It broke"
});
then() takes two arguments, a callback for a success case, and another for the failure case
Chaining: then() isn't the end of the story, you can chain then together to transform values or run additional async actions one after another.
promise.then(function(val) {
  console.log(val); // 1
  return val + 4;
}).then(function(val) {
  console.log(val); // 5
})
Event Emitters
Ok so we reviewed some important concepts but now what happens when we want to pull data from the server that we built? Well, we would have to change it up a bit and use ‘event emitters’.
What are Event Emitters?
An Event emitter, as it sounds, is just something that triggers an event to which anyone can listen. Different libraries offer different implementations and for different purposes, but the basic idea is to provide a framework for issuing events and subscribing to them.
In node.js an event can be described simply as a string with a corresponding callback. An event can be “emitted” (or in other words, the corresponding callback be called) multiple times or you can choose to only listen for the first time it is emitted.
Let’s say your node.js app is connected to an office automation system…
var office = require('./office');

office.door.on('knock', function() {
  /// do something
});
The ‘on’ function pretty much says whenever I get a data event, run this function. As a client of this object you start listening to “knock” events by using the .on method & passing in a function that gets called whenever an event with that specific name happens
The on or addListener method (basically the subscription method) allows you to choose the event to watch for and the callback to be called.
The emit method (the publish method), on the other hand, allows you to "emit" an event, which causes all callbacks registered to the event to 'fire', (get called).
// get the reference of EventEmitter class of events module
const events = require('events');

//create an object of EventEmitter class by using above reference
const em = new events.EventEmitter();

// register a listener for the 'knock' event
em.on('knock', function (data) {
    console.log('Received the knock event: ' + data);
});

// trigger an event called 'knock'
em.emit('knock', "who's there?");-
In NodeJs, any object that emits an event is an instance of the EventEmitter class
-
If you run this script the response in terminal will be:
Received the knock event: who’s there?
Node Package Manager (NPM)
What is NPM? It is the official package manager for Node and is bundled & installed automatically with the environment.
Here is how you would install a specific package via terminal:
npm install — save *package_name
*npm update
by writing ‘save’ it will save the package in to your package.json folder which handles your dependencies.
What is package.json?
{
  “name”: “Node101”,
  “version”: “0.0.0”,
  “description”: “Sample Code”,
  “main”: “hello_world.js”,
  “author”: {
    “name”: “Linda Haviv”,
    “email”: “”
  }
}
There are lots of great modules on NPM:
Popular NPM modules:

- 7053 [underscore](https://www.npmjs.com/package/underscore)
- 6458 [async](https://www.npmjs.com/package/async)
- 5591 [request](https://www.npmjs.com/package/request)
- 4931 [lodash](https://www.npmjs.com/package/lodash)
- 3630 [commander](https://www.npmjs.com/package/commander)
- 3543 [express](https://www.npmjs.com/package/express)
- 2708 [yargs](https://www.npmjs.com/package/yargs)
- 2634 [coffee-script](https://www.npmjs.com/package/coffee-script)
*How does it work? * The best way to manage locally installed npm packages is to create apackage.json file.
A package.json file affords you a lot of great things:
-
It serves as documentation for what packages your project depends on.
-
It allows you to specify the versions of a package that your project can use using semantic versioning rules.
-
Makes your build reproducible which means that its way easier to share with other developers.
(source: npmjs docs)
In general, Node is a great tool to quickly get an api up and running
Note: The first thing you do when you get any kind of Node project is that you navigate to the directory that it’s in and in terminal write:
npm installThis command will look at everything you have in your package.json file and it will install all of those things
How to use Modules in Node.js?
Now that we listed some popular modules, you might be wondering how to use them in your projects. To do that, we need to use a function in Node called require. The demo server we previously built used the built-in require module.
const http = require(‘http’);
.....
Require will let us do 3 things:
-
load in modules that come with Node.js — example: http module, FS module
-
load in third party libraries that allows us to write less code — example: express.js
-
require our very own files. This will allow us to break up our application to multiple smaller files which is essential for building real-world apps.
INTRODUCTION TO EXPRESS.JS
What is Express?
It’s a web framework that let’s you structure a web application to handle multiple different http requests at a specific url.
Express is a minimal, open source and flexible Node.js web app framework designed to make developing websites, web apps, & API’s much easier.
Why use Express?
Express helps you respond to requests with route support so that you may write responses to specific URLs
Supports multiple templating engines to simplify generating HTML.
The nice thing about it is it’s very simple and it’s open-source
Installing & using Express
You can get it through NPM
npm install expressDemo: Creating a simple Rest api
-
A router maps HTTP requests to a callback
-
HTTP requests can be sent as GET/POST/PUT/DELETE, etc..
-
URLs describe the location targeted
Basic express app:
Step 1: Go to terminal & create a folder called “Hello World”
mkdir node-web-serverStep 2: Go inside the project & generate the package.json file using npm init
cd node-web-server
npm init
use the default values just by pressing enter through all of the options
Step 3: Install express
npm install express --saveStep 4: create a file called server.js in the root
touch server.jsthis is where we will configure all our routes.
Step 5: Paste the following code in your server.js file:
const express = require('express');

var app = express();

app.get('/', (req, res) =##{
    res.send('Hello Express')
});

app.listen(process.env.PORT || 3000)
Line 1: You can think of require as a need to import something. You can instantiate it at the top of your file. Line 2: We are creating the express app by setting it to the app variable. Line 3: .get is saying that when it gets that route it should give the response that is specified in the function. It takes in 2 arguments: (1) the url (2) the function that tells express what to send back to the person making the request. Line 5: .listen is going to bind the application to the port on our machine.
When you run NPM install and save the dependencies in the terminal, they get added in to the* package.json* file:
{
  “name”: “node-web-server”,
  “version”: “0.0.0”,
  “description”: “Sample Code”,
  “main”: “index.js”,
  “author”: {
    “name”: “Linda Haviv”,
    “email”: “”
  },
  "dependencies": {
     "express": "4.15.3",
     "jade": "*",
     "underscore": "^1.7.0"
  }
}-
The syntax it uses is semantic versioning, which pretty much means you can specify which version of the dependency you would like.
-
A star symbol (*) means it can be any version, whichever is the latest one.
-
A carrot symbol ^ prior to the version means I want that version or anything newer.
To run the application install nodemon & type the following in terminal:
npm install -g nodemon
nodemon server.js
*you can use ‘nodemon’ instead of ‘node’ when running your app locally. Nodemon monitors your app for any changes & automatically restarts your application; With the ‘node’ command, you have to do that manually.
Step 6: Go to your browser and go to port 3000
http://localhost:3000/You should see “Hello Express”. :)
Templating
What is middleware?
You might hear the term middleware thrown around a lot but what is it in the context of Express.js? Middleware is any number of functions that are invoked by the Express.js routing layer before your final request handler is, and thus sits in the middle between a raw request and the final intended route. It basically lets you configure how your express application works.
In order to add middleware we will do the following:
Step 7: Go to terminal and in the root create a folder called *Public *and add an html file inside
mkdir public
cd public
touch test.html
the public folder, as it sounds, is public and is where you put static assets that can be viewed by everybody
Step 8: Paste the following code in the test.html file
<!DOCTYPE html>
<html>
  <head>
    <meta charset="utf-8">
    <title>Test Page</title>
  </head>
  <body>
    <h1>Test Page</h1>
    <p>Some text here</p>
  </body>
</html>
the goal will be to serve up this page without having to manually configure it
Step 9: Let’s add some middleware by going to the server.js file & adding the following code:
*app.use takes the middleware function you want to use
const express = require('express');

var app = express();

app.use(express.static(__dirname + '/public'));

app.get('/', (req, res) => {
    res.send('Hello Express')
});

app.listen(process.env.PORT || 3000)
Step 10: Go to the terminal & run nodemon
nodemon server.js##Step 11: Go to localhost 3000
http://localhost:3000/test.html*you should see the following:
 localhost:3000/test.html
For dynamic templating look into handlebars
Sample Structure of a Node Express app
Node and Express don’t come with a strict file and folder structure.
-
controllers/ — defines your app routes and their logic. You main route might be index.js but you might also have a route called for example ‘/user’ so you might want to make a JS file that just handles that.
-
helpers/ — code and functionality to be shared by different parts of the project
-
middlewares/ — Express middlewares which process the incoming requests before handling them down to the routes
-
models/ — represents data, implements business logic and handles storage
-
public/ — contains all static files like images, styles and javascript
-
views/ — provides templates which are rendered and served by your routes
-
tests/ — tests everything which is in the other folders
-
app.js — initializes the app and glues everything together
-
package.json — remembers all packages that your app depends on and their versions
Build A RESTful Api With Node.js And Express.Js Part One
In this tutorial, we’ll be learning how to build a Rest API in Node.js and Express.js by building a simple todo app API. This tutorial assumes an intermediate knowledge of javascript and experience working on the command line. The source code for the final project can be found here .
Getting Started
To get started create a new folder and call it todo.
$ mkdir todo
$ cd todo
In your todo folder create a new file called app.js
$ touch app.jsThe next thing for us to do is to install Node. you can install node here. After node has been installed then we’ll install express with npm. Node comes with npm so we won’t need to install npm.
Initialize The App
Navigate on the command line to the root of your app and run.
npm init Click the return key repeatedly for every questions asked of you on the command line.
This will create a package.json file for you.
Install Dependencies And Set Up Babel
$ npm install express —-saveCreate A Dummy Database
The last thing we’ll need to do before we get started creating our Apis is to create a dummy database we’ll use.
Create a folder and name it db.
$ mkdir dbIn the folder create a file and call it db.js
$ cd db
$ touch db.js
In db.js create a javascript object to create a dummy database
const todos =  [
    {
      id: 1,
      title: "lunch",
      description: "Go for lunc by 2pm"
    }
];

export default todos;
Setup The App And Create Our First Endpoint
Now let’s get started creating our todo app
const express = require('express');
const db = require('./db/db');

// Set up the express app
const app = express();

// get all todos
app.get('/api/v1/todos', (req, res) =##{
  res.status(200).send({
    success: 'true',
    message: 'todos retrieved successfully',
    todos: db
  })
});

const PORT = 5000;

app.listen(PORT, () =##{
  console.log(`server running on port ${PORT}`)
});
We imported express which we installed at the beginning of the course, app.get makes a get request to the server with the route/endpoint provided as the first parameter, the endpoint is meant to return all the todos in the database.
-
res.status(200) is used to send back the status of the request, 200 means ok and it indicates a successful request. Status codes are ways for client like web app or mobile app to check wether things went wrong or not.if we get a 404(which means Not Found)we don’t need to check the payload because we know that nothing is coming that we are really interested in. If 200 comes back we can check the payload because we know we are expecting something. You can learn more about HTTP status codes here.
-
res.send() is used to send back a response to the client, the resource passed into the send as a parameter is what gets sent back to the client. in this case, we send back an object which contains some information, the todos property of the object contains the data we imported at the top of app.js from our dummy database.
-
app.listen creates a web server for us, it takes two parameters, the first parameter is the port we want our application to listen on t, whatever port we provide, in our case, 5000 will be the port our server will be running on in our system. the second parameter is optional, it is a callback function of what should happen when the server gets created, in our case we are logging a message to the console. when the sever gets created then we can access our endpoint
Now to run this code let’s go to the command line.we’ll normally run our node app from the command line like this.
$ node app.js But this will throw an error because our code is in ES6, to successfully run our code we’ll have to run it with babel-node which will compile it to ES5. babel-node comes with the babel-cli which we installed at the beginning of the course.
$ node_modules/.bin/babel-node app.jsNow we can go to postman and test our endpoint, postman is an application we use to test our endpoints. you can download postman here.
To test the endpoint we’ll go to localhost:5000/api/v1/todos.
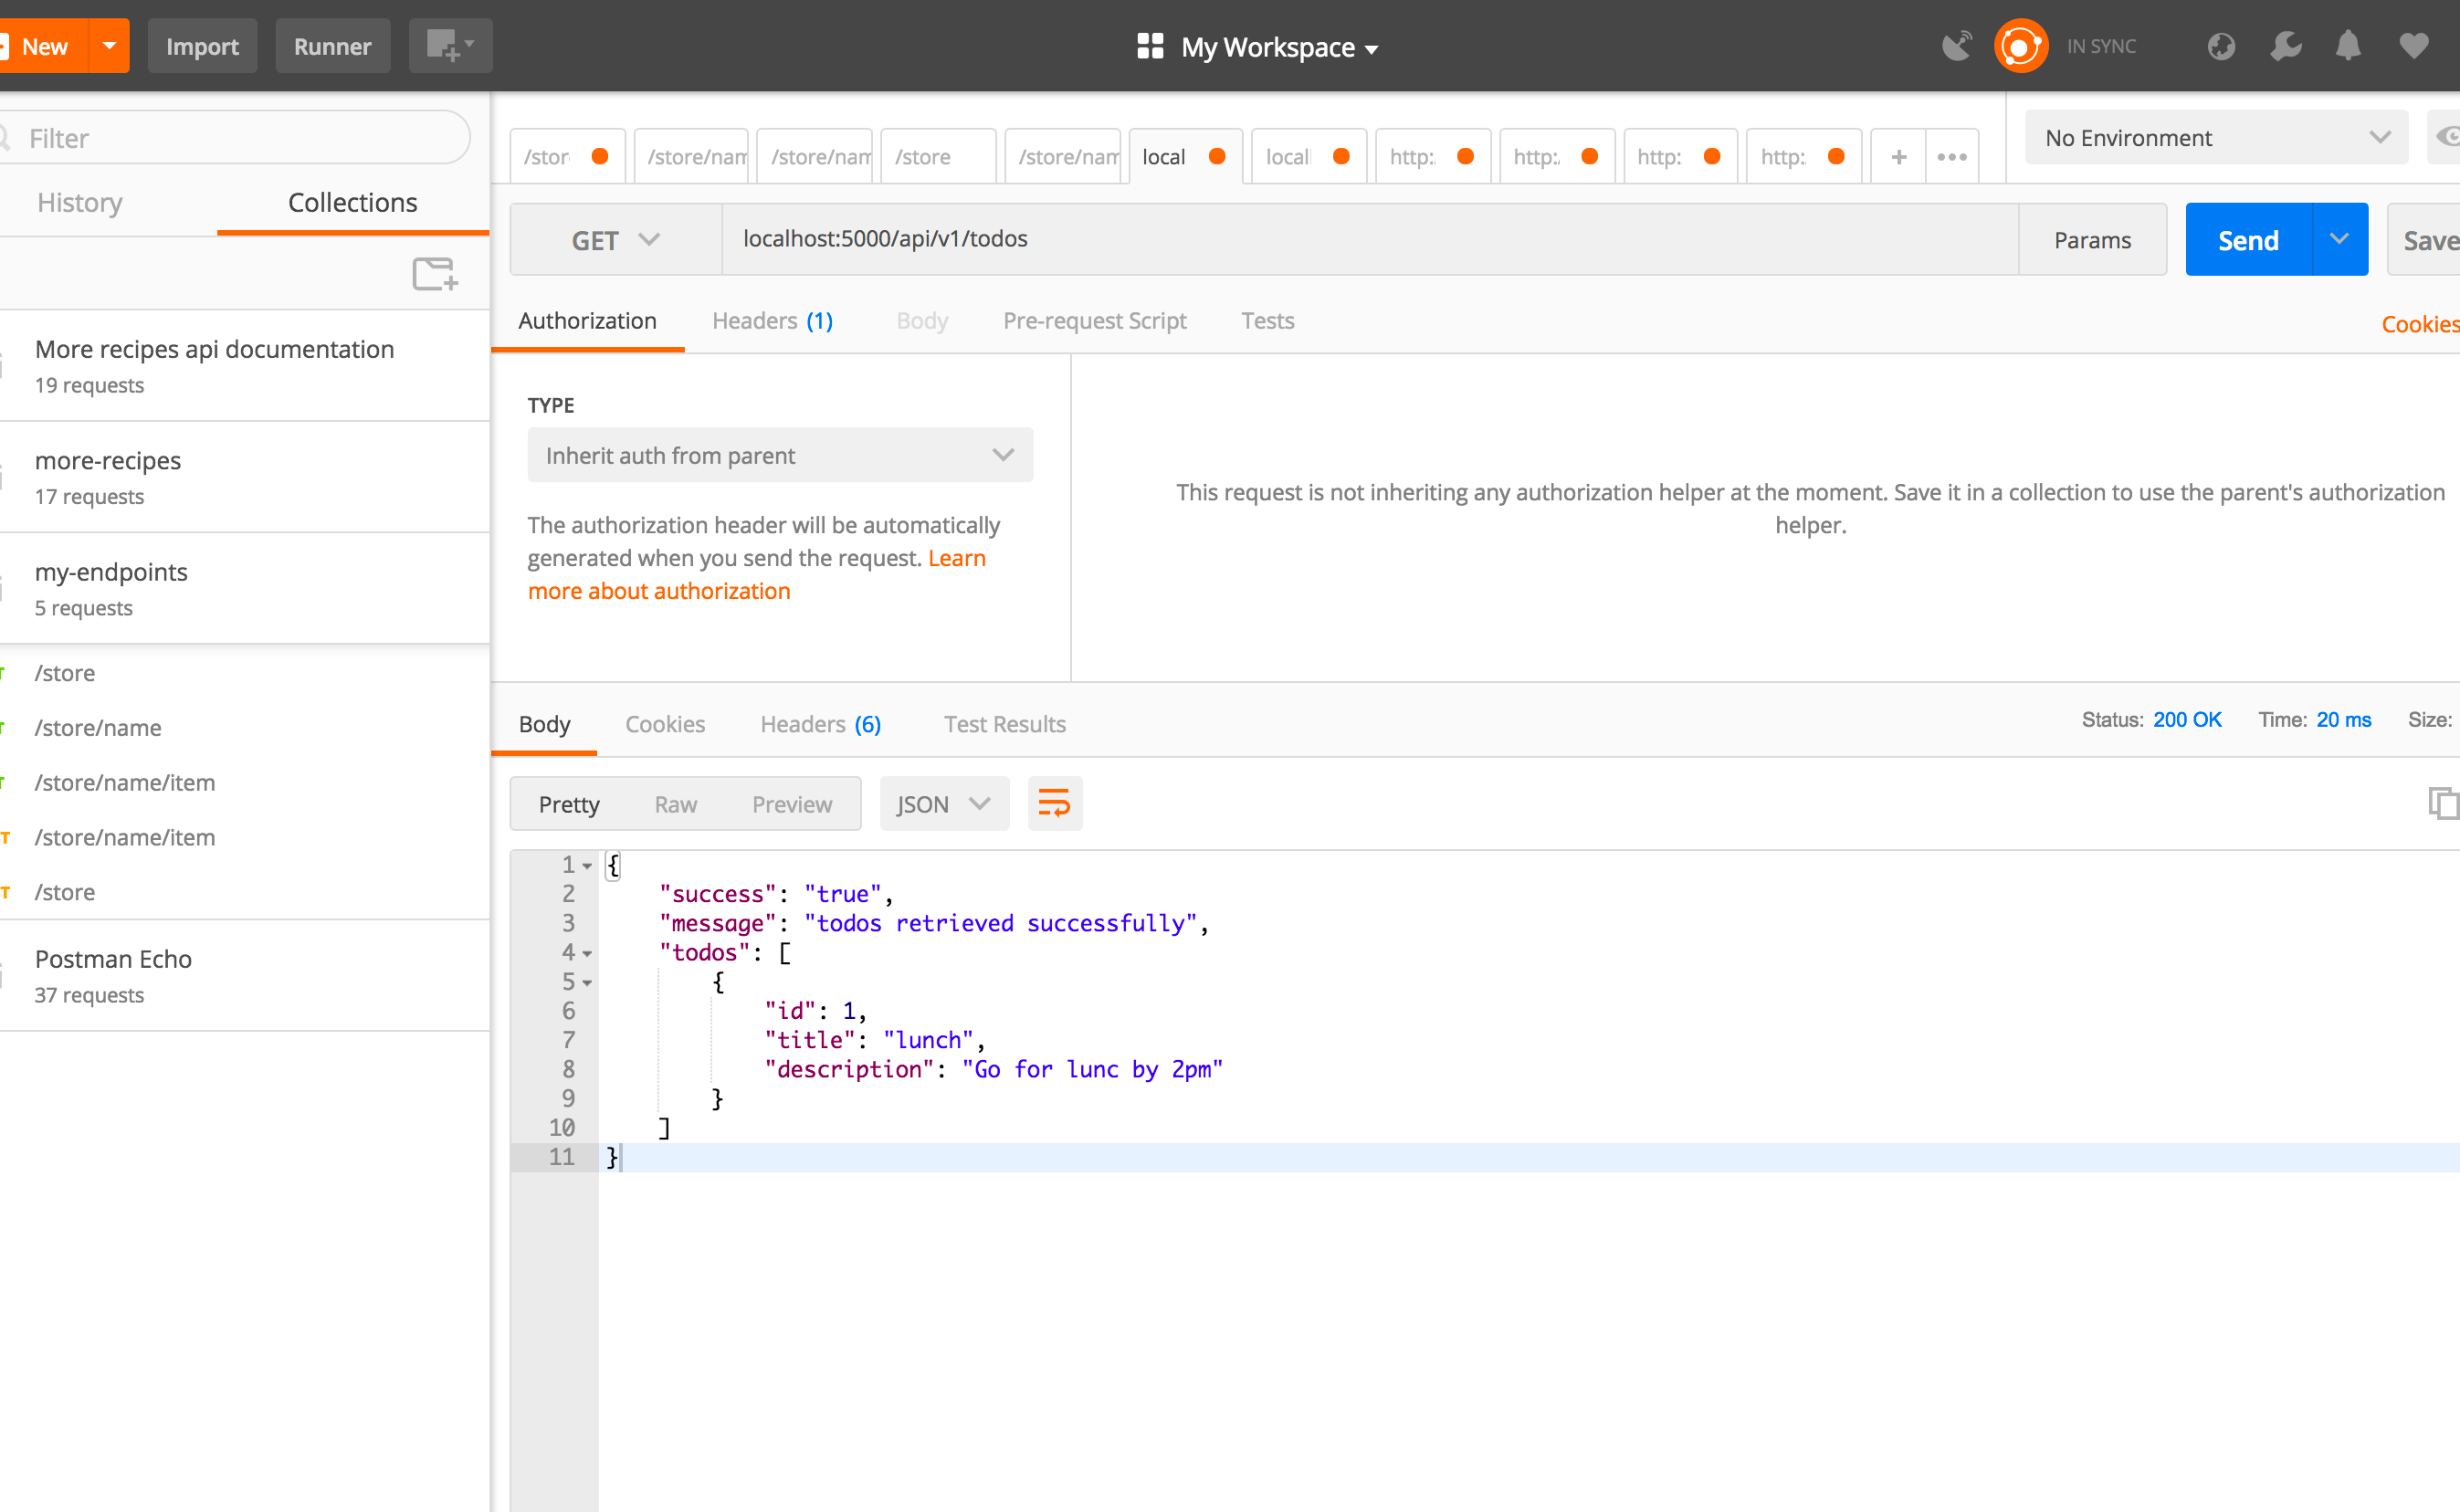
Take a look at the ‘GET’ before localhost:5000/api/v1/todos, remember our endpoint is a get request, that is why we set that dropdown to ‘GET, if our endpoint was a post request i.e we had app.post then we would have set that to POST.
Getting our server started by running this every single time is stressful, to simplify this process we are going to do two things, first, we are going to install nodemon, Secondly, we’ll create a script in our package,json to start our server.
Let’s install nodemon, run the following in your terminal.
$ npm install nodemon --save-devNodemon watches your app for file changes and restarts the server every time a file changes in your app. This eases your work because you won’t have to start and restart the server manually every time you change files in your app
Lets create the script, in your package.json, inside the script part include this
"start": "nodemon app.js"You know what babel-node does.
Now every time we want to start our app we just run the following script on the terminal.
npm run startThis will run the start script in our package.json file.
Let’s create an endpoint to add todos, but before then let’s install a package called body-parser, body-parser parses incoming request bodies in a middleware before your handlers, available under the req.bodyproperty.
When you are sending data to the server, the data could be coming from a form or it could be a json, what body parser does is that it parses this data that is coming from the client in an object called req.body, so for example if I have a JSON data coming from the client to the server.
{
   "name": "Ola",
   "school": "unilag"
}
What body parser does is that it parses this JSON data and makes it available under the req.body as a property. remember req is the first property we provide for our callback when we make an API request, and remember I said req contains information about the request that is coming from the client, so body parser makes the data coming from the form or any JSON data coming from the client available as a property under the req.body, so we can access the JSON data from req.body as.
req.body.name
req.body.school
So lets install body-parser
$ npm install body-parser --saveNow lets import it in app.js
const bodyParser = require('body-parser');Now we will configure body parser for our application like this.
const app = express();

// Parse incoming requests data
app.use(bodyParser.json());
app.use(bodyParser.urlencoded({ extended: false }));
Create Todo
Now lets get to creating an endpoint to create a todo.
app.post('/api/v1/todos', (req, res) =##{
  if(!req.body.title) {
    return res.status(400).send({
      success: 'false',
      message: 'title is required'
    });
  } else if(!req.body.description) {
    return res.status(400).send({
      success: 'false',
      message: 'description is required'
    });
  }
 const todo = {
   id: db.length + 1,
   title: req.body.title,
   description: req.body.description
 }
 db.push(todo);
 return res.status(201).send({
   success: 'true',
   message: 'todo added successfully',
   todo
 })
});
In this endpoint, we are not making a request to the server to get data but rather we are posting data. just like we explained, the data coming in are parsed into req.body as properties, so we have req. body.title, etc.
We create a todo object with the information we got from the client through body-parser and then push it to the dummy db array as a new todo.
Let’s test this out in postman, we would have to pass in some data and send them to the server to test this out, on postman, when you select POST, click on n body before Headers which is before Authorization and pass in your values in the field.
localhost:5000/api/v1/todos, ensure you set the HTTP method in your postman to POST.
Take a look at the ‘POST’ before localhost:5000/api/v1/todos, remember our endpoint is a post request, that is why we set that dropdown to POST.Ensure the radio button x-www-form-urlencoded is checked or use raw where you would pass JSON data like this.
{
"title": "breakfast",
"description": "get breakfast"
}
Get A Single Todo
Now let’s create an endpoint to get a single todo from the database. Type the following:
app.get('/api/v1/todos/:id', (req, res) =##{
  const id = parseInt(req.params.id, 10);
  db.map((todo) => {
    if (todo.id === id) {
      return res.status(200).send({
        success: 'true',
        message: 'todo retrieved successfully',
        todo,
      });
    }
});
 return res.status(404).send({
   success: 'false',
   message: 'todo does not exist',
  });
});
Just, as usual, this endpoint takes two parameters, the route and the callback function. the different thing here is that the route in this endpoint has a :id, there are times we want to pass parameters to our endpoints because we will need them in our application, to pass those parameters we use :param.
The endpoint created above is meant to get a single todo, to get a single todo we’ll need a unique way to identify this todo in the database, so if we know the id of the todo we want to get we can then fetch it from the database, so every time we make a request to this endpoint we pass along the id of the todo we want to get, the callback function will then query the database for the todo with that application.
Delete Todo
Now let’s create an endpoint to delete todos from the database.
app.delete('/api/v1/todos/:id', (req, res) =##{
  const id = parseInt(req.params.id, 10);
  db.map((todo, index) =##{
    if (todo.id === id) {
       db.splice(index, 1);
       return res.status(200).send({
         success: 'true',
         message: 'Todo deleted successfuly',
       });
    }
  });
    return res.status(404).send({
      success: 'false',
      message: 'todo not found',
    });
});
Update Todo
Now let’s create an endpoint to update todos.
app.put('/api/v1/todos/:id', (req, res) =##{
  const id = parseInt(req.params.id, 10);
  let todoFound;
  let itemIndex;
  db.map((todo, index) =##{
    if (todo.id === id) {
      todoFound = todo;
      itemIndex = index;
    }
  });

  if (!todoFound) {
    return res.status(404).send({
      success: 'false',
      message: 'todo not found',
    });
  }

  if (!req.body.title) {
    return res.status(400).send({
      success: 'false',
      message: 'title is required',
    });
  } else if (!req.body.description) {
    return res.status(400).send({
      success: 'false',
      message: 'description is required',
    });
  }

  const updatedTodo = {
    id: todoFound.id,
    title: req.body.title || todoFound.title,
    description: req.body.description || todoFound.description,
  };

  db.splice(itemIndex, 1, updatedTodo);

  return res.status(201).send({
    success: 'true',
    message: 'todo added successfully',
    updatedTodo,
  });
});
Just as usual we get the id of the todo we want to update from the URL, we loop through our dummy db to find the todo with that id, if we don’t find the todo then we return a message to the user saying todo not found. If we find the todo then we get new input supplied by the user, the new input is parsed by body parser to the req.body, we get the updated entries from req.body and create an updated todo object with it. We then use db.splice to remove the old todo that match our iteration when we looped through the dummy db and replace it with the updatedTodo that we created.
Comments