
Getting Started with React Native for Mobile Development
React Native brings React's declarative UI framework to iOS and Android. With React Native, you use native UI controls and have full access to the native platform.
- Declarative. React makes it painless to create interactive UIs. Declarative views make your code more predictable and easier to debug.
- Component-Based. Build encapsulated components that manage their state, then compose them to make complex UIs.
- Developer Velocity. See local changes in seconds. Changes to JavaScript code can be live reloaded without rebuilding the native app.
Portability. Reuse code across iOS, Android, and other platforms.
Welcome to the very start of your React Native journey! If you're looking for environment setup instructions, they've moved to their own section. Continue reading for an introduction to the documentation, Native Components, React, and more!
Environment setup instructions React Native
nstall React First things first, go peruse the React Native “Get Started” documentation. There’s some things you’re going to need to download, like Node. Now, I hate to step into controversy right out of the gate, but you have a decision point right when you start creating a react native project. You can either:
- Use the Create React Native App
- Build React Native from CLI. Essentially, react-native init AwesomeProject
The difference between these two paths is laid out a bit confusingly on the “Get Started” documentation. What it boils down to is whether you’re building your React Native project with Expo or not. Expo is a toolchain that was baked into the create-react-native-app library that removes some barriers up front, but in our own experience, adds barriers on the back end.
Setup using React native cli
Creating a new React Native project There are two ways to start a React Native project.
Using npx (recommended) Available since react-native@0.60
This method is preferred if you don't want to install global packages.
npx react-native init MyAppUsage in an existing React Native project Once you're inside an existing project, a local react-native binary will be available for you to use. Feel free to use Yarn to call it directly.
Example running start command in terminal:
yarn react-native start
# or:
npx react-native start
# or
node ./node_modules/.bin/react-native startYou can also add npm scripts to call it with whichever package manager you use:
{
  "scripts": {
    "start": "react-native start"
  }
}
Another Option Expo CLI
Assuming that you have Node 12 LTS or greater installed, you can use npm to install the Expo CLI command line utility:
npm install -g expo-cliThen run the following commands to create a new React Native project called "AwesomeProject":
expo init AwesomeProjectcd AwesomeProject
npm start # you can also use: expo startThis will start a development server for you.
Running your React Native application Install the Expo client app on your iOS or Android phone and connect to the same wireless network as your computer. On Android, use the Expo app to scan the QR code from your terminal to open your project. On iOS, use the built-in QR code scanner of the Camera app.
Modifying your app
Now that you have successfully run the app, let's modify it. Open App.js in your text editor of choice and edit some lines. The application should reload automatically once you save your changes.
You can choose either of these approached to quick start react native application development
Prerequisites
To work with React Native, you will need to have an understanding of JavaScript fundamentals. If you’re new to JavaScript or need a refresher, you can dive in or brush up at Mozilla Developer Network.
While we do our best to assume no prior knowledge of React, Android, or iOS development, these are valuable topics of study for the aspiring React Native developer. Where sensible, we have linked to resources and articles that go more in depth.
Interactive examples
This introduction lets you get started immediately in your browser with interactive examples like this one:
Example can run on Expo CLI
import React from 'react';
import { Text, View } from 'react-native';

export default function YourApp() {
  return (
    <View style={{ flex: 1, justifyContent: "center", alignItems: "center" }}>
      <Text>
        Try editing me! 🎉
      </Text>
    </View>
  );
}
Optionally, if you want to setup a local development environment, you can follow our guide to setting up your environment on your local machine and paste the code examples into your App.js file there. (If you are a web developer, you may already have a local environment set up for mobile browser testing!)
Function Components and Class Components
With React, you can make components using either classes or functions. Originally, class components were the only components that could have state. But since the introduction of React's Hooks API, you can add state and more to function components.
Hooks were introduced in React Native 0.58., and because Hooks are the future-facing way to write your React components, we wrote this introduction using function component examples. Where useful, we also cover class components under a toggle like so:
- Function Component Example
- Class Component Example
import React from 'react';
import { Text, View } from 'react-native';

export default function HelloWorldApp() {
  return (
    <View style={{
        flex: 1,
        justifyContent: 'center',
        alignItems: 'center'
      }}>
      <Text>Hello, world!</Text>
    </View>
  );
}
import React, { Component } from 'react';
import { Text, View } from 'react-native';
export default class HelloWorldApp extends Component {
render() {
return (
<View style={{
flex: 1,
justifyContent: "center",
alignItems: "center"
}}>
<Text>Hello, world!</Text>
</View>
);
}
}
The login about state and Props work in same way in React Native
import React, { Component, useState } from 'react';
import { Text, TextInput, View } from 'react-native';

export default function PizzaTranslator() {
  const [text, setText] = useState('');
  return (
    <View style={{padding: 10}}>
      <TextInput
        style={{height: 40}}
        placeholder="Type here to translate!"
        onChangeText={text => setText(text)}
        defaultValue={text}
      />
      <Text style={{padding: 10, fontSize: 42}}>
        {text.split(' ').map((word) => word && '🍕').join(' ')}
      </Text>
    </View>
  );
}
let's Understand Core and Native Components
Native Components
In Android development, you write views in Kotlin or Java; in iOS development, you use Swift or Objective-C. With React Native, you can invoke these views with JavaScript using React components. At runtime, React Native creates the corresponding Android and iOS views for those components. Because React Native components are backed by the same views as Android and iOS, React Native apps look, feel, and perform like any other apps. We call these platform-backed components Native Components.
React Native lets you to build your own Native Components for Android and iOS to suit your app’s unique needs. We also have a thriving ecosystem of these community-contributed components. Check out Native Directory to find what the community has been creating.
React Native also includes a set of essential, ready-to-use Native Components you can use to start building your app today. These are React Native's Core Components.
Core Components
React Native has many Core Components for everything from form controls to activity indicators. You can find them all documented in the API section. You will mostly work with the following Core Components:
| React Native UI Component | Android View | iOS View | Web Analog | Description |
|---|---|---|---|---|
<View> |
<ViewGroup> |
<UIView> |
A non-scrollling <div> |
A container that supports layout with flexbox, style, some touch handling, and accessibility controls |
<Text> |
<TextView> |
<UITextView> |
<p> |
Displays, styles, and nests strings of text and even handles touch events |
<Image> |
<ImageView> |
<UIImageView> |
<img> |
Displays different types of images |
<ScrollView> |
<ScrollView> |
<UIScrollView> |
<div> |
A generic scrolling container that can contain multiple components and views |
<TextInput> |
<EditText> |
<UITextField> |
<input type="text"> |
Allows the user to enter text |
In the next section, you will start combining these Core Components to learn about how React works. Have a play with them here now!
import React from 'react';
import { View, Text, Image, ScrollView, TextInput } from 'react-native';

export default function App() {
  return (
    <ScrollView>
      <Text>Some text</Text>
      <View>
        <Text>Some more text</Text>
        <Image
          source={{
            uri: 'https://reactnative.dev/docs/assets/p_cat2.png',
          }}
          style={{ width: 200, height: 200 }}
        />
      </View>
      <TextInput
        style={{
          height: 40,
          borderColor: 'gray',
          borderWidth: 1
        }}
        defaultValue="You can type in me"
      />
    </ScrollView>
  );
}
Lets create simple Application using some React Native Components
In our app, we have five main screens
- Bookcase
- Explore
- Add Book
We will use React Native Router to create Route Views React Navigation Library
import React, { Component } from 'react';
import {
  StyleSheet,
  Text,
  View
} from 'react-native';

export default class Boookcase extends Component {
  render() {
    return (
      <View style={styles.container}>
        <Text style={styles.title}>
          Bookcase
        </Text>
      </View>
    );
  }
}

const styles = StyleSheet.create({
  container: {
    flex: 1,
    justifyContent: 'center',
    alignItems: 'center',
    backgroundColor: '#F5FCFF',
  },
  title: {
    fontSize: 20,
    textAlign: 'center',
    margin: 10,
  }
});
We will create tab navigation at the bottom of the screen. We’re going to be using the React Navigation library. We’ll add a router.js file to the root of our app folder and then install a couple of libraries:
npm install react-navigation --save

import { Dimensions, Platform } from 'react-native';
import { StackNavigator, TabNavigator } from 'react-navigation';
import { Icon } from 'react-native-elements';
Now we can create TabNavigator or create bottom Tab View
import React, { Component } from 'react';
import { Dimensions, Platform } from 'react-native';
import { StackNavigator, TabNavigator } from 'react-navigation';
import { Icon } from 'react-native-elements';
import Bookcase from './screens/Bookcase';
import Explore from './screens/Explore';
import AddBook from './screens/AddBook';
import Lists from './screens/Lists';
import Profile from './screens/Profile';
let screen = Dimensions.get('window');
export const Tabs = TabNavigator({
'Bookcase': {
screen: Bookcase,
navigationOptions: {
tabBarLabel: 'Bookcase',
tabBarIcon: ({ tintColor }) => <Icon name="open-book" type="entypo" size={28} color={tintColor} />
},
},
'Explore': {
screen: Explore,
navigationOptions: {
tabBarLabel: 'Explore',
tabBarIcon: ({ tintColor }) => <Icon name="ios-map-outline" type="ionicon" size={28} color={tintColor} />
},
},
'Add Book': {
screen: AddBook,
navigationOptions: {
tabBarLabel: 'Add Book',
tabBarIcon: ({ tintColor }) => <Icon name="ios-add-circle-outline" type="ionicon" size={28} color={tintColor} />
},
},
'Lists': {
screen: ReadingListStack,
navigationOptions: {
tabBarLabel: 'Lists',
tabBarIcon: ({ tintColor }) => <Icon name="list" type="entypo" size={28} color={tintColor} />
},
},
'My Profile': {
screen: Profile,
navigationOptions: {
tabBarLabel: 'Profile',
tabBarIcon: ({ tintColor }) => <Icon name="ios-person-outline" type="ionicon" size={28} color={tintColor} />
},
},
});
export const createRootNavigator = () => {
return StackNavigator(
{
Tabs: {
screen: Tabs,
navigationOptions: {
gesturesEnabled: false
}
}
},
);
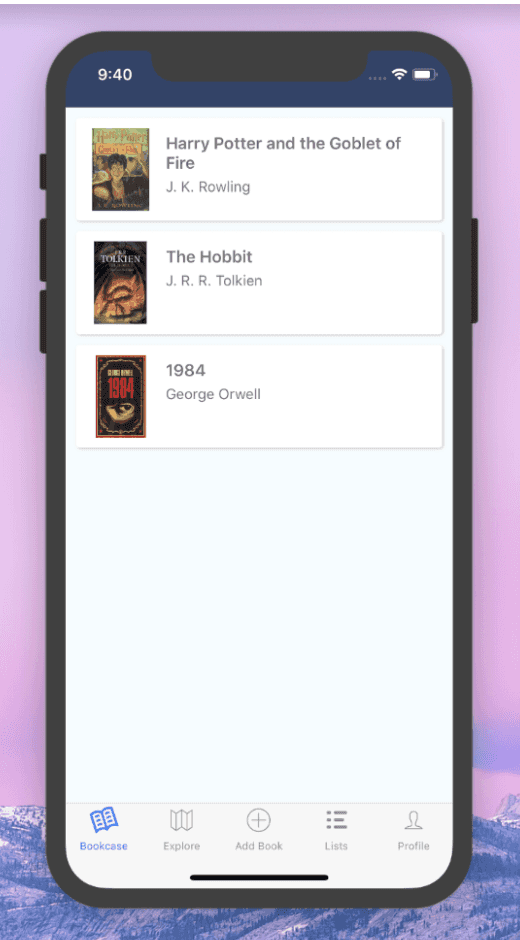
};We have book List Tab to show some list of Books
We’re going to be using React Native’s FlatList component. This is a really neat component that works out of the box to loop through and display data. The reason it’s so neat is because it has a ton of functionality built in, things like: scroll loading, pull to refresh, etc.
Our bookcase.js file is going to look like this:
import React, { Component } from 'react';
import {
  StatusBar,
  StyleSheet,
  FlatList,
  Text,
  View
} from 'react-native';
import BookcaseItem from './BookcaseItem';
export default class Boookcase extends Component {
  constructor(props) {
    super(props);
    this.state = {
      books: [
        {
          id: 1,
          title: 'Harry Potter and the Goblet of Fire',
          author: 'J. K. Rowling',
          thumbnail: 'https://covers.openlibrary.org/w/id/7984916-M.jpg'
        },
        {
          id: 2,
          title: 'The Hobbit',
          author: 'J. R. R. Tolkien',
          thumbnail: 'https://covers.openlibrary.org/w/id/6979861-M.jpg'
        },
        {
          id: 3,
          title: '1984',
          author: 'George Orwell',
          thumbnail: 'https://covers.openlibrary.org/w/id/7222246-M.jpg'
        }
      ]
    }
  }

  _renderItem = ({item}) => (
    <BookcaseItem
      id={item.id}
      title={item.title}
      author={item.author}
      thumbnail={item.thumbnail}
    />
  );

  _keyExtractor = (item, index) => item.id;

  render() {
    return (
      <View style={styles.container}>
        <StatusBar
          barStyle="light-content"
        />
        <FlatList
          data={this.state.books}
          keyExtractor={this._keyExtractor}
          renderItem={this._renderItem}
        />
      </View>
    );
  }
}
FlatList is used to render every item of book and renderItem is using BookcaseItem component to render each book from List, its child component getting data using Props from parent component, We can build simple ListItem components
export default class BookcaseItem extends Component {
    render() {
        return(
          <View style={styles.rowContainer}>
            <Image source={{uri: this.props.thumbnail}}
            style={styles.thumbnail}
            resizeMode="contain" />
            <View style={styles.rowText}>
              <Text style={styles.title} numberOfLines={2} ellipsizeMode ={'tail'}>
                {this.props.title}
              </Text>
              <Text style={styles.author} numberOfLines={1} ellipsizeMode ={'tail'}>
                {this.props.author}
              </Text>
            </View>
          </View>
        );
    }
}
Futher we can crate other Views and Components Like Edit book and add new Book using React forms.
Developer Notes
People from many different development backgrounds are learning React Native. You may have experience with a range of technologies, from web to Android to iOS and more. We try to write for developers from all backgrounds. Sometimes we provide explanations specific to one platform or another like so:
Comments