
There are a few things you should know before you start playing around with React.
-
JavaScript and programming concepts.
-
Document Object Model — DOM. (Optional, as DOM is covered in this course)
-
Familiarity with ES6 syntax and features.
-
Node.js and npm installed globally on your machine.
Why ReactJS?
Problem: In traditional web application programming, for even a small change in the webpage, the whole page is reloaded. This makes the web pages slower than they should be.
How ReactJS solves this problem: React only updates what’s necessary.
What is React?
-
React or ReactJS is a JavaScript library.
-
React is not a framework. (unlike Angular, which is more opinionated).
-
React is an open-source project created by Facebook.
-
React is used to build user interfaces (UI) on the front end.
-
React is the view layer of an MVC application (Model View Controller).
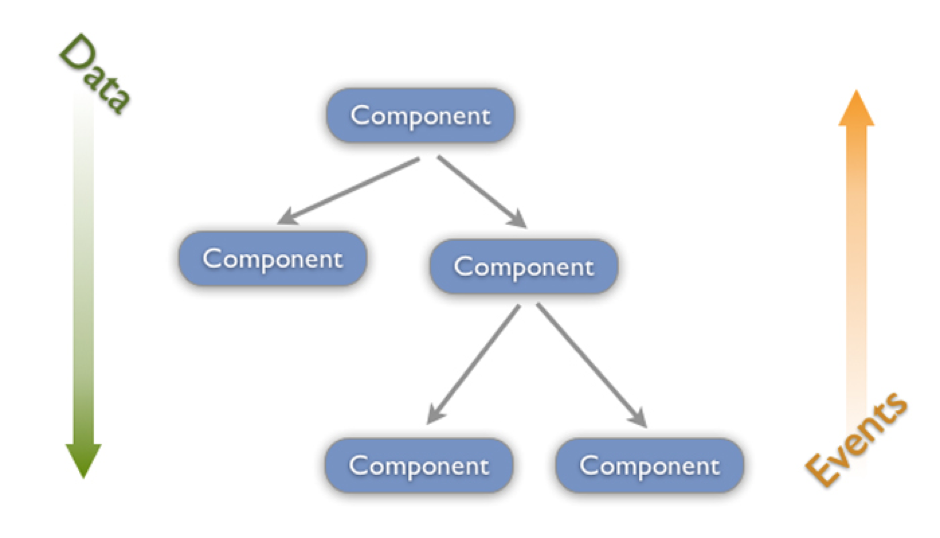
React allows developers to create/compose large web applications with complex UIs from small and isolated pieces of code called “components” which can change data, without reloading the page.
Other ReactJS Features?
- JSX: Javascript + XML
It is a XML syntax extension to JavaScript. JSX is simple JavaScript which allows HTML quoting and uses these HTML tag syntax to render subcomponents. You can definitely use React without JSX but JSX makes React a lot more elegant. Just like XML, JSX tags have a tag name, attributes, and children.
- Single-Way data flow
Otherwise called Unidirectional. In React, a set of immutable values are passed to the renderer of each component as properties in its HTML tags. The component cannot directly modify any properties but can pass a callback function with the help of which we can do modifications. This complete process is known as “properties flow down; actions flow up”.
- Virtual DOM (Document Object Model)
Behind the screens of a web browser:
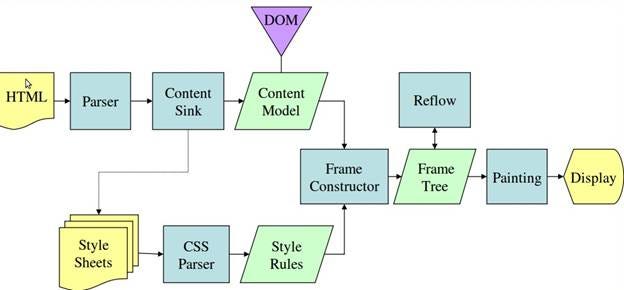
What is DOM? The Document Object Model (DOM) is a cross-platform and language-independent API that treats an HTML, XHTML, or XML document as a tree structure. The DOM model represents a document with a logical tree.

!DOCTYPE html
<html>
<head>
<title>My title</title>
<head>
<body>
<h1>A heading</h1>
<a href=””>Link text</a>
</body>
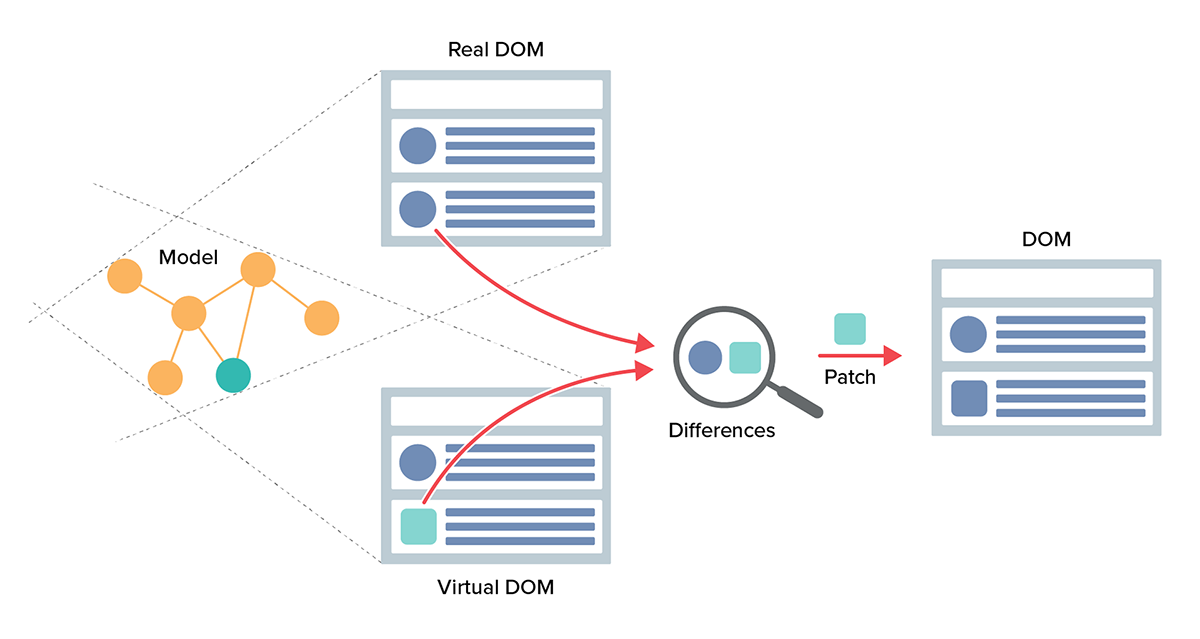
</html>Virtual DOM React creates an in-memory data structure cache which computes the changes made and then updates the browser. This allows a special feature which enables a programmer to code as if the whole page is going to render on each change whereas the react library only render components that actually change. One special thing about ReactDOM.render is that it only updates DOM elements that have changed.
In React, if you render the exact same thing twice in a row, the second render will do nothing.
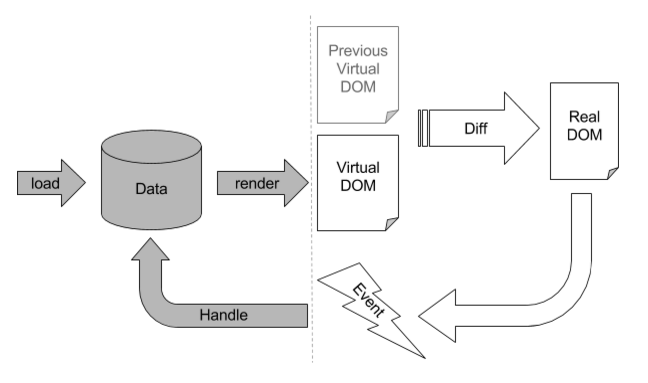
Updating the browser’s DOM is a three-step process in React.
-
Whenever anything has changed, the entire UI will be re-rendered in a Virtual DOM representation first.
-
The difference between the previous Virtual DOM representation and the new Virtual DOM will be calculated.
-
The Real DOM will be updated with that difference. This is very much like applying a patch.

ReactJS ENVIRONMENT SETUP
If you wish to play around with React and do setup later, you can use an online code playground. Try a Hello World template on CodePen or CodeSandbox. I would recommend CodeSandbox as it allows us to create files and directories.
ReactJS can be set up in a number of ways, let’s look at a few of them.
-
Using a Static HTML File
-
“Create React App” via npm
Using a Static HTML File
Let’s start by making a basic index.html file. We’re going to load in three CDNs in the head — React, React DOM, and Babel. We’re also going to make a div with an id called root, and finally, we’ll create a script tag where your custom code will live.
These are the libraries/dependencies required, which are linked in script tags.
-
React — the React top-level API
-
React DOM — adds DOM-specific methods
-
Babel — a JavaScript compiler that lets us use ES6+ in old browsers
index.html
  <title>Hello React!</title>

  <script src="https://unpkg.com/react@16/umd/react.development.js"></script>
  <script src="https://unpkg.com/react-dom@16/umd/react-dom.development.js"></script>
  <script src="https://unpkg.com/babel-standalone@6.26.0/babel.js"></script>
<div id="root"></div> <script type="text/babel"> *// React code will go here* </script>
The entry point for our app will be the root div element, which is named by convention. You’ll also notice the text/babel script type, which is mandatory for using Babel.
Now, let’s write our first code block to React. We’re going to use ES6 classes to create a React component called App.
class App extends React.Component {
   *//...*
}
Now we’ll add the render( ) method, the only required method in a class component, which is used to render DOM nodes.
class App extends React.Component {
    render( ) {
        return (
           *//...*
        );
    }
}
Inside the return, we’re going to put what looks like a simple HTML element. Note that we’re not returning a string here, so don’t use quotes around the element. This is called JSX, and we’ll learn more about it soon.
class App extends React.Component {
    render( ) {
        return (
           <h1>Hello React!</h1>
        );
    }
}
Finally, we’re going to use the React DOM render( ) method to render the App class we created into the root div in our HTML.
ReactDOM.render(<App />, document.getElementById('root'));Here is the full code for our index.html.
<!doctype html>
<html>
<head>
    <meta charset="utf-8">

    <title>Hello React!</title>

    <script src="https://unpkg.com/react@16/umd/react.development.js"></script>
    <script src="https://unpkg.com/react-dom@16/umd/react-dom.development.js"></script>
    <script src="https://unpkg.com/babel-standalone@6.26.0/babel.js"></script>
</head>

<body>
    <div id="root"></div>

<script type="text/babel">
        class App extends React.Component {
            render( ) {
                return (
                    <h1>Hello world!</h1>
                );
            }
        }
        ReactDOM.render(<App />, document.getElementById('root'));
    </script>

</body>
</html>
Now if you view your index.html in the browser, you’ll see the h1 tag we created rendered to the DOM.
The method we just used for loading JavaScript libraries into a static HTML page and rendering the React and Babel on the fly is not efficient, and is hard to maintain.
If you are planning to build a fully fledged, integrated React app, i would highly suggest to do complete setup on your PC/Laptop using create-react-app.
“Create React App” via npm
Prerequisite:
Install Node.js and npm globally on your machine.
Fortunately, Facebook has created Create React App, an environment that comes pre-configured with everything you need to build a React app. It will create a live development server, use Webpack to automatically compile React, JSX, and ES6, auto-prefix CSS files, and use ESLint to test and warn about mistakes in the code.
To set up create-react-app, run the following code in your terminal, one directory up from where you want the project to live. Make sure you have 5.2 or higher in Node.js.
npx create-react-app my-appnpm create-react-app command is deprecated
Once that finishes installing, move to the newly created directory and start the project.
cd my-app
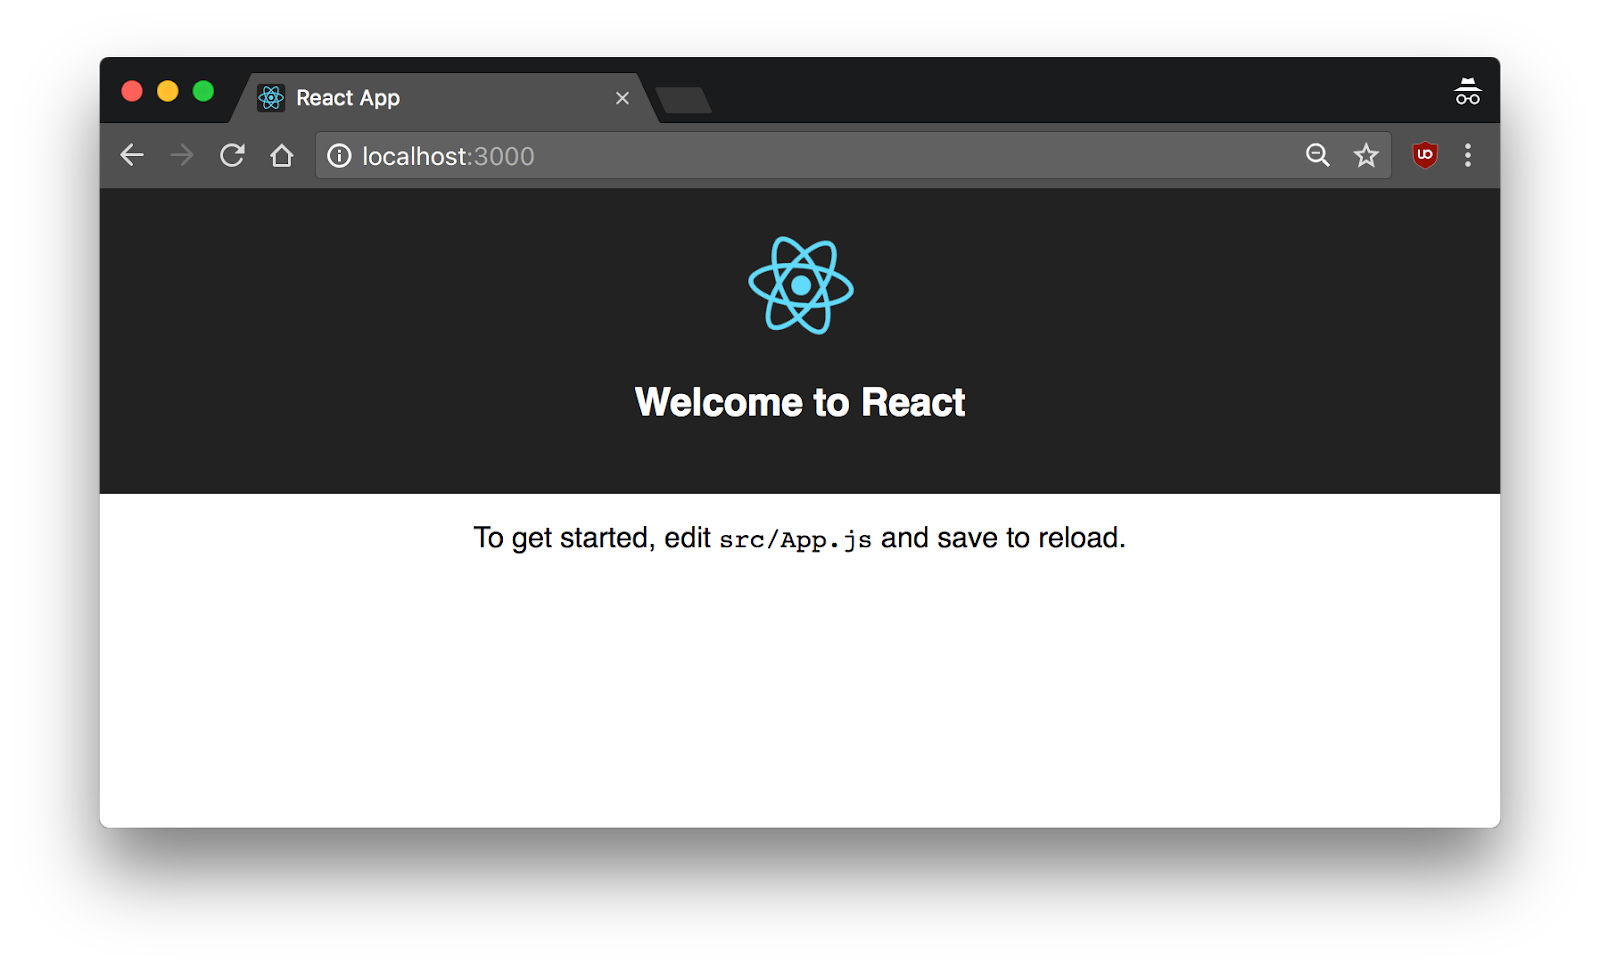
npm startOnce you run this command. In your browser, a new window will pop up at localhost:3000 with your new React app.
If you look into the project structure, you’ll see a /public and /src directory, along with the regular node_modules, .gitignore, README.md, and package.json.
In /public, our important file is index.html, which is very similar to the static index.html file we made earlier — just a root div. This time, no libraries or scripts are being loaded in. The /src directory will contain all our React code.
To see how the environment automatically compiles and updates your React code, find the line that looks like this in /src/App.js:
To get started, edit

<code>

src/App.js

</code>

and save to reload.
And replace it with any other text. Once you save the file, you’ll notice localhost:3000 compiles and refreshes with the new data.
Go ahead and delete all the files out of the /src directory, and we’ll create our own boilerplate file without any bloat. We’ll just keep index.css and index.js.
For index.css, we will just copy-and-paste the contents of Primitive CSS into the file. If you want, you can use Bootstrap or whatever CSS framework you want, or nothing at all. I just find it easier to work with primitive CSS.
Now in index.js, we’re importing React, ReactDOM, and the CSS file.
import React from 'react';
import ReactDOM from 'react-dom';
import './index.css';
Let’s create our App component again. Before, we just had an
, but now I’m adding in a div element with a class as well. You’ll notice that we use className instead of class. This is our first hint that the code being written here is JavaScript, and not actually HTML.
class App extends Component {
    render( ) {
        return (
            <div className="App">
                <h1>Hello, React!</h1>
            </div>
        );
    }
}
class App extends Component {
render( ) {
return (
<div className="App">
<h1>Hello, React!</h1>
</div>
);
}
}Finally, we’ll render the App to the root as before.
ReactDOM.render(<App />, document.getElementById('root'));Here’s our full index.js. This time, we’re loading the Component as a property of React, so we no longer need to extend React.Component.
import React, { Component } from 'react';
import ReactDOM from 'react-dom';
import './index.css';
class App extends Component {
render( ) {
return (
<div className="App">
<h1>Hello, React!</h1>
</div>
);
}
}
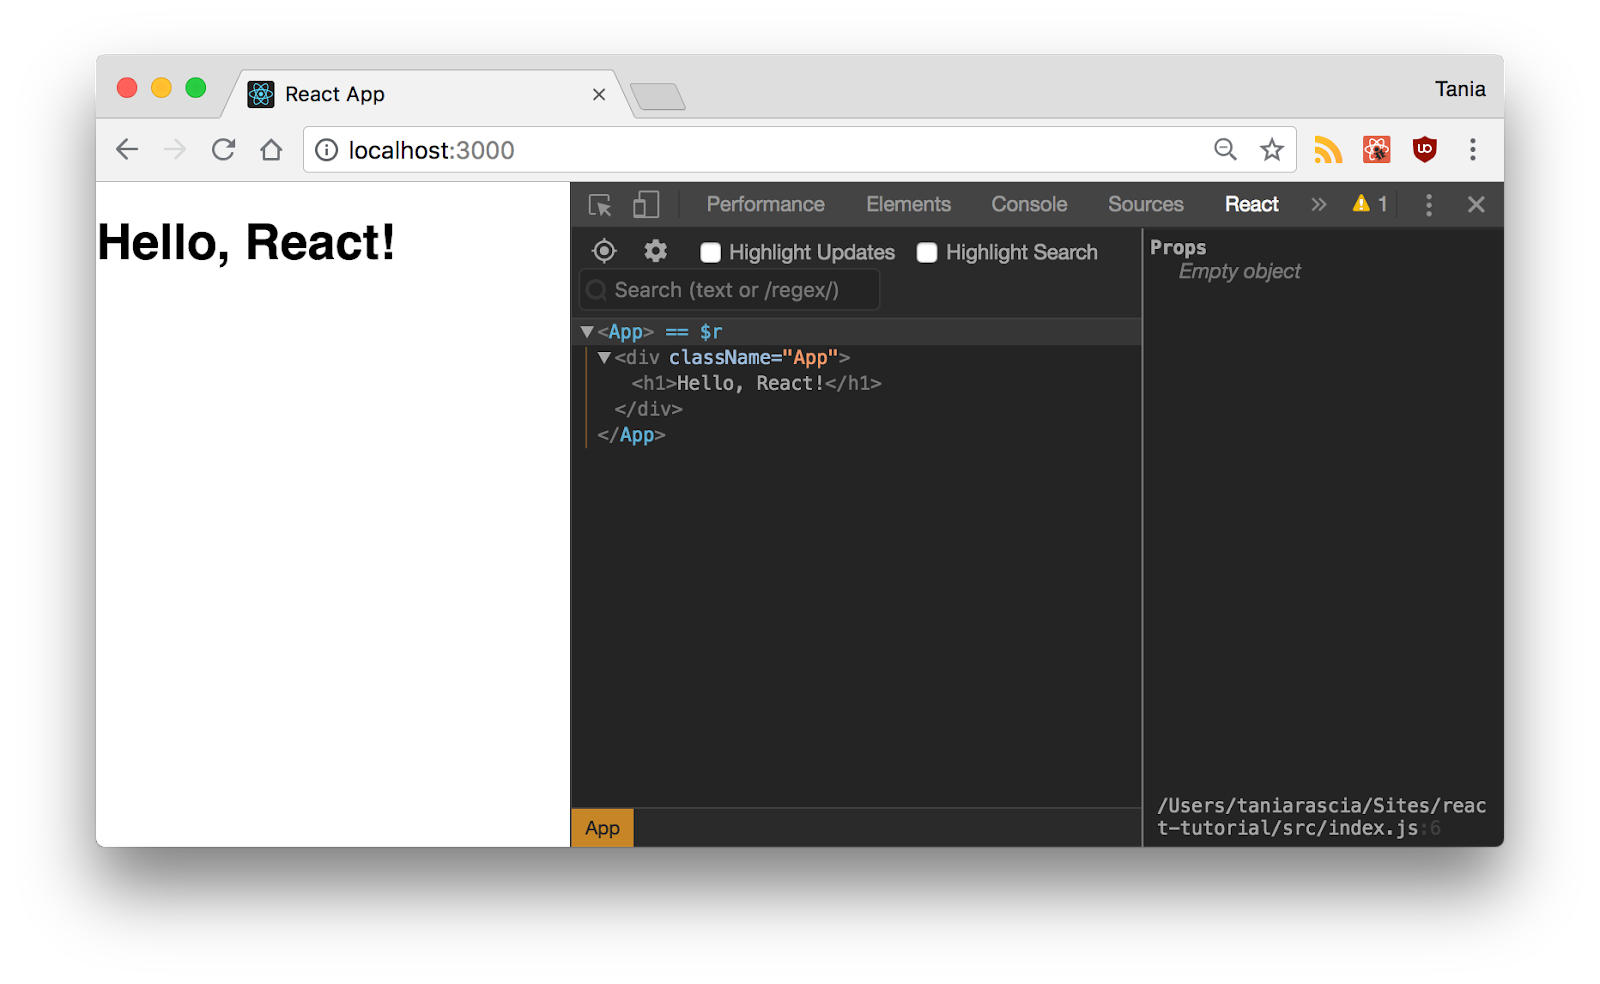
ReactDOM.render(<App />, document.getElementById('root'));If you go back to localhost:3000, you’ll see “Hello, React!” just like before. We have the beginnings of a React app now.
React Developer Tools
There is an extension called React Developer Tools that will make your life much easier when working with React. Download React DevTools for Chrome, or whatever browser you prefer to work on.
After you install it, when you open DevTools in chrome, you’ll see a tab for React. Click on it, and you’ll be able to inspect components as they’re written. You can still go to the Elements tab to see the actual DOM output. It may not seem like that much of a deal now, but as the app gets more complicated, it will become increasingly necessary to use.
JSX: Javascript + XML
We use JSX frequently in ReactJS, let us learn more about it. What is JSX?
- JSX stands for JavaScript XML. JSX is not JavaScript nor HTML.
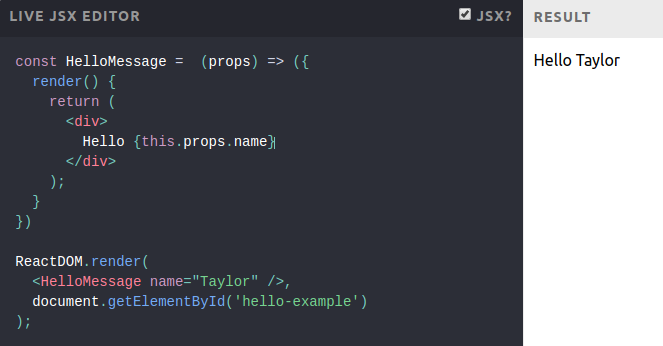
Eg: const element =
Hello World!
-
JSX is a XML syntax extension to JavaScript that also comes with the full power of ES6 (ECMAScript 2015).
-
Just like HTML, JSX tags can have tag names, attributes, and children. If an attribute is wrapped in curly braces, the value is a JavaScript expression.
Embedding Expressions in JSX:

This funny tag syntax is neither a string nor HTML.

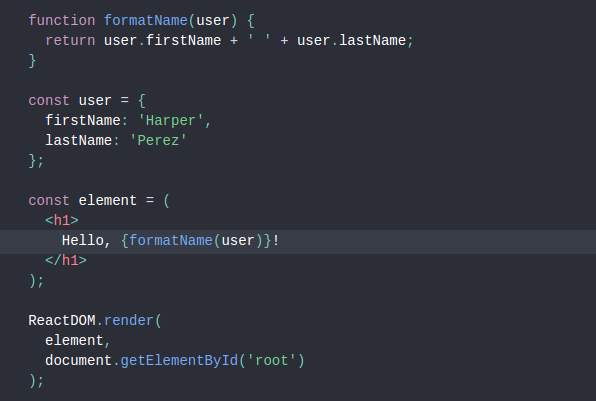
You can put any valid JavaScript expression inside the curly braces in JSX. For example, 2 + 2, user.firstName, or formatName(user) are all valid JavaScript expressions.
Read more info at Javascript XML-JSX.
Rendering Elements
-
Elements are the smallest building blocks of React apps.
-
An element describes what you want to see on the screen.

- Let’s say there is a somewhere in your HTML file.
Eg:
-
We call this a “root” DOM node because everything inside it will be managed by React DOM.
-
To render a React element into a root DOM node, pass both to ReactDOM.render( ):
- It displays “Hello, world” on the page.
Components
-
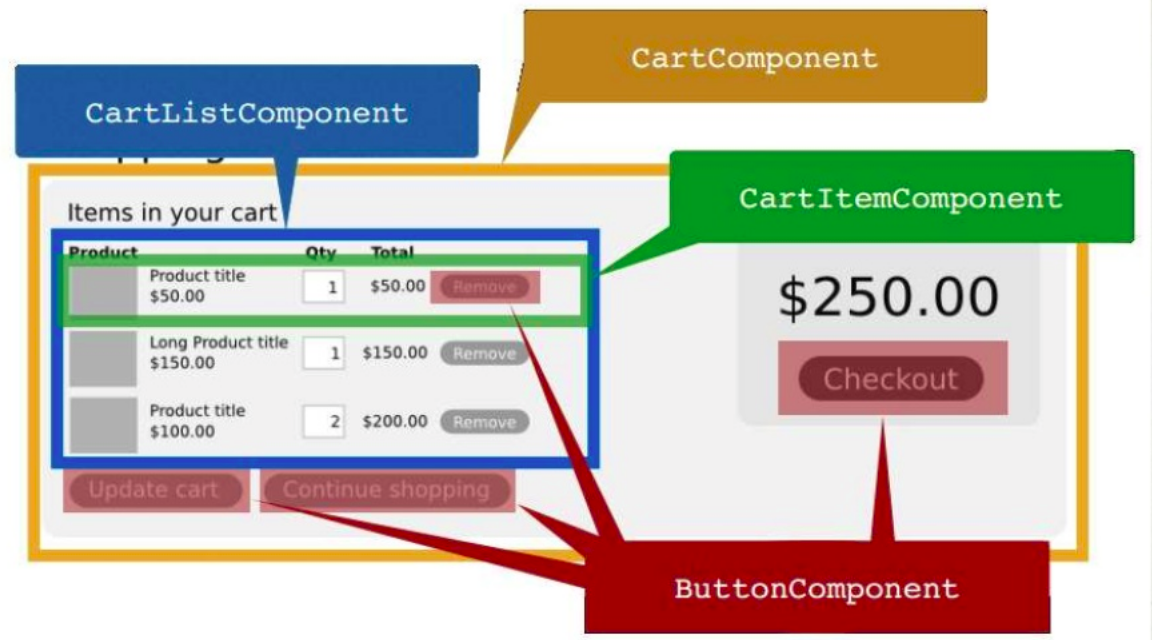
Components let you split the UI into independent, reusable pieces.
-
Conceptually, components are like javascript functions. They accept arbitrary inputs (called “props”) and return React elements describing what should appear on the screen.
-
Let’s look at below example:
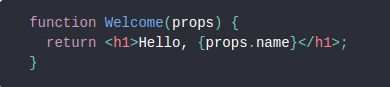
- The simplest way to define a component is to write a JavaScript function:
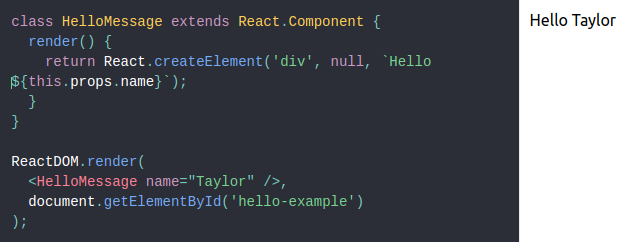
This function is a valid React component because it accepts a single “props” (which stands for properties) object argument with data and returns a React element. We call such components “function components” because they are literally JavaScript functions.
Component-Props Props short for properties, are passed into a component. Props are immutable.
With JSX:
Without JSX:
Most widely props are passed from the parent component to child component via attributes. Check below example: where Header.js and Body.js are child components to App.js, we pass a prop(number) from App.js to Body.js https://codesandbox.io/s/github/qvil/react-tutorial/tree/master/
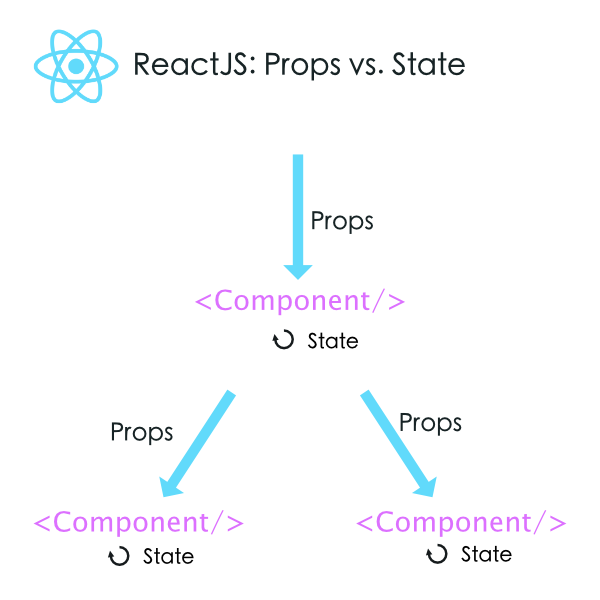
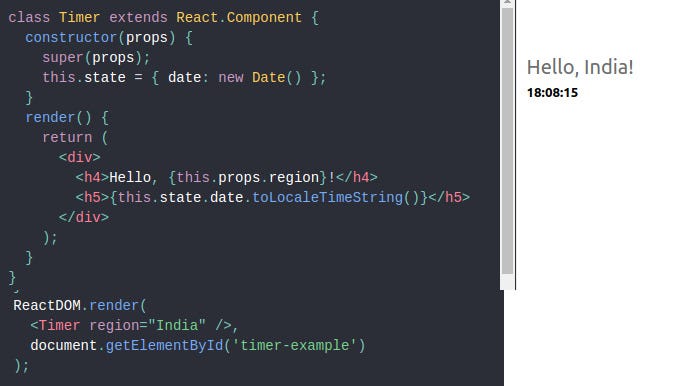
Component State:
The behavior of the app/component at a given moment in time is defined by the state. Components data will be stored in the component’s State. This state can be modified based on user action or other action.
When a component state is changed, React will re-render the component to the browser.
class App extends Component {
    state = {
        characters: [
            { 'name': 'Charlie', Age: 40 }
        ]
     }; *// end of state*
To retrieve the state, we’ll get this.state.characters using the same ES6 method as before. To update the state, we’ll use this.setState( ), a built-in method for manipulating state.
State Vs Props
-
Props are immutable i.e. once set the props cannot be changed, while State is an observable object that is to be used to hold data that may change over time and to control the behavior after each change.
-
While Props are set by the parent component, State is generally updated by event handlers.
Component types based on state
-
Stateless Components
-
Stateful Components
Stateless components
A stateless component is one with no “state”. That means the component will have a render function (as always), and it accepts props but won’t initialize any state:
Stateful Components
A State is a private data of a component
-
The state is mutable.
-
When state changes -> Re-render component.
-
States can’t read from the outside component.
-
This also contains props.
This is your traditional React Component. Specifically, you need a component that has a state and/or lifecycle.
We pass props to the base constructor.
Example-2:
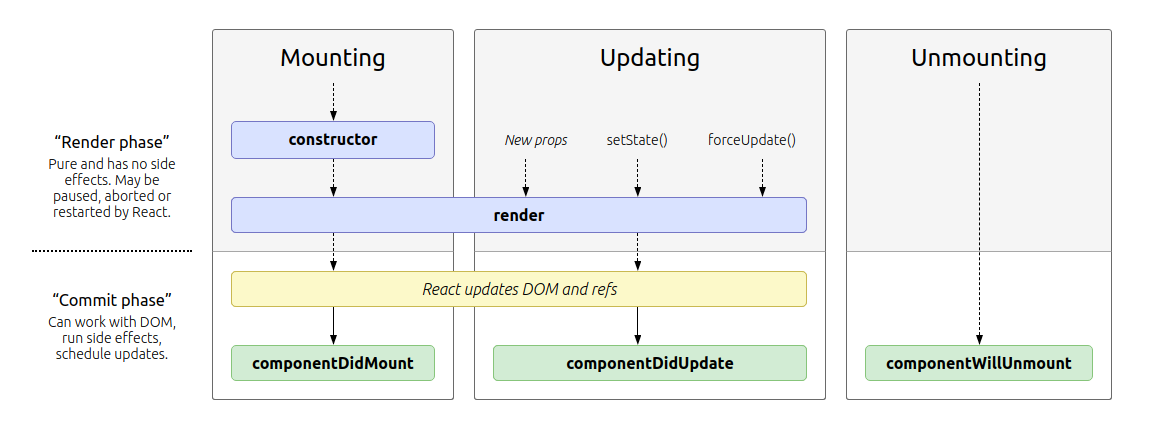
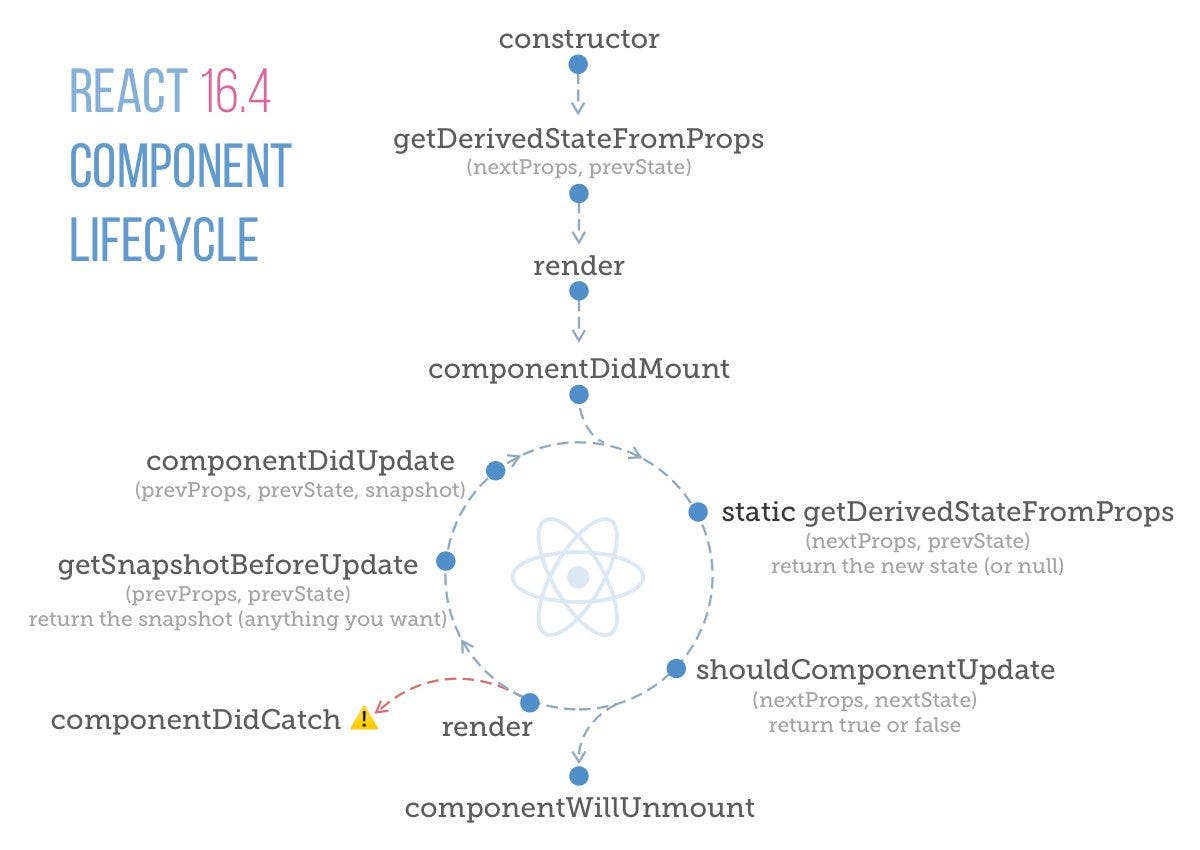
Component Lifecycle
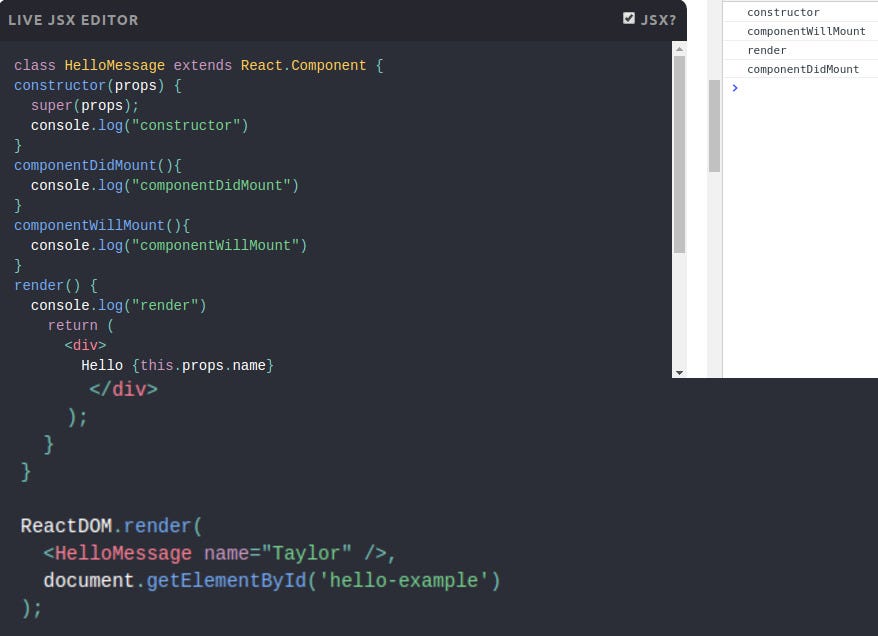
React component lifecycle executes in three different intervals/phases. These three phases are Mounting, Updating, and Unmounting. Within these phases, there are methods called Lifecycle hooks that happen in a particular order.
Lifecycle phases and hooks
Mounting or Initial phase
-
constructor( )
-
componentWillMount( )
-
render( )
-
componentDidMount( )
Updating phase
-
componentWillReceiveProps( )
-
shouldComponentUpdate( )
-
componentWillUpdate( )
-
render( )
-
componentDidUpdate( )
Unmounting phase
- componentWillUnmount( )
Highly recommended ⇒ Learn to Code: How ReactJS Works Internally (10min)
Lifecycle hooks in detail
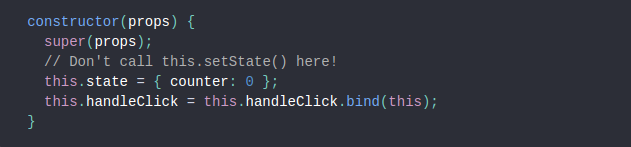
constructor( ): React constructors are only used for two purposes:
-
Initializing local state by assigning an object to this.state.
-
Binding event handler methods to an instance.
If you don’t initialize state and you don’t bind methods, you don’t need to implement a constructor for your React component.
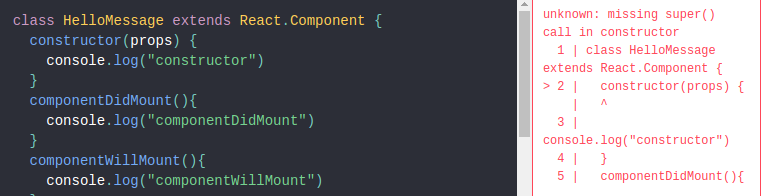
The constructor for a React component is called before it is mounted. When implementing the constructor for a React.Component subclass, you should call super(props) before any other statement. Otherwise, this.props will be undefined in the constructor, which can lead to bugs.
componentWillMount( )
-
componentWillMount( ) is invoked just before mounting occurs.
-
It is called before first render( ), therefore calling setState( ) synchronously in this method will not trigger an extra rendering.
-
Generally, we recommend using the constructor( ) instead for initializing state.
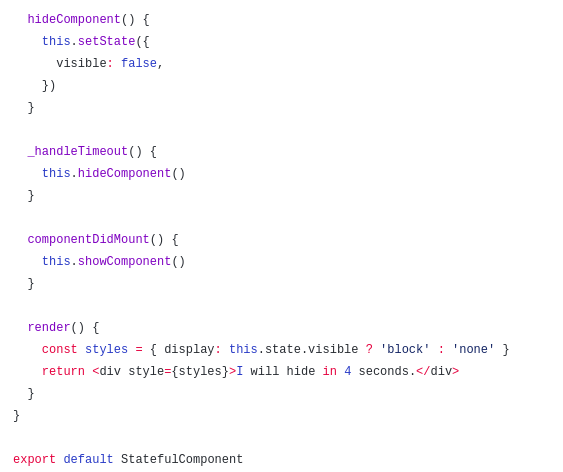
componentDidMount( )
-
componentDidMount( ) is invoked immediately after a component is mounted (inserted into the tree).
-
If you need to load data from a remote endpoint, this is a good place to instantiate the network request.
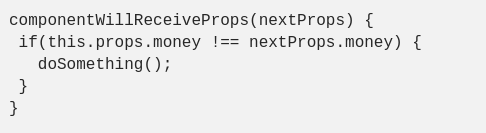
componentWillReceiveProps( )
-
componentWillReceiveProps( ) is invoked before a mounted component receives new props.
-
If you need to update the state in response to prop changes, you may compare this.props and nextProps and perform state transitions using this.setState( ) in this method.
-
Note that if a parent component causes your component to re-render, this method will be called even if props have not changed.
-
It only calls this method if some of the component’s props may update.
-
Make sure to compare the current and next values if you only want to handle changes.
Where nextProps represent the new props and this.props now are equal to the old set of props.
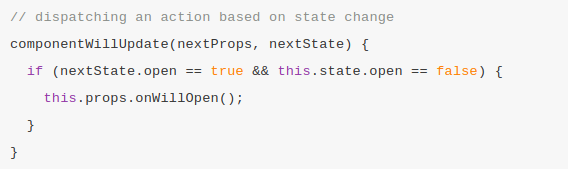
componentWillUpdate( )
-
componentWillUpdate( ) is invoked just before rendering when new props or state are being received.
-
React teaches that this is a good place to prepare your component for the new data that is coming through.
-
Note that you cannot call this.setState( ) here. If you need to update state in response to a prop change, use componentWillReceiveProps( ) instead.
-
The reason we do not call this.setState( ) is that the method triggers another componentWillUpdate( ).
shouldComponentUpdate( )
-
React will re-render whenever props or state change within a component(s).
-
This method will let React know that the component’s output is not affected by the change in data (props and/or state).
-
This method is invoked before re-rendering after new props and/or state are being received. It defaults to true.
-
if shouldComponentUpdate( ) returns false, then render( ), and componentDidMount( ) will not be invoked.
-
This method is rarely used Lifecycle method.
Syntax:
componentDidUpdate( )
-
componentDidUpdate( ) is invoked immediately after updating occurs. This method is not called for the initial render.
-
It can be useful to check previous props/state and then perform certain functionality.
componentWillUnmount( )
-
componentWillUnmount( ) is invoked immediately before a component is unmounted and destroyed.
-
Perform any necessary cleanup in this method, such as invalidating timers, canceling network requests.
Pulling in API Data and componentDidMount
One very common usage of React is pulling in data from an API. If you’re not familiar with what an API is or how to connect to one, I would recommend reading How to Connect to an API with JavaScript, which will walk you through what APIs are and how to use them with vanilla JavaScript.
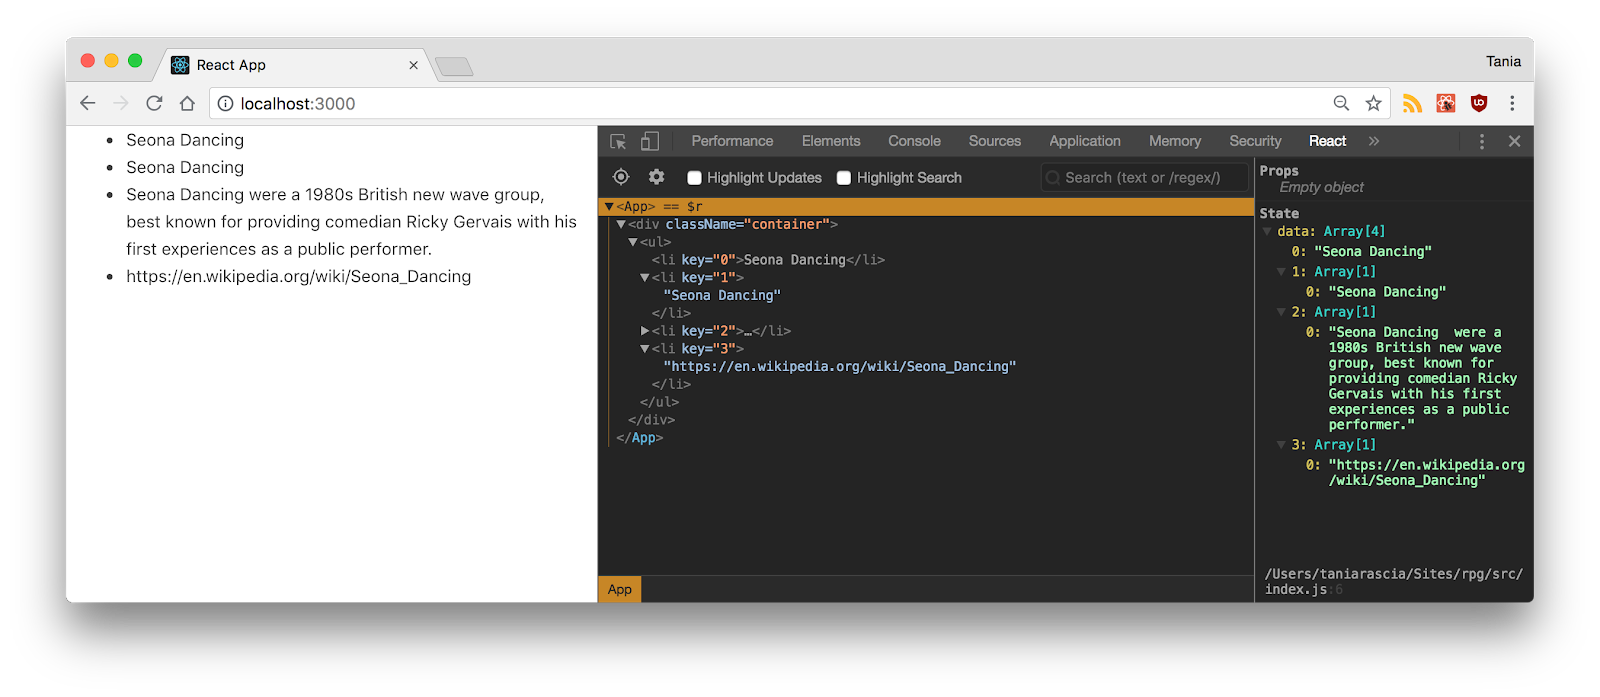
As a little test, we can create an Appapi.js component, and import it into App.js.
import Appapi from ‘./Appapi’.Make sure you have JSONView installed on your browser. A public API we can test with is the Wikipedia API, and I have a URL endpoint right here for a random search. We’re going to use JavaScript’s built-in Fetch to gather the data from that URL endpoint and display it.
I’m not going to explain this code line-by-line, as we’ve already learned about creating a component, rendering, and mapping through an array object in the state. In this code we will use componentDidMount( ) method we learnt earlier.
When we pull in API data, we want to use componentDidMount, because we want to make sure the component has rendered to the DOM before we bring in the data. In the below snippet, you’ll see how we bring in data from the Wikipedia API, and display it on the page.
import React, { Component } from 'react';

class Appapi extends Component {
    state = {
        data: [ ]
    };

    *// Code is invoked after the component is mounted/inserted into the DOM tree.*
    componentDidMount( ) {
        const url = "https://en.wikipedia.org/w/api.php?action=opensearch&search=Seona+Dancing&format=json&origin=*";

        fetch(url)
            .then(result => result.json( ))
            .then(result => {
                this.setState({
                    data: result
                })
            });
    }

    render( ) {
        const { data } = this.state;

        const result = data.map((entry, index) => {
            return <li key={index}>{entry}</li>;
        });

        return <ul>{result}</ul>;
    }
}

export default Appapi;
Once you save and run this file in the local server, you’ll see the Wikipedia API data displayed in the DOM.
Read more info at React components and Lifecycle methods
Handling Events
Handling events with React elements is very similar to handling events on DOM elements in JS. There are some syntactic differences:
-
React events are named using camelCase, rather than lowercase.
-
With JSX you pass a function as the event handler, rather than a string.
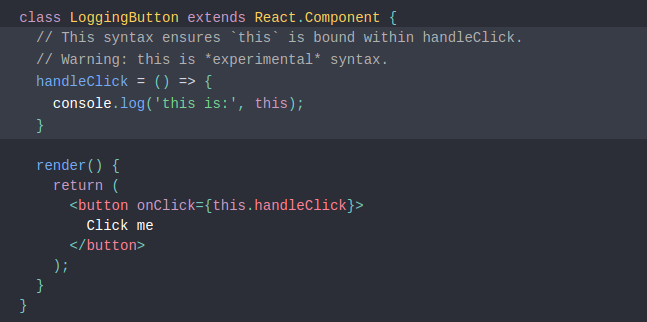
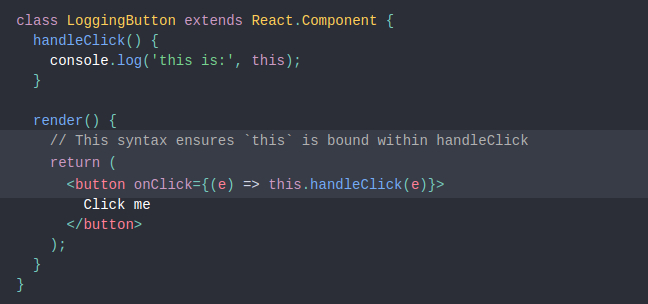
When you define a component using an ES6 class, a common pattern is for an event handler to be a method on the class. For example, this Toggle component renders a button that lets the user toggle between “ON” and “OFF” states:
-
In JavaScript, class methods are not bound by default. If you forget to bind this.handleClick and pass it to onClick, this will be undefined when the function is actually called.
-
If calling bind annoys you, there are two ways you can get around this. If you are using the experimental public class fields syntax, you can use class fields to correctly bind callbacks:
This syntax is enabled by default in Create React App.
If you aren’t using class fields syntax, you can use an arrow function in the callback:
Passing Arguments to Event Handlers
- Inside a loop, it is common to want to pass an extra parameter to an event handler. For example, if the id is the row ID, either of the following would work:
The above two lines are equivalent and use arrow functions and Function.prototype.bind respectively.
- In both cases, the e argument representing the React event will be passed as a second argument after the ID. With an arrow function, we have to pass it explicitly, but with bind, any further arguments are automatically forwarded.
Read more info at Handling events in React
Conditional Rendering
-
In React, you can create distinct components that encapsulate behavior you need. Then, you can render only some of them, depending on the state of your application.
-
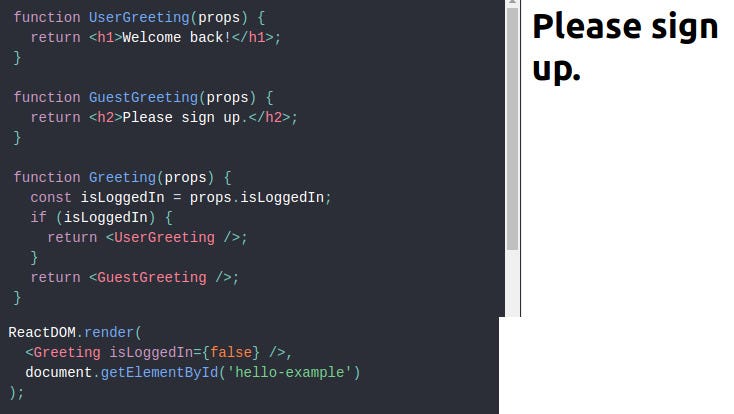
Conditional rendering in React works the same way conditions work in JavaScript. Use JavaScript operators like “if” or the “conditional operator” to create elements representing the current state, and let React update the UI to match them.
We’ll create a “Greeting” component that displays either “UserGreeting” or “GuestGreeting” components depending on whether a user is logged in:
Conditional Rendering types
-
Inline If with Logical && Operator
-
Inline If-Else with Conditional Operator
Conditional Rendering: Inline If with Logical && Operator
- You may embed any expressions in JSX by wrapping them in curly braces. This includes the JavaScript logical && operator. It can be handy for conditionally including an element:
-
It works because in JavaScript, the true && expression always evaluates to expression, and false && expression always evaluates to false.
-
Therefore, if the condition is true, the element right after && will appear in the output. If it is false, React will ignore and skip it.
Conditional Rendering: Inline If-Else with Conditional Operator
-
Another method for conditionally rendering elements inline is to use the JavaScript conditional operator condition? true: false.
-
Considering the above example we can use If-else as below:
- Therefore, if the condition is true, the element right after ? will appear in the rendered output. Otherwise, If it is false the element right after: will appear in the rendered output.
React-Router
Why react router?
In single page apps, there is only a single HTML page, we are reusing the same HTML page to conditionally render different components based on the logic. Conditional rendering is not navigation. Is it?
Install react router
To install the react router you need to download the react-router-dom package by running the following commands in your command line.
npm install react-router-dom

npm start  //to run  dev server
What is react router?
-
React router is a routing library built on top of the react which is used to create routing in react apps.
-
But in multi-page apps, you will get an entirely new page from the server when you navigate.
React router example:
Initially, when we create React App, there is only a single App component. Let’s assume “app.js” is our App component.
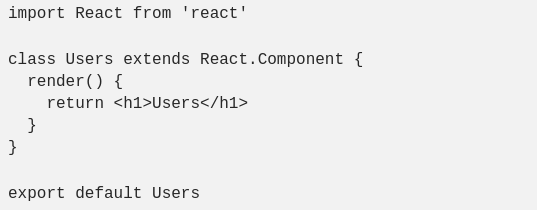
Let’s create two more components.
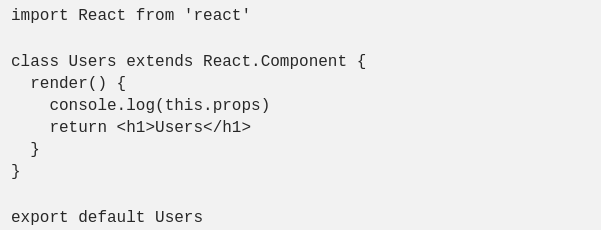
- User component “users.js”
- Contact component “contact.js”
Now our app has three components one is App and the other two are Users and Contact.
Routing:
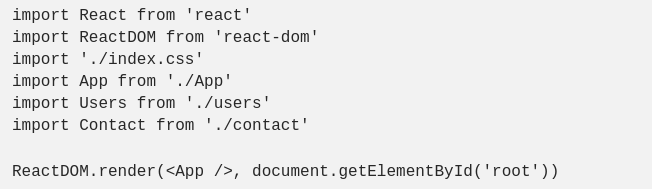
Open the index.js file and import the three components (App, Users, Contact)
File: Index.js
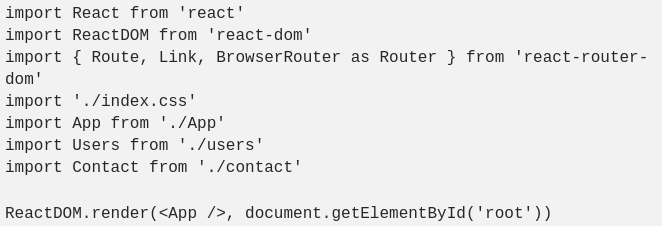
React router gives us three components which help us to implement the routing.
-
Route
-
Link
-
BrowserRouter
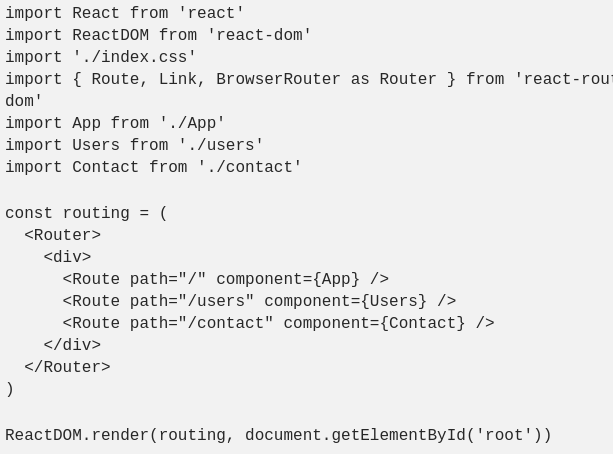
Let’s implement the routing.
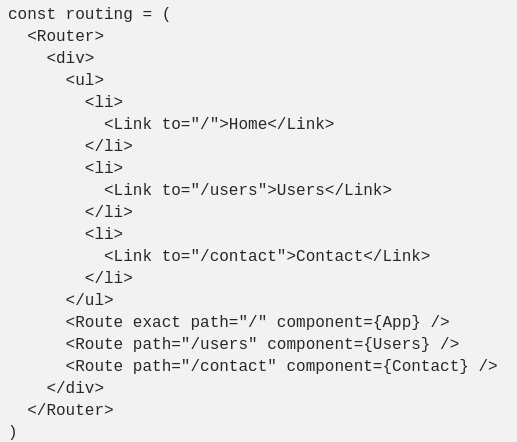
In the Route component, we need to pass the two props
-
path: specify the path to the component.
-
component: an actual component that needs to be seen when they will navigate to that path.
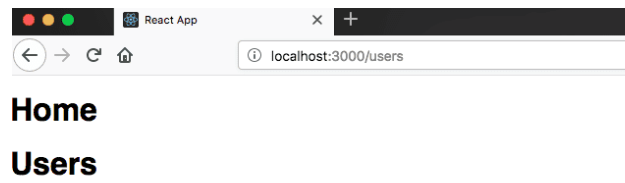
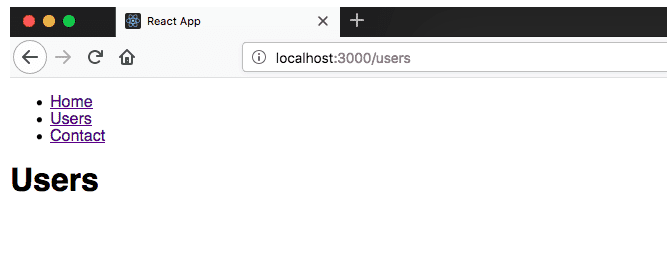
Now if you enter manually localhost:3000/users you will see Users component is rendered. And same for Contact component.
But still, Home component is also rendered in the screen this happens because of our home path is ‘/’ and users path is ‘/users’. ‘/’ or slash exists in both URLs so that it renders both components. To stop this behavior we need to use the exact prop.
Now if you see only users component is rendered on the screen.
Adding Navigation using Link component :
File: Index.js
- After adding navigation you will see the routes are rendered on the screen. if you click on the “users” you will see URL is changing and Users component is rendered.
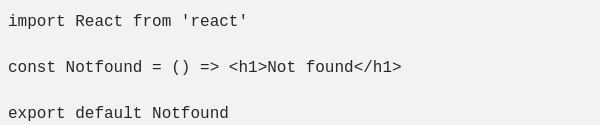
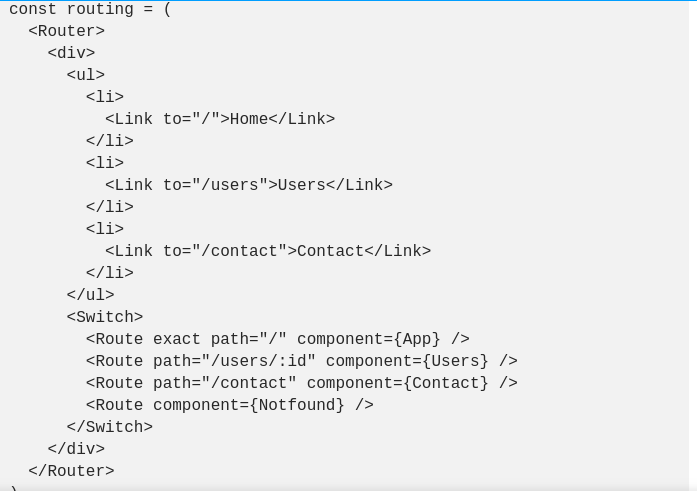
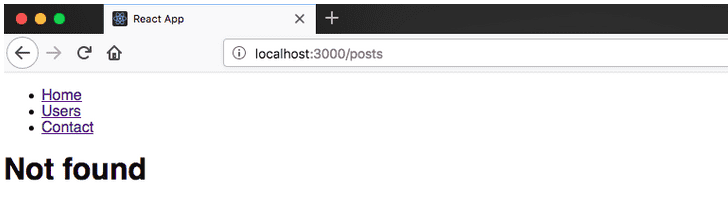
Adding 404 Pages (Not found page) :
-
When a user navigates to the wrong path that doesn’t present in the website we need to show the not found page.
-
We need to import another component called “Switch” which is provided by the react router.
-
Switch component helps us to render the components only when path matches otherwise it fallbacks to the not found component.
File: notfound.js
Let’s import Notfound component in the index.js file.
Let’s test it by manually entering a wrong URL: localhost:3000/posts
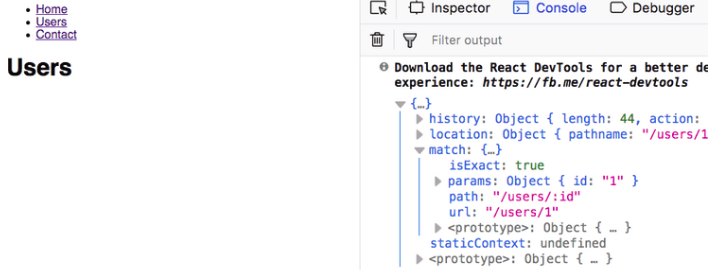
Url Parameters:
-
Url parameters help us to render the same component based on its dynamic URL like in our Users component assume that they are different users with id 1,2,3.
-
Let us pass “id” as a parameter to Users path in the index.js file as below.
-
Add console.log(this.props) in your “users.js” file.
Now, this URL “localhost:3000/users/1” would log an object in your console which is passed by the react router.
You can see the params object with id: ‘1’ in the console, which we passed in the URL here at localhost:3000/users/1.
Read more info at Nested Routes, NavLink & Programmatic navigation
Building and Deploying a React App
Everything we’ve learned so far has been in a development environment. We’ve been compiling, hot-reloading, and updating on the fly. For production, we’re going to want to have static files loading in and none of the source code. We can do this by making a build and deploying it.
Now, if you just want to compile all the React code and place it in the root of a directory somewhere, all you need to do is run the following line:
npm run buildThis will create a build folder which will contain your app. Put the contents of that folder anywhere, and you’re done!
Read more info at React-app-Deployment
I hope this article was helpful in starting with ReactJS.
Thanks for the read, I will be discussing React with Redux in my next article.
This story is authored by Koushik. He is a software engineer and a keen data science and machine learning enthusiast.
You can use online code editors to practice, or you can use Create React App.
- I have setup a development environment in JSFiddle and in Codepen.
To grasp all the fundamentals of React, you can start with the following tutorials:
- React official documentation by React
- Beginners guide to React by Kent C. Dodds
- Fundamentals of React by Samer Buna
By now, you should have a basic idea of the fundamentals of React. It’s enough to start developing simple web apps in React.
Now, take a look at the React official tutorial:
React Official tutorial by React
It’s a well-written article covering the fundamentals of React. And it also explains the specific topics very clearly.
Last but not least, learn how to connect to APIs with React apps:
Fetching API with React.js by Ethan Jarrell
- Start building some projects
- Simple todo-app
- Simple calculator app
- Build a shopping cart
- Display GitHub’s user stats using GitHub API
- React Router
- React Router helps you create routes to your single page applications. It’s very powerful and easy to use with your React application.
To get started:
- React Router tutorial by Paul Sherman
- React Router and intro to SPA by Learn Code Academy
- Routing React apps by Scotch.io
These articles are more than enough for you to get started with React routing.
Projects
- A simple CURD application
- Hacker News clone
If you are really interested in learning much about Router, check out the following guide:
React Router complete guide by React Training
Webpack
Webpack is a famous JavaScript module bundler. Webpack helps you to maintain dependencies as static files for your project so developers don’t have to do it.
Webpack also comes with loaders. Loaders help run specific tasks around your project.
To learn much more about Webpack, follow the following tutorials.
- When and why to use Webpack by Andrew Ray
- Webpack tutorial by Learn Code Academy
To setup your local React environment using Webpack, you can refer to the following GitHub repo:
React SPA template by Hanif Roshan
I think the above tutorials are enough to get started with Webpack. However, to get in-depth knowledge you can refer to the following guides:
- Webpack introduction by SurviveJS
- Webpack official docs
- Server rendering
- Server rendering is one of the coolest features in React. It can be used with any of the back-end technologies.
Server Side Rendering (SSR) in React helps you to create components in the server and render that as HTML in your browser. And when all the JavaScript modules are downloaded in the browser, React takes the stage. Simple!
First of all, take a look at the React-DOM API:
- React-DOM API by React
- And follow the below tutorials to get in-depth knowledge:
- React server rendering by Tyler McGinnis
- React router server rendering by Roilan Salinas
- React Server side rendering guide by Dennis Brotzky
Redux Redux is a JavaScript library developed for maintaining application states. When you are building a complex application, it will add overhead to manage states across components. Redux helps you store all your states in a single source. And of course, React plays well with Redux :)
To get started:
- Redux tutorial by Learn Code Academy
- Redux tutorial for beginners by Valentino Gagliardi
- React Redux by CSS Tricks
- These tutorials are more than enough to getting started with Redux. However, I cannot resist mentioning the below tutorial too. It’s worth it :)
- Getting started with Redux by Dan Abramov
Refernce links
- How to Hire a Great React.js Developer
-


Comments